jason schaefer . com

"arguing that you don’t care about the right to privacy because you have nothing to hide is no different than saying you don’t care about free speech because you have nothing to say."

Tag: windows

  • Setup PPTP server using OpenWRT

    DON”T USE PPTP ITS INSECURE!! USE OPENVPN or WIREGUARD INSTEAD.  TUTORIALS ->
    http://jasonschaefer.com/openvpn-on-the-openwrt
    https://jasonschaefer.com/wireguard-vpn-on-openwrt/

    That said, if you want to setup pptp on the openwrt here is a guide.
    The router is Backfire 10.03.1 at address 192.168.11.1/24. This configuration will setup the PPtP VPN server and it should be pointed out that its not a very secure VPN. Basically, it requires that someone capture the authentication handshake of a pptp connection. Then extract the keys and crack the hashes or bruteforce. There is a service that was released last year that will crack these keys and produce the authentication hash, that can auth as the password. This was done to encourage people to stop using this lame technology. Here is a great write up that will answer all questions https://www.cloudcracker.com/blog/2012/07/29/cracking-ms-chap-v2/

    With the above insecurity disclaimer and a note that this really shouldn’t be used for anything requiring real security. I proceed..

    opkg install pptpd kmod-mppe

    == /etc/pptpd.conf ==

    #debug
    option /etc/ppp/options.pptpd
    speed 115200
    stimeout 10
    localip 192.168.11.1
    remoteip 192.168.11.40-49

    == /etc/ppp/options.pptpd ==

    debug
    logfile /tmp/pptp-server.log
    192.168.11.1:
    auth
    name "pptp-server"
    lcp-echo-failure 3
    lcp-echo-interval 60
    default-asyncmap
    mtu 1482
    mru 1482
    nobsdcomp
    nodeflate
    proxyarp #required to be able to connect to the lan subnet without being directly connected.
    #noproxyarp
    #nomppc
    mppe required,no40,no56,stateless
    require-mschap-v2
    refuse-chap
    refuse-mschap
    refuse-eap
    refuse-pap
    ms-dns 192.168.11.1

    == /etc/ppp/chap-secrets ==

    #USERNAME PROVIDER PASSWORD IPADDRESS
    jason * testypass *

    == /etc/firewall.user ==

    # This file is interpreted as shell script.
    # Put your custom iptables rules here, they will
    # be executed with each firewall (re-)start.
    # Allow all traffic in and out of the ppp interface. No reason to specify nets.
    iptables -A input_rule -i ppp+ -j ACCEPT
    iptables -A output_rule -o ppp+ -j ACCEPT
    # This rule will allow traffic towards internet
    iptables -A forwarding_rule -i ppp+ -j ACCEPT

    == /etc/config/firewall ==

    config 'rule'
    option 'target' 'ACCEPT'
    option '_name' 'pptpd'
    option 'src' 'wan'
    option 'proto' 'tcpudp'
    option 'dest_port' '1723'
  • Installing OpenVPN client on Windows

    These are the manual instructions for installing and configuring OpenVPN client.

    After having many problems over the years with openvpn gui breaking, I have devised a reliable work around. Create the following batch script, name it something like ovpnConnect.bat, and right click to “Run as Administrator”. This does require the openvpn gui from openvpn.net to be installed. It calls the openvpn.exe. You can also add multiple vpn client connections!

    @echo off
    
    net session >nul 2>&1
    if %errorLevel% == 0 (
        echo Success: Administrative permissions confirmed.
    ) else (
        echo Failure: Please right click and "Run as administrator"
    pause
    exit 0
     )
    
    cd "c:\Program Files\OpenVPN\config\" && "c:\Program Files\OpenVPN\bin\openvpn.exe" [userconfig].ovpn
    

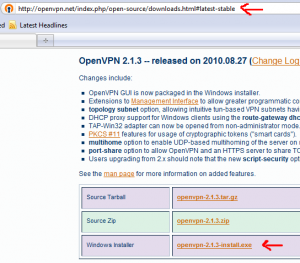
    Download openvpn gui at http://openvpn.net/index.php/open-source/downloads.html#latest-stable

    Run installer

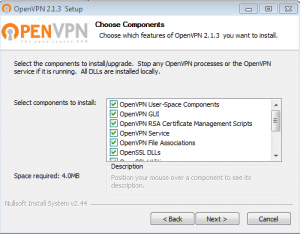
    Leave the components section as default.

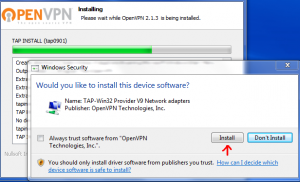
    Accept the TAP driver install

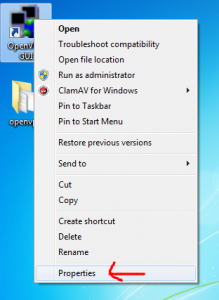
    Right click on OpenVPN GUI and select properties

    Go to Compatibility tab and select “run this program as administrator”
    (It requires admin priviledges because it needs to write routes for the new VPN tunnel. Without, it will connect but won’t know how to reach the other network.)

    Get your OpenVPN configuration files from the system administrator. Copy and paste them into C:\Program Files\OpenVPN\config


    ca.crt (certificate authority)
    jason.crt (client certificate)
    jason.key (client secret key)
    jason.ovpn (client configuration). Here are the contents of jason.ovpn:

    client
    dev tun0
    cert jason.crt
    key jason.key
    ca ca.crt
    remote vpn.server 1194

    Now you can launch OpenVPN GUI by double clicking the icon on the desktop (the one we just set to run as admin). This will launch the OpenVPN GUI into the system tray.

    Click on system tray, right click on OpenVPN GUI, left click “Connect”.

    If all goes well, you will successfully connect. The OpenVPN GUI systray icon turns green. Now you are on the Virtual Private Network!

  • Spoof MAC address in Windows or gnu/linux

    start -> run -> regedit
    make a backup, if you want.
    goto:

    HKEY_LOCAL_MACHINE\SYSTEM\CurrentControlSet\Control\Class\{4D36E972-E325-11CE-BFC1-08002bE10318}
    

    look through the list of subkeys (0000, 0001, etc)
    DriverDesc keyword will tell you which network adapter. For example, “NVIDIA nForce Networking Controller”
    when you find it, right click and add -> new -> string value

    new keyword:

    Value Name: = NetworkAddress
    Value Data: = your new MAC, with no space or : For example, 0019DB71C830
    

    then type:

    ipconfig /release
    ipconfig /renew
    ipconfig /all   (to verify the new mac took)
    

    Now your a l33t Winblows H4|<3r! If you want to go back to your hardware MAC, remove the NetworkAddress key and restart the interface. FYI, in gnu/linux follow these simple steps to change your MAC address

    ifconfig eth0 hw ether 00:19:DB:71:C8:30

    if you get this error

    SIOCSIFHWADDR: Device or resource busy - you may need to down the interface

    do this

    ifconfig eth0 down

    and try to change the MAC again.