"arguing that you don’t care about the right to privacy because you have nothing to hide is no different than saying you don’t care about free speech because you have nothing to say."
In this example I will setup a OpenWRT router to tunnel all traffic through a Wireguard VPN interface. I will attempt to keep this as simple and concise as usual ;-)
Start by setting up a peer on the wireguard “server”. If you don’t control your Wireguard server and just have keys and an endpoint from someone else’s service then you can skip this. I have written a tutorial on setting up the wg server from beginning to end. https://jasonschaefer.com/wireguard-vpn-on-openwrt/
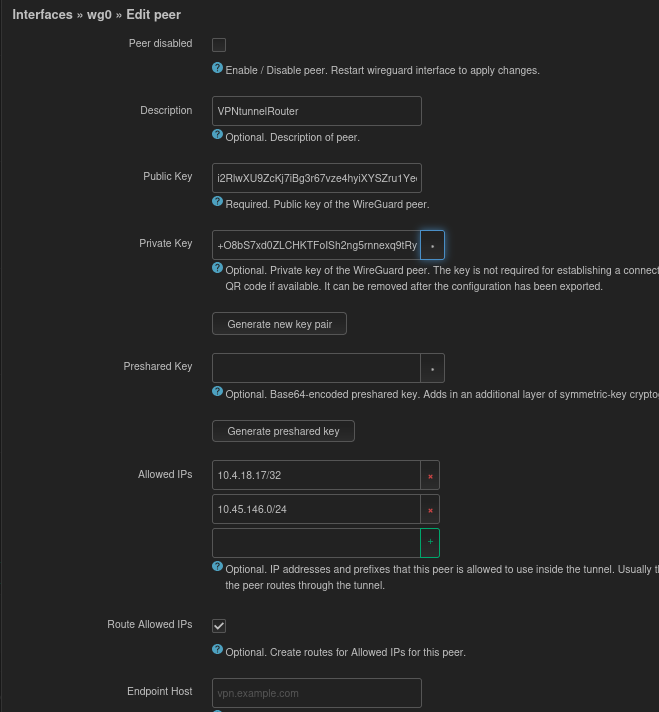
Use the generate new key pair if you don’t want to mess with the command line “wg genkey” method. Note the public key (i2Rl…) and private (+O8b…) for later use. The Allowed IP 10.4.18.17/32 is for the Wireguard peer to peer traffic and the 10.45.146.0/24 is the remote LAN subnet of the router I will setup later. “Route Allowed IPs” adds 10.45.146.0/24 to this Wireguards “server” routing table so we don’t need to use NAT masquerading. Additionally, this allows for two subnets to reach each other which is nice for an office setup or similar.
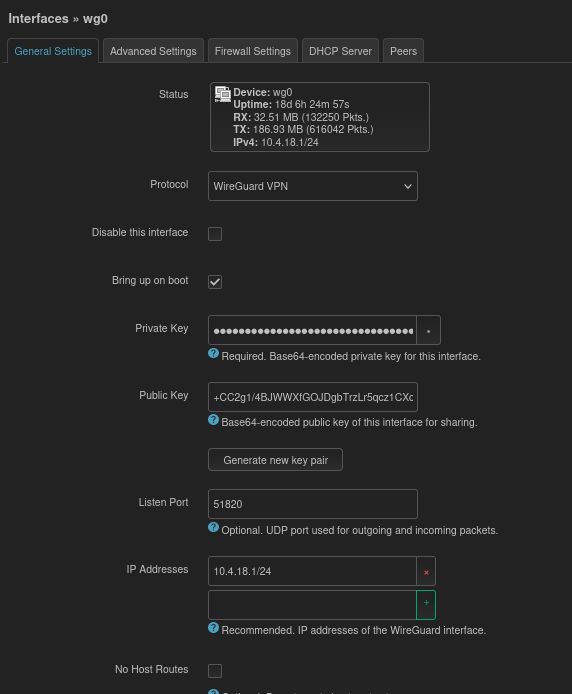
We need the public key from the Wireguard “server” found on the General Settings page of the “server” interface:
Now that we have the public (i2Rl…) and private key (+O8b…) for the peer and the public key (+CC2…) of the Wireguard “server” peer we can move onto setting up the OpenWRT VPN Router “client”.
Install luci-proto-wireguard on the VPN client router. Use the System -> Software gui to do this easily.
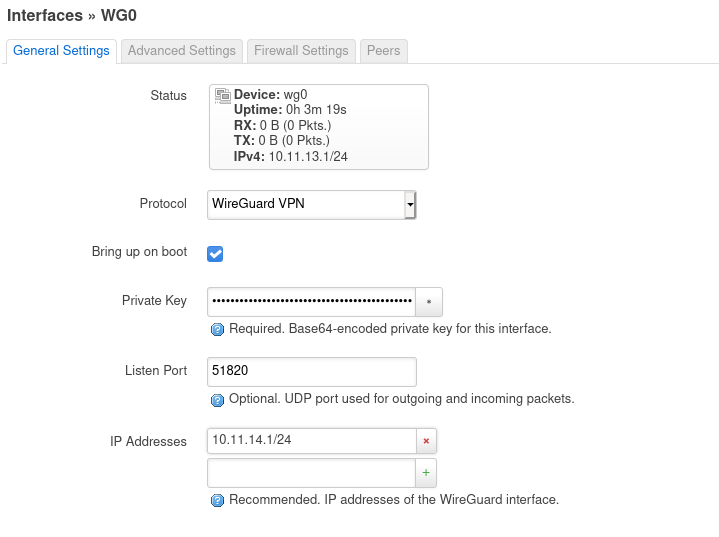
Now “add new interface” under Networking -> Interfaces. Name it wg0 (or whatever you want) and select Protocol “WireGuard VPN”. This takes you to the “general settings”. Use the public (i2Rl…) and private (+O8b…) key from the remote “server” wireguard peer that I setup in the first step of this tutorial. “IP addresses” is the ip also specified in the remote server peer of 10.4.18.17/32
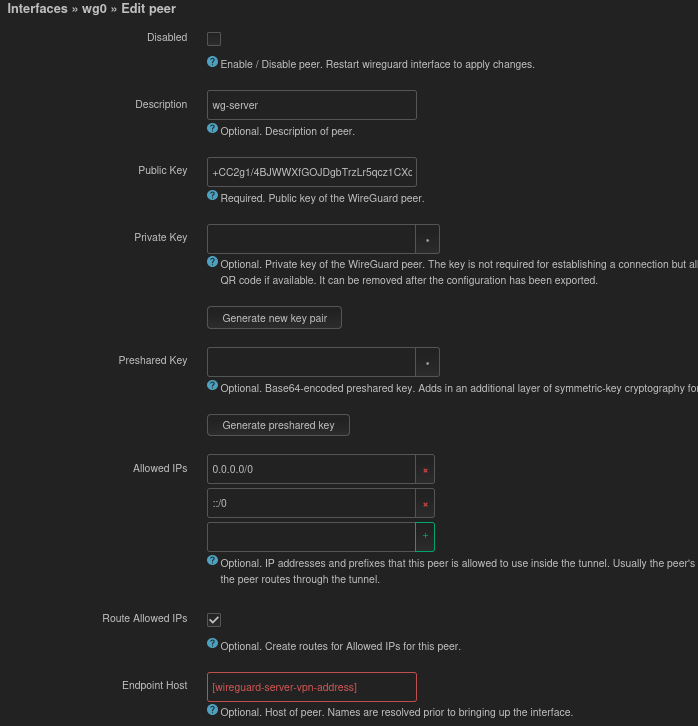
From the peer tab, click “Add new peer” and use the public key (+CC2…) of the Wireguard “server” from the first steps of this tutorial. Allowed IP’s will be 0.0.0.0/0 for all ip4 traffic and ::/0 for all ip6 traffic. Route allowed IP’s will be enabled and Endpoint host is the wireguard server hostname or ip. Persistent keep alive can optionally be set to 25 on both ends of the VPN (not shown in screenshots).
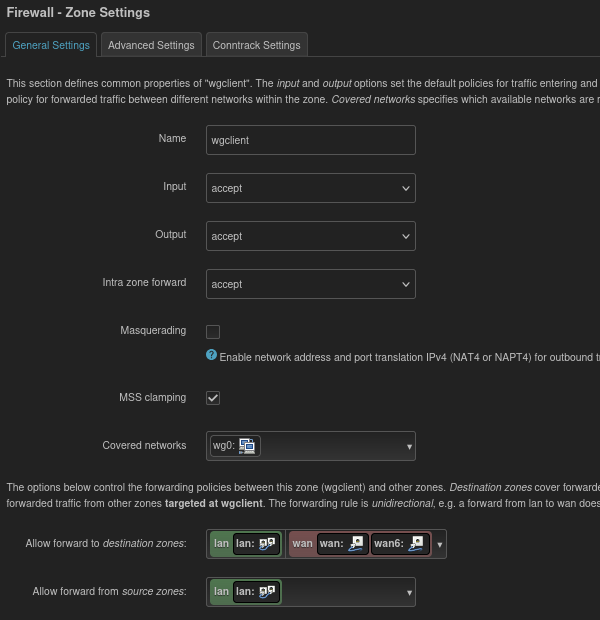
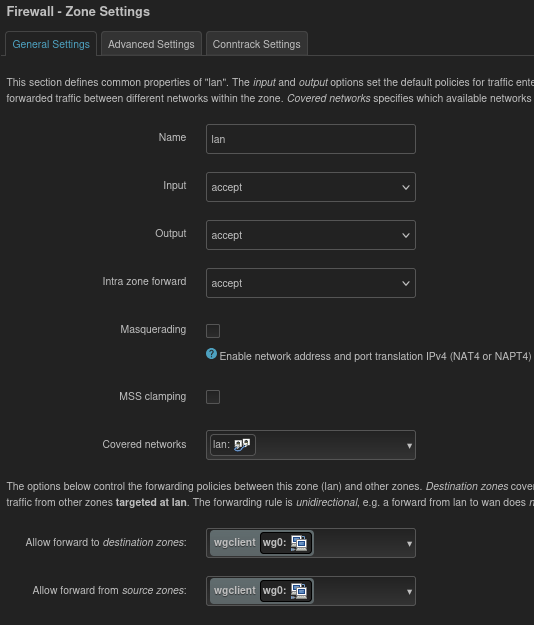
Moving onto firewall setup. This allows all traffic from remote network to reach local LAN and vice versa. I like to handle security on a per device basis more than rely on intermediate restrictions. MSS clamping is not required but may be useful under certain conditions to avoid fragmentation. Masquerading could be used but I hate NAT and would rather use proper routing to establish a connection. This is why “Route allowed IP’s” for “Allowed Networks” 10.45.146.0/24 is set on the “server”.
Ok, now for the magic of how to get all traffic out the wg0 interface without locking yourself out of the router and having to factory reset or serial in. lol
In the Firewall zone for LAN set the “Allow forward to destination zones:” and “Allow forward from source zones:” to the Wireguard firewall zone (in this case I called it wgclient).
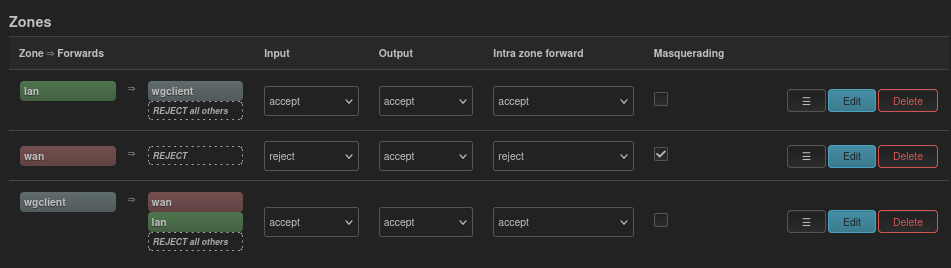
Here is an overview of the firewall settings
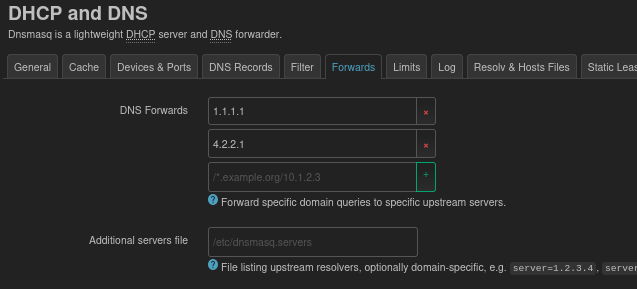
Lastly, if the endpoint vpn “server” is using a hostname you will need DNS that can resolve. Use the Forwards tab and use whatever DNS is appropriate.
The commands vary depending on the version of VyOS. These instructions are for the rolling release 1.3.0
ssh to your router and start from the run terminal vyos@myGW:~$
and begin with generating keys
generate wireguard default-keypair
This creates the public and private keys that will automatically be used by wireguard /config/auth/wireguard/default/private.key and public.key
You can create the peer pub/priv keys on vyos or someplace else. If you do it on vyos follow these steps
sudo su -
wg genkey | tee /config/auth/wireguard/jason.privatekey | wg pubkey > /config/auth/wireguard/jason.publickey
exit
Now enter the configuration mode of Vyos to setup a wireguard interface
vyos@myGW:~$ configure
vyos@myGW#
set interfaces wireguard wg0 address 10.22.211.1/24 set interfaces wireguard wg0 port 51820 cat /config/auth/wireguard/jason.publickey
G8w+5qjq0hZVfoYOfgdmLp584oJ8UZFGRBMHQjPrqyA=
set interfaces wireguard wg0 peer jason pubkey G8w+5qjq0hZVfoYOfgdmLp584oJ8UZFGRBMHQjPrqyA=
set interfaces wireguard wg0 peer jason allowed-ips 10.22.211.10/32
set interfaces wireguard wg0 peer jason persistent-keepalive 15
commit; save
This is what the wireguard config should look like:
vyos@myGW# show interfaces wireguard
wireguard wg0 {
     address 10.22.211.1/24
     peer jason {
         allowed-ips 10.22.211.10/32
         persistent-keepalive 15
         pubkey G8w+5qjq0hZVfoYOfgdmLp584oJ8UZFGRBMHQjPrqyA=
     }
     port 51820
 }
Open the port on the firewall to allow wireguard traffic to reach the router.
modify the rule number so you don’t overwrite an existing rule.
set firewall name wan-local rule 60 description "allow wireguard"
set firewall name wan-local rule 60 action accept
set firewall name wan-local rule 60 destination port 51820
set firewall name wan-local rule 60 protocol udp
Wireguard is a wonderfully superior VPN. Its simple, fast, lightweight, modern, GPL licensed and very secure. Read more at Wireguard.com
Here is the setup:
10.11.13.1 is the OpenWRT gateway/router/vpn (v19.07.4). 10.11.13.0/24 is the lan subnet on this router.
172.21.13.0/24 is a public vlan on this router for guests to access the internet through. We will setup wireguard client to be able to route to this vlan.
10.11.14.0/24 is the wireguard subnet with 10.11.14.1 as the Wireguard interface on our OpenWRT router (wg0).
Each wireguard client will be assigned an address between 10.11.14.2-254
Begin by installing the required packages on the OpenWRT gateway (Alternately, this can be done from Luci. System -> Software)
Create the Wireguard interface. Add the private key from above listen port 51820 ip 10.11.14.1/24 keep alive of 25
Optionally, add the following to /etc/config/network
config interface 'wg0'
	option proto 'wireguard'
	option private_key 'QFLJ9p7MFz31DxTqNKCTu2ARhxLvN0lWhvoKarBT2Vg='
	option listen_port '51820'
	list addresses '10.11.14.1/24'
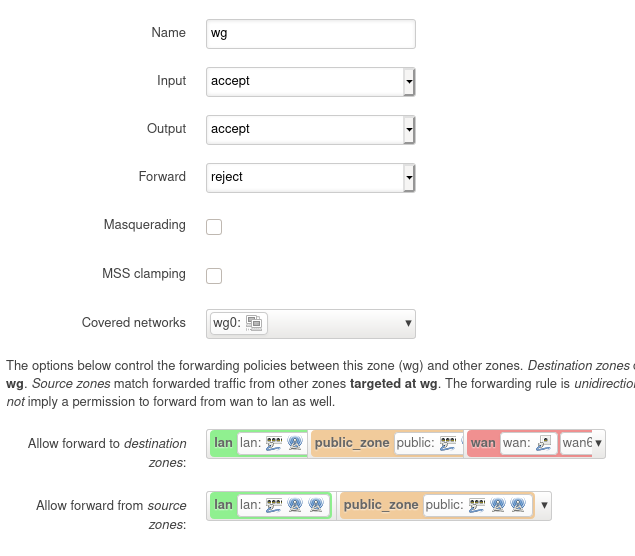
Create a firewall zone for the wg0 interface and allow forwarding to and from the lan and public zones. As well as allow it to forward to the wan zone. This is needed when routing all traffic through the vpn. Network -> Firewall -> Add (zone)
Optionally, add the following to /etc/config/firewall
config zone
	option name 'wg'
	option input 'ACCEPT'
	option network 'wg0'
	option output 'ACCEPT'
	option forward 'REJECT'
config forwarding
	option dest 'lan'
	option src 'wg'
config forwarding
	option dest 'public_zone'
	option src 'wg'
config forwarding
	option dest 'wg'
	option src 'lan'
config forwarding
	option dest 'wg'
	option src 'public_zone'
config forwarding
        option dest 'wan'
        option src 'wg'
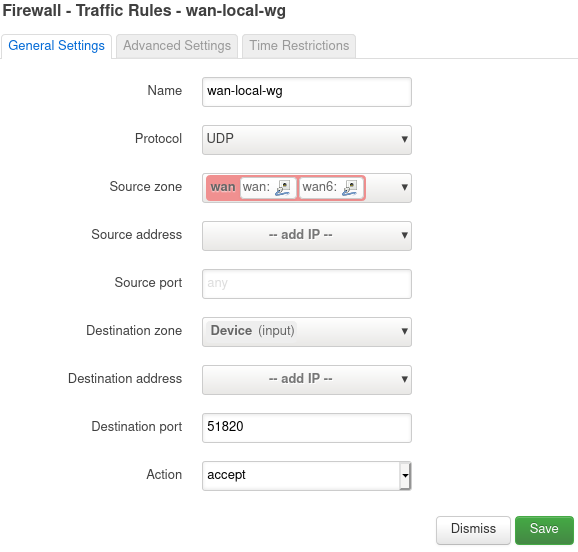
We need to open up the Wireguard port in the firewall. You can use any port you like. I’m using the default (51820). Network -> Firewall -> Traffic Rules -> Add Change the following, leaving everything else default Name: wan-local-wg Protocol: UDP Source zone: wan Destination zone: Device Destination port: 51820
Optionally, add a firewall rule to /etc/config/firewall
config rule
        option dest_port '51820'
        option src 'wan'
        option name 'wan-local-wg'
        option target 'ACCEPT'
        list proto 'udp'
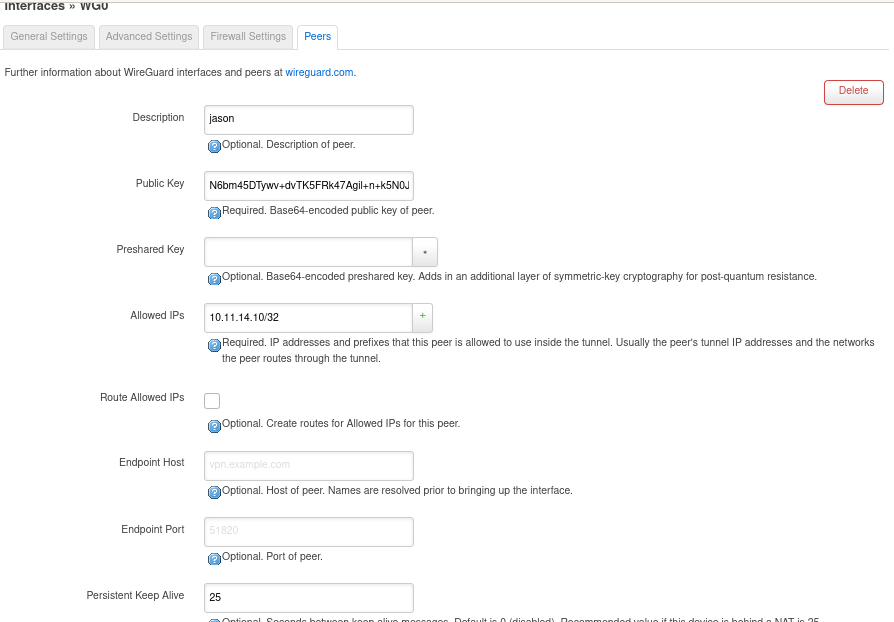
Now lets setup a peer (client).
Generate a public private keypair
wg genkey | tee jason.privatekey | wg pubkey > jason.publickey
– Add a description: jason – Paste the public key: N6bm45DTywv+dvTK5FRk47Agil+n+k5N0JyaOvfL7iw=
– Add a Preshared Key if you are worried about quantum computing compromising your keypair sometime in the future.
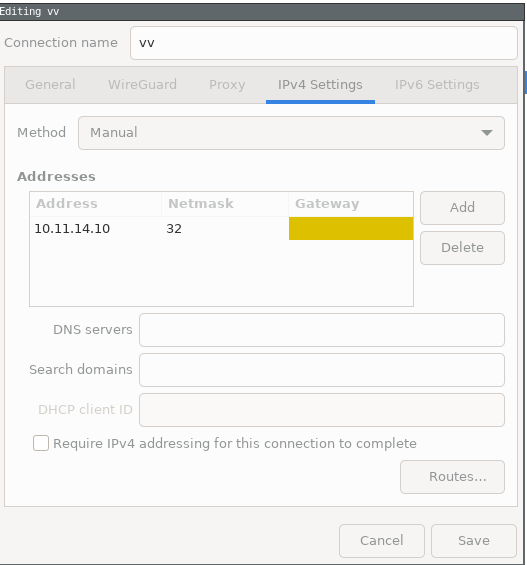
– Set “Allowed IPs” to an ip inside the wireguard subnet (10.11.14.0/24). For this peer we will use 10.11.14.10/32. If you add another peer this address will need to be unique. So the next peer can use .11/32.
Wireguard uses a ip to pubkey mechanism called cryptokey routing. In this case any traffic destined for 10.11.14.10 will be encrypted with this peers public key “…L7iw=” and sent to its most recent endpoint address.
– Change the “Persistent Keep Alive” to 25 seconds, which is recommended for traversing NAT. If your not behind NAT leave it blank.
Optionally, you can add a peer directly to /etc/config/network
After adding a peer the wg0 interface needs to be restarted!
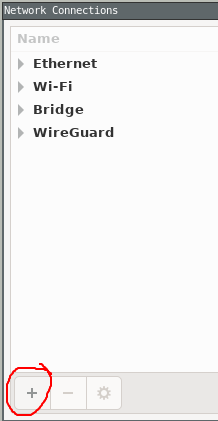
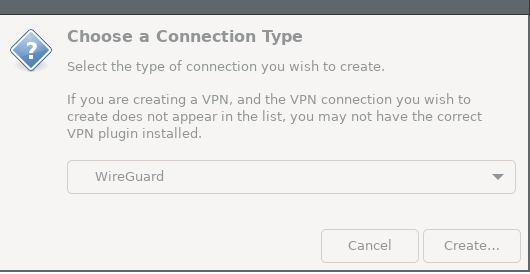
Now we are ready connect as a peer to this server. This can be done a number of ways. Wireguard has adopted a modular model like most GNU projects. They don’t concern themselves with the configuration or key distribution.
Here is a quote from the project “WireGuard securely encapsulates IP packets over UDP. You add a WireGuard interface, configure it with your private key and your peers’ public keys, and then you send packets across it. All issues of key distribution and pushed configurations are out of scope of WireGuard; these are issues much better left for other layers, lest we end up with the bloat of IKE or OpenVPN“
There are a few client connection options. You can do this manually (or scripted) using ip and wg or there is a helper script called wg-quick.
This is part of the wireguard-tools package on Debian. I recommend wg-quick because its easy and slick. Create a config file called something like jasonvpn.conf either in your home directory someplace or in /etc/wireguard/
I prefer the vpn config in my home directory. I place mine in a directory called ~/wg/
Here is the client config with some options commented out (#) for reference. Save this to a file called whatever.conf and run wq-quick up wg/whatever.conf
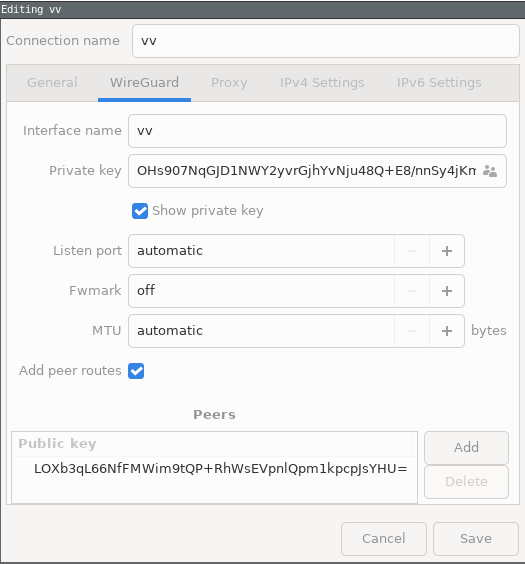
[Interface]
Address = 10.11.14.10/32
PrivateKey = OHs907NqGJD1NWY2yvrGjhYvNju48Q+E8/nnSy4jKmE=
#DNS = 10.11.14.1
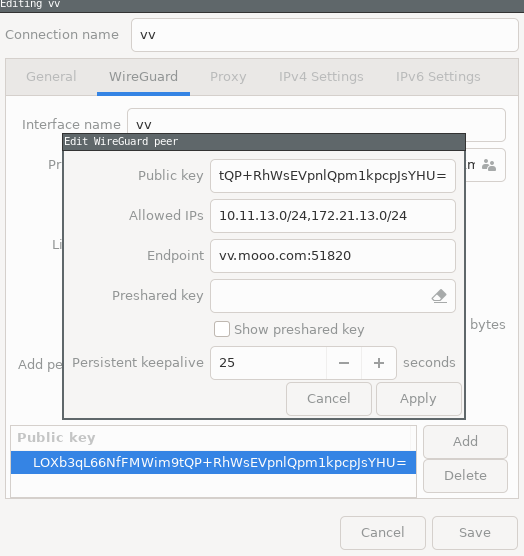
[Peer]
PublicKey = LOXb3qL66NfFMWim9tQP+RhWsEVpnlQpm1kpcpJsYHU=
Endpoint = [wireguard server IP or hostname]:51820
#AllowedIPs = 0.0.0.0/0, ::/0
AllowedIPs = 10.11.13.0/24, 172.21.13.0/24
# This is for if you're behind NAT
PersistentKeepalive = 25
Take note that the [Peer] PublicKey is the servers (openwrt gateway) public key and the [Interface] PrivateKey is the private key we generated for Jason. The corresponding public key for Jason is what we added to the servers Peer section.
The above “AllowedIPs” will allow for split tunnel, where the client can connect to remote subnet 10.11.13.0/24 and 172.21.13.0/24 and any other traffic will route out of their default gateway. If you want to route all traffic through the vpn then set “AllowedIPs = 0.0.0.0/0, ::/0”
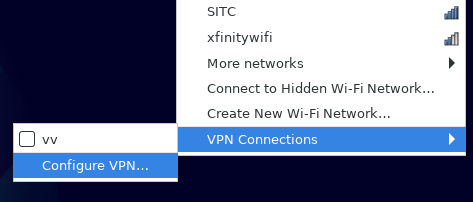
Lets test the above whatever.conf connection. Instead of calling it whatever.conf I have called it vv.conf and saved it in ~/wg/ Now lets start the vpn
sudo wg-quick up wg/vv.conf
Warning: `/home/jason/wg/vv.conf' is world accessible
[#] ip link add vv type wireguard
[#] wg setconf vv /dev/fd/63
[#] ip -4 address add 10.11.14.10/32 dev vv
[#] ip link set mtu 1420 up dev vv
[#] ip -4 route add 172.21.13.0/24 dev vv
[#] ip -4 route add 10.11.13.0/24 dev vv