"arguing that you don’t care about the right to privacy because you have nothing to hide is no different than saying you don’t care about free speech because you have nothing to say."
In this example I will setup a OpenWRT router to tunnel all traffic through a Wireguard VPN interface. I will attempt to keep this as simple and concise as usual ;-)
Start by setting up a peer on the wireguard “server”. If you don’t control your Wireguard server and just have keys and an endpoint from someone else’s service then you can skip this. I have written a tutorial on setting up the wg server from beginning to end. https://jasonschaefer.com/wireguard-vpn-on-openwrt/
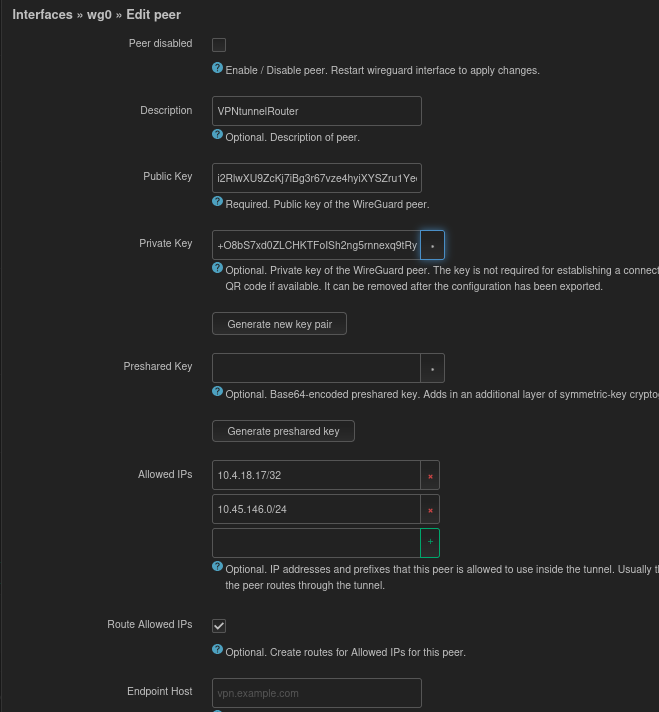
Use the generate new key pair if you don’t want to mess with the command line “wg genkey” method. Note the public key (i2Rl…) and private (+O8b…) for later use. The Allowed IP 10.4.18.17/32 is for the Wireguard peer to peer traffic and the 10.45.146.0/24 is the remote LAN subnet of the router I will setup later. “Route Allowed IPs” adds 10.45.146.0/24 to this Wireguards “server” routing table so we don’t need to use NAT masquerading. Additionally, this allows for two subnets to reach each other which is nice for an office setup or similar.
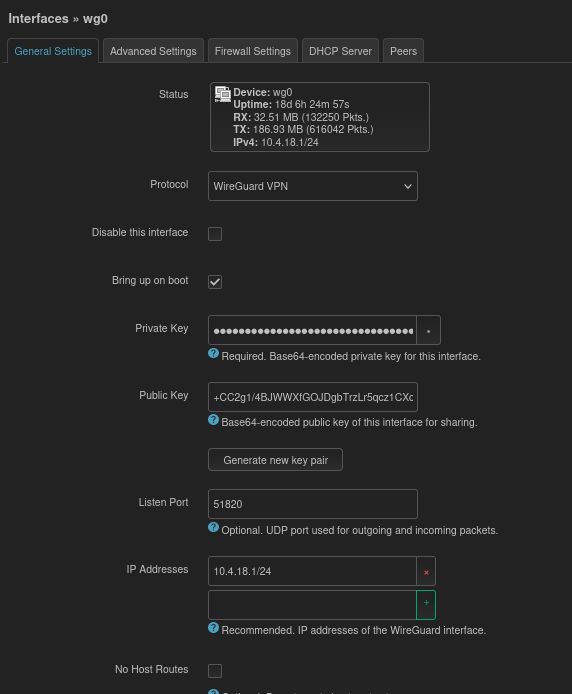
We need the public key from the Wireguard “server” found on the General Settings page of the “server” interface:
Now that we have the public (i2Rl…) and private key (+O8b…) for the peer and the public key (+CC2…) of the Wireguard “server” peer we can move onto setting up the OpenWRT VPN Router “client”.
Install luci-proto-wireguard on the VPN client router. Use the System -> Software gui to do this easily.
Now “add new interface” under Networking -> Interfaces. Name it wg0 (or whatever you want) and select Protocol “WireGuard VPN”. This takes you to the “general settings”. Use the public (i2Rl…) and private (+O8b…) key from the remote “server” wireguard peer that I setup in the first step of this tutorial. “IP addresses” is the ip also specified in the remote server peer of 10.4.18.17/32
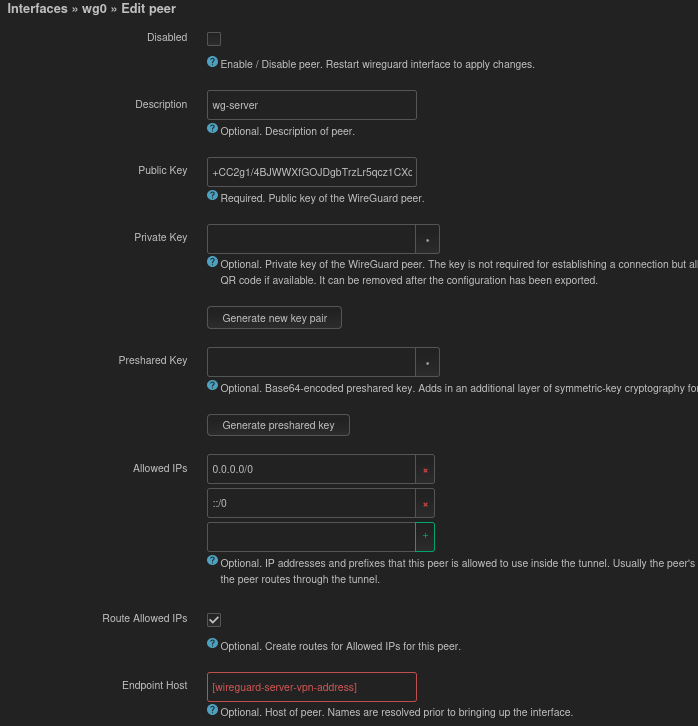
From the peer tab, click “Add new peer” and use the public key (+CC2…) of the Wireguard “server” from the first steps of this tutorial. Allowed IP’s will be 0.0.0.0/0 for all ip4 traffic and ::/0 for all ip6 traffic. Route allowed IP’s will be enabled and Endpoint host is the wireguard server hostname or ip. Persistent keep alive can optionally be set to 25 on both ends of the VPN (not shown in screenshots).
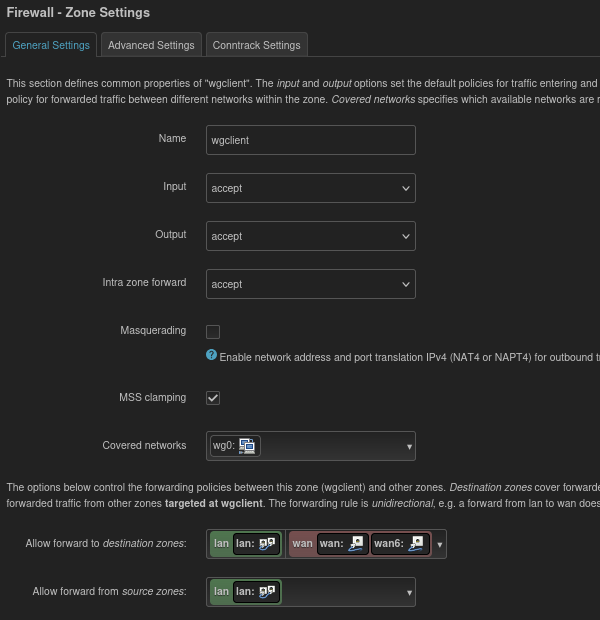
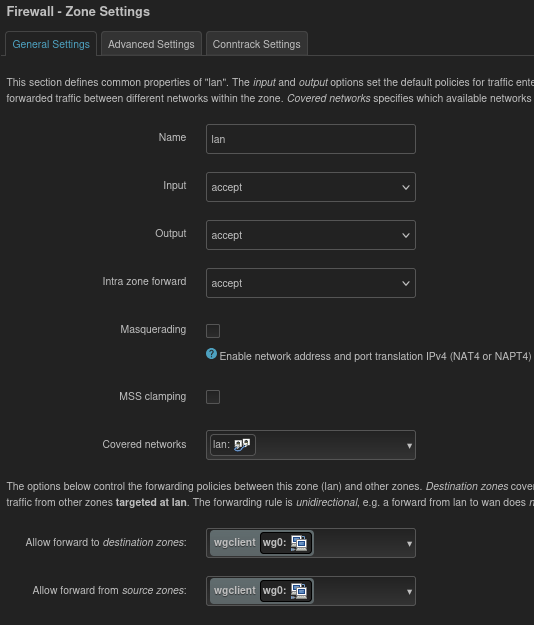
Moving onto firewall setup. This allows all traffic from remote network to reach local LAN and vice versa. I like to handle security on a per device basis more than rely on intermediate restrictions. MSS clamping is not required but may be useful under certain conditions to avoid fragmentation. Masquerading could be used but I hate NAT and would rather use proper routing to establish a connection. This is why “Route allowed IP’s” for “Allowed Networks” 10.45.146.0/24 is set on the “server”.
Ok, now for the magic of how to get all traffic out the wg0 interface without locking yourself out of the router and having to factory reset or serial in. lol
In the Firewall zone for LAN set the “Allow forward to destination zones:” and “Allow forward from source zones:” to the Wireguard firewall zone (in this case I called it wgclient).
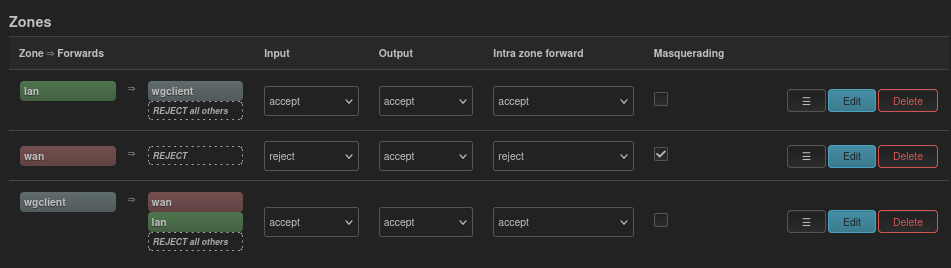
Here is an overview of the firewall settings
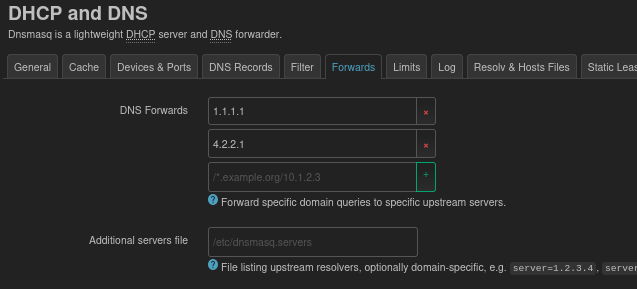
Lastly, if the endpoint vpn “server” is using a hostname you will need DNS that can resolve. Use the Forwards tab and use whatever DNS is appropriate.
This is a concise tutorial, it is not meant to be a hand holding step by step guide. Please comment or contact me if you find errors.
Prerequisites: Setup a domain/sub domain with an A record to the ip of the server or a CNAME to a “dynamic DNS” hostname. I recommend https://freedns.afraid.org. The server needs to have ports 80 and 443 reachable to the public. The DNS must be propagated for letsencrypt to be successful. These steps should work for other versions of Nextcloud. Leave a comment with your experience.
  <Directory /var/www/example.com/>
    Require all granted
    AllowOverride All
    Options FollowSymLinks MultiViews

    <IfModule mod_dav.c>
      Dav off
    </IfModule>
  </Directory>
To avoid certain race conditions between the /etc/apache2/sites-available/example.com.conf and /etc/apache2/sites-available/000-default.conf I prefer to remove example.com.conf and move the http->https redirect into the 000-default.conf
cat /etc/apache2/sites-available/example.com.conf
….snip…
# after it has been globally disabled with “a2disconf”. #Include conf-available/serve-cgi-bin.conf RewriteEngine on RewriteCond %{SERVER_NAME} =example.com RewriteRule ^ https://%{SERVER_NAME}%{REQUEST_URI} [END,NE,R=permanent] </VirtualHost>
# vim: syntax=apache ts=4 sw=4 sts=4 sr noet
copy the rewrite rule at the bottom:
RewriteEngine on
RewriteCond %{SERVER_NAME} =example.com
RewriteRule ^ https://%{SERVER_NAME}%{REQUEST_URI} [END,NE,R=permanent]
edit and paste into the default conf apache config
add apc cli enabling line in here -> /etc/php/8.4/cli/php.ini
apc.enable_cli=1
Restart php to pick up above changes
systemctl restart php8.4-fpm.service
[Setup cron for Nextcloud]
crontab -u www-data -e
*/5 * * * * php -f /var/www/example.com/cron.php
done;
If building Nextcloud for many users it will be necessary to increase the php fpm pm settings in /etc/php/8.4/fpm/pool.d/www.conf and apache mpm event in /etc/apache2/mods-enabled/mpm_event.conf
The nightmare that is NAT: Network Address Translation. We require TURN: Traversal Using Relays around NAT and STUN: Session Traversal Utilities for NAT. These servers facilitate the connections between clients, navigating around NAT, for voice and video communications*. In this implementation we assume the coturn server will be publicly routeable (have a public ip).
install coturn
apt-get install coturn
enable it
vi /etc/default/coturn
TURNSERVER_ENABLED=1
Fixup the turnserver config. I recommend using “/” to search through your config and uncomment the following items, this keeps your original config as close to stock as possible. It does have the downside of being a pain to read, see my grep trick below to help with that.
vi /etc/turnserver.conf

fingerprint
use-auth-secret
static-auth-secret=[some long password]
realm=example.com
total-quota=100
stale-nonce
cert=/etc/letsencrypt/live/example.com/cert.pem
pkey=/etc/letsencrypt/live/example.com/privkey.pem
syslog
no-multicast-peers
no-cli
no-rfc5780
no-stun-backward-compatibility
response-origin-only-with-rfc5780
Here is a description of each parameter at coturns github
grep out all the comments and whitespace so you can see what is enabled and confirm your config is correct
grep -v ^# /etc/turnserver.conf |grep .
Use letsencrypt with turnserver
We will use the same certs as we are using for Nextcloud. See my post on installing Nextcloud server. The letsencrypt directory needs to be opened up for coturn to use it. The best way to do this is add turnserver to the group ssl-cert and then allow this group access to the certs. First fixup the group
usermod -a -G ssl-cert turnserver
Keep the owner as root and change the group to ssl-cert. Then change the group to have read and execute permissions.
Additionally, the private key is only read and writeable by root as shown below.
#confirm perms are not ok
ls -l /etc/letsencrypt/archive/example.com/privkey1.pem
-rw------- 1 root root  241 Nov 22 17:49 privkey1.pem
Change owner (chown) and change mode (chmod) for the privkey1.pem. Future renewed keys will continue with these set permissions. So privkey2.pem will also have “-rw-r—– root ssl-cert”.
chown root:ssl-cert /etc/letsencrypt/archive/example.com/privkey1.pem

chmod g+r /etc/letsencrypt/archive/example.com/privkey1.pem

#confirm perms are good
ls -l /etc/letsencrypt/archive/example.com/privkey1.pem
-rw-r----- 1 root ssl-cert 241 Nov 22 17:49 privkey1.pem
Verify and test. Look through the log for coturn after a restart. Press “G” to go to the end of log and then scroll back up to see any errors from your last restart.
systemctl restart coturn
journalctl -u coturn
run the turnutils client against the server. This package is part of coturn First test turn://
8: : Total transmit time is 4
8: : Total lost packets 0 (0.000000%), total send dropped 0 (0.000000%)
8: : Average round trip delay 93.400000 ms; min = 88 ms, max = 104 ms
8: : Average jitter 3.700000 ms; min = 0 ms, max = 13 ms
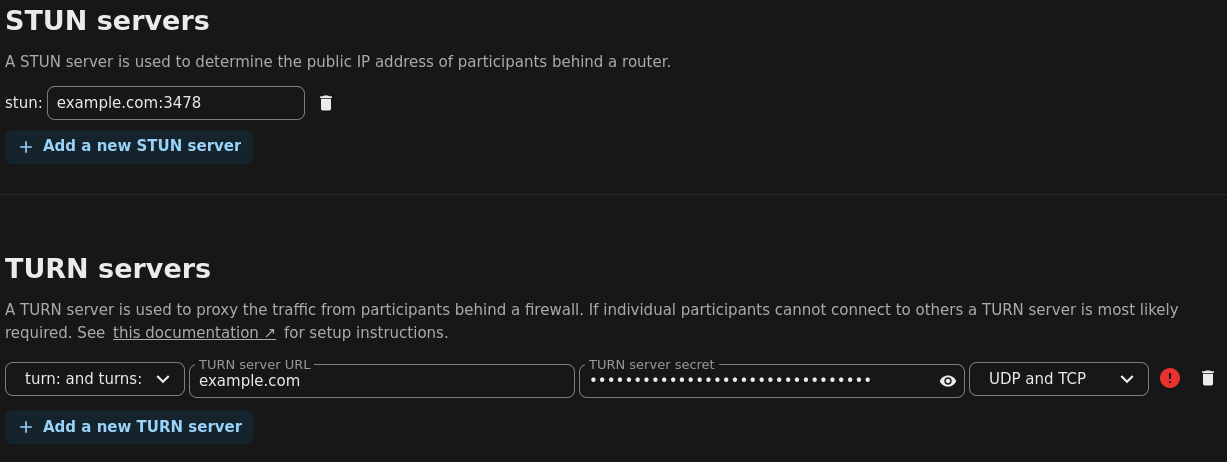
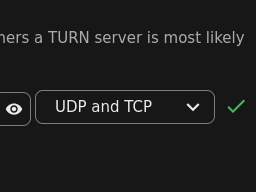
Now we add this server to Nextcloud, under Administration Settings -> Talk set STUN to “example.com:port” set to TURN to “turn: and turns:” | “example.com” | “[static-auth-secret]” | “UDP and TCP”
Look for the green check mark to see that it works
* Here is a description of how TURN and STUN work from Nextclouds documentation
Talk tries to establish a direct peer-to-peer (P2P) connection, thus on connections beyond the local network (behind a NAT or router), clients do not only need to know each others public IP, but the participants local IPs as well. Processing this, is the job of a STUN server. As there is one preconfigured for Nextcloud Talk that is operated by Nextcloud GmbH, for this case nothing else needs to be done.

But in many cases, especially in combination with firewalls or symmetric NAT, a direct P2P connection is not possible, even with the help of a STUN server. For this a so called TURN server needs to be configured additionally.

Nextcloud Talk will try direct P2P in the first place, use STUN if needed and TURN as last resort fallback. Thus to be most flexible and guarantee functionality of your Nextcloud Talk instance in all possible connection cases, you would want to setup a TURN server.
– solar charged – battery powered – low temp Li-ion charge cutoff – low power – no gps module due to fixed location – advantageous location – reliable/durable – medium gain antenna
Materials:
Soldering iron. Whatever you have should work, no fancy soldering required
JST ZH1.5mm 2PIN Micro Electrical Male and Female Connector Plug with 150mm Wire Cables **this is only needed if you want to bypass the low temp charge controller and plug in direct to the onboard RAK solar plug** https://www.amazon.com/dp/B0B58M7D49
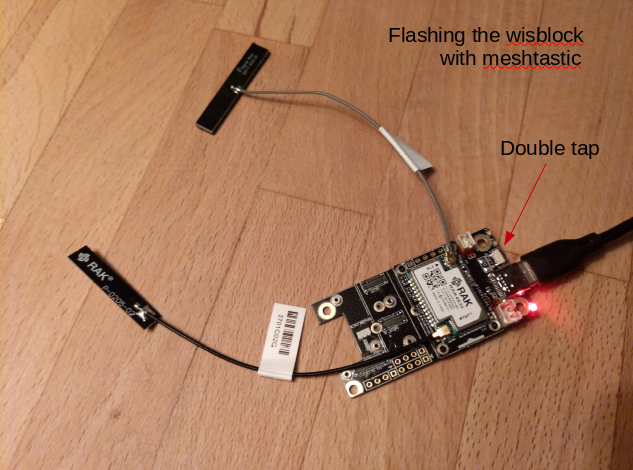
The Rak Wisblock is the perfect choice for a repeater. Its low power, modular and extremely reliable. You can purchase the starter kit which comes with the base board (RAK19007) and the Lora + bluetooth chip (RAK4631). It comes with PCB antenna (0.8dBi) that we won’t use for this fixed repeater. Always keep the antennas connected before powering the radio! Lack of antenna load will result in damage to the radio chip.
Lets start by setting up the Rak wisblock for Meshtastic firmware
The Rak4631 is a NRF52 chipset so get the firmware-nrf.. zip, make a directory and unzip into it.
unzip firmware-nrf52840-2.5.20.4c97351.zip
locate the firmware file for the wisblock 4631. Its called “firmware-rak4631-2.5.20.4c97351.uf2” (replace the 2.5.20…. with whatever fw version your using)
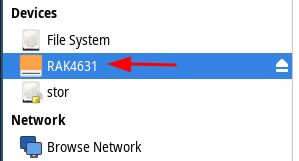
plug the wisblock into your computer and double tap the button shown below.
This will expose a mountable filesystem that you can copy the firmware image into.
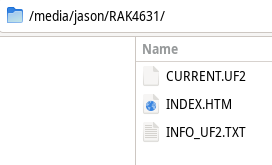
First copy the Meshtastic_nRF52_factory_erase_v3_S140_7.3.0.uf2 to the RAK4631 partition. This erases the flash storage.
Double tap the button again and copy “firmware-rak4631-2.5.20.4c97351.uf2” onto the RAK4631 mount point. It might have current.uf2, index.htm and info_uf2.txt, don’t mess with those. Just copy and paste the “firmware-rak4631-2.5.20.4c97351.uf2” file into the RAK4631 partition. The green light will flash while its transferring and it will reboot when done. The firmware is now loaded and we move onto programming the radio with meshtastic software.
We will use pip to install meshtastic and create a python virtual environment to control the version of binaries and all the dependencies needed. These instructions are for Debian, of course ;-)
Enter the virtual environment and install meshtastic esptool and all its dependencies
source python/bin/activate

pip install --upgrade esptool meshtastic
Anytime in the future when you need to use meshtastic you will enter the python virtual environment with
source meshtastic/python/bin/activate
This way you can control the versions of meshtastic and esptool without affecting any other versions of the python scripts, binaries and dependencies on your system.
Now we can program the RAK radio
to see whats currently programmed run
meshtastic --info
If this radio has been used before or you want to be sure of a blank slate run a factory reset
meshtastic --factory-reset
Now the radio can be setup from scratch. “Region US” sets the radio up for use in the USA at 915mhz
meshtastic --set lora.region US
set the name of this node
meshtastic --set-owner [name]
I like to set a preset bluetooth pin so I can easily access it locally over bluetooth from android phone using the meshtastic app.
meshtastic --set bluetooth.mode FIXED_PIN
the pin must be 6 characters long
meshtastic --set bluetooth.fixed_pin 123456
Designate this as a router. Here is a description of what this means https://meshtastic.org/docs/configuration/radio/device/ Be very careful that you only use ROUTER if this radio has a significant advantage for your mesh. This does NOT include your roof or a hill. Router’s should be placed on the top of a large mountain, skyscraper or radio tower. Otherwise, use CLIENT as this will act like a router without degrading the mesh with a poorly placed ROUTER.
meshtastic --set device.role ROUTER
Since this wisblock does not have the gps module (since its fixed location and conserves power) you will need to set its location manually. You can add a GPS module with the RAK12500 GNSS GPS Location Module.
To monitor the serial output of the device use noproto. This is helpful to figure out whats actually happening with your radio.
meshtastic --noproto
CHANNEL GROUPS
And finally the channels URL. These URL’s hold the encryption key and name of the channel. Use these to add future devices to the mesh. The last “Complete URL” additionally contains the admin channel so only use that for nodes that you want to use for remote administration and devices that you want to be able to remotely administer. I will go over client configs later in this post using a tbeam.
Primary channel URL: https://meshtastic.org/e/#Ci4SIDHMn8GX074n_yIOik3-c1l9CccxXWCzyXimIvdZYcaQGgZmYW1pbHk6AgggEgoIAUADSAFQHmgB

Complete URL (includes all channels): https://meshtastic.org/e/#Ci4SIDHMn8GX074n_yIOik3-c1l9CccxXWCzyXimIvdZYcaQGgZmYW1pbHk6AgggCikSIMOYnWI3socNXuYxy-RI40Lg8BB-oqmXJEm814GTUnxgGgVhZG1pbhIKCAFAA0gBUB5oAQ
copy and paste the channel URL’s into your notes, for later.
Now we move on to the hardware needed to turn this into a robust, long term outdoor repeater
The RAK repeater is very tolerant to extreme temperatures but the li-ion battery is not so forgiving. It is sensitive to very hot and cold conditions. The most limiting factor is charging li-ion in freezing conditions. This will quickly destroy a battery. To help minimize temperature swings I opted for a larger container with some insulation to smooth out the hot and cold transitions. This case was cheap, insulated and decent quality. So far its survived a few years in the harshest of conditions. https://www.harborfreight.com/brands/apache/1800-weatherproof-protective-case-small-black-64550.html
This case is not enough to keep the battery above freezing. Winter months are long and very cold and my batteries would get trashed within a few months of use in winter conditions. To solve this problem I used a low temp-cutoff charge controller from adafruit. https://www.adafruit.com/product/4755 in conjunction with a 10k thermistor https://www.adafruit.com/product/372
This charge controller is far superior to the internal charge controller of the RAK and with the added low temp cutoff I haven’t had to replace a battery since.
== Roaming mobile nodes ==
Requisites:
– Small/portable – low power – battery powered – GPS – waterproof – low gain antenna – easily re-charged (usb)
The commands vary depending on the version of VyOS. These instructions are for the rolling release 1.3.0
ssh to your router and start from the run terminal vyos@myGW:~$
and begin with generating keys
generate wireguard default-keypair
This creates the public and private keys that will automatically be used by wireguard /config/auth/wireguard/default/private.key and public.key
You can create the peer pub/priv keys on vyos or someplace else. If you do it on vyos follow these steps
sudo su -
wg genkey | tee /config/auth/wireguard/jason.privatekey | wg pubkey > /config/auth/wireguard/jason.publickey
exit
Now enter the configuration mode of Vyos to setup a wireguard interface
vyos@myGW:~$ configure
vyos@myGW#
set interfaces wireguard wg0 address 10.22.211.1/24 set interfaces wireguard wg0 port 51820 cat /config/auth/wireguard/jason.publickey
G8w+5qjq0hZVfoYOfgdmLp584oJ8UZFGRBMHQjPrqyA=
set interfaces wireguard wg0 peer jason pubkey G8w+5qjq0hZVfoYOfgdmLp584oJ8UZFGRBMHQjPrqyA=
set interfaces wireguard wg0 peer jason allowed-ips 10.22.211.10/32
set interfaces wireguard wg0 peer jason persistent-keepalive 15
commit; save
This is what the wireguard config should look like:
vyos@myGW# show interfaces wireguard
wireguard wg0 {
     address 10.22.211.1/24
     peer jason {
         allowed-ips 10.22.211.10/32
         persistent-keepalive 15
         pubkey G8w+5qjq0hZVfoYOfgdmLp584oJ8UZFGRBMHQjPrqyA=
     }
     port 51820
 }
Open the port on the firewall to allow wireguard traffic to reach the router.
modify the rule number so you don’t overwrite an existing rule.
set firewall name wan-local rule 60 description "allow wireguard"
set firewall name wan-local rule 60 action accept
set firewall name wan-local rule 60 destination port 51820
set firewall name wan-local rule 60 protocol udp
Wireguard is a wonderfully superior VPN. Its simple, fast, lightweight, modern, GPL licensed and very secure. Read more at Wireguard.com
Here is the setup:
10.11.13.1 is the OpenWRT gateway/router/vpn (v19.07.4). 10.11.13.0/24 is the lan subnet on this router.
172.21.13.0/24 is a public vlan on this router for guests to access the internet through. We will setup wireguard client to be able to route to this vlan.
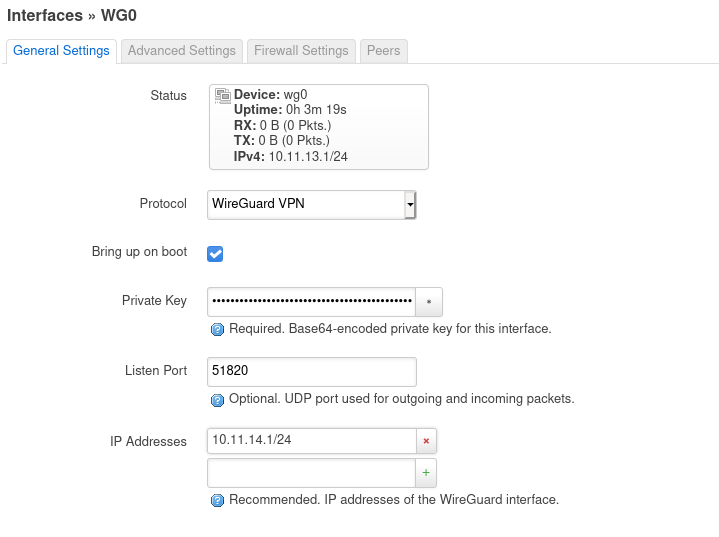
10.11.14.0/24 is the wireguard subnet with 10.11.14.1 as the Wireguard interface on our OpenWRT router (wg0).
Each wireguard client will be assigned an address between 10.11.14.2-254
Begin by installing the required packages on the OpenWRT gateway (Alternately, this can be done from Luci. System -> Software)
Create the Wireguard interface. Add the private key from above listen port 51820 ip 10.11.14.1/24 keep alive of 25
Optionally, add the following to /etc/config/network
config interface 'wg0'
	option proto 'wireguard'
	option private_key 'QFLJ9p7MFz31DxTqNKCTu2ARhxLvN0lWhvoKarBT2Vg='
	option listen_port '51820'
	list addresses '10.11.14.1/24'
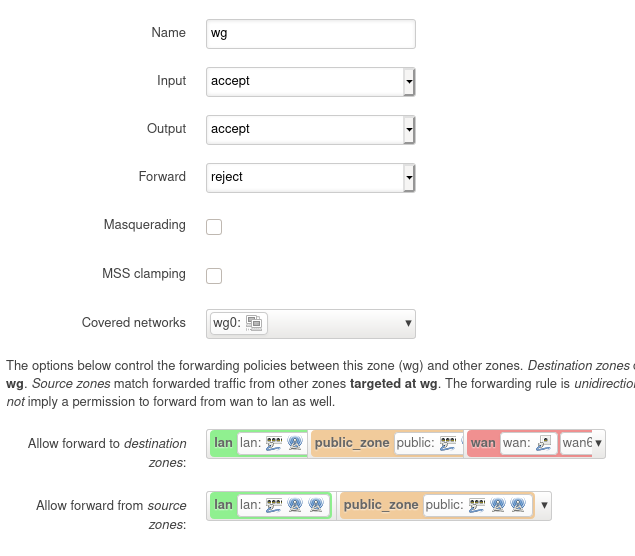
Create a firewall zone for the wg0 interface and allow forwarding to and from the lan and public zones. As well as allow it to forward to the wan zone. This is needed when routing all traffic through the vpn. Network -> Firewall -> Add (zone)
Optionally, add the following to /etc/config/firewall
config zone
	option name 'wg'
	option input 'ACCEPT'
	option network 'wg0'
	option output 'ACCEPT'
	option forward 'REJECT'
config forwarding
	option dest 'lan'
	option src 'wg'
config forwarding
	option dest 'public_zone'
	option src 'wg'
config forwarding
	option dest 'wg'
	option src 'lan'
config forwarding
	option dest 'wg'
	option src 'public_zone'
config forwarding
        option dest 'wan'
        option src 'wg'
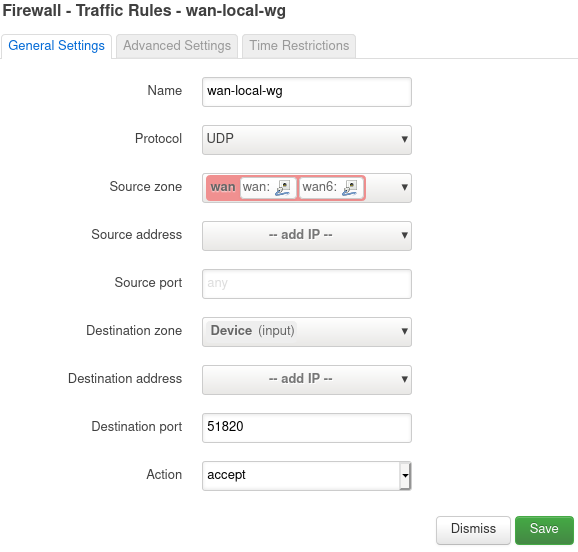
We need to open up the Wireguard port in the firewall. You can use any port you like. I’m using the default (51820). Network -> Firewall -> Traffic Rules -> Add Change the following, leaving everything else default Name: wan-local-wg Protocol: UDP Source zone: wan Destination zone: Device Destination port: 51820
Optionally, add a firewall rule to /etc/config/firewall
config rule
        option dest_port '51820'
        option src 'wan'
        option name 'wan-local-wg'
        option target 'ACCEPT'
        list proto 'udp'
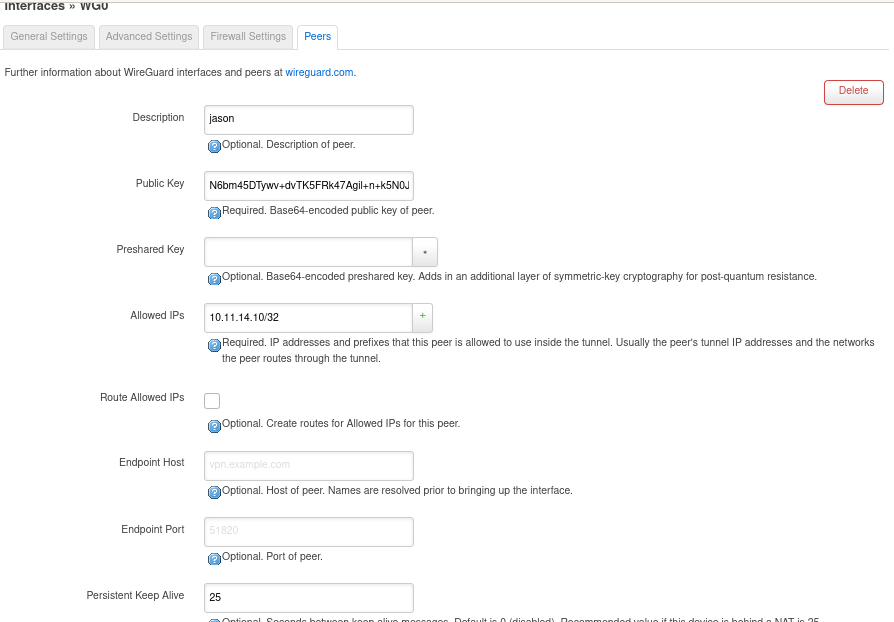
Now lets setup a peer (client).
Generate a public private keypair
wg genkey | tee jason.privatekey | wg pubkey > jason.publickey
– Add a description: jason – Paste the public key: N6bm45DTywv+dvTK5FRk47Agil+n+k5N0JyaOvfL7iw=
– Add a Preshared Key if you are worried about quantum computing compromising your keypair sometime in the future.
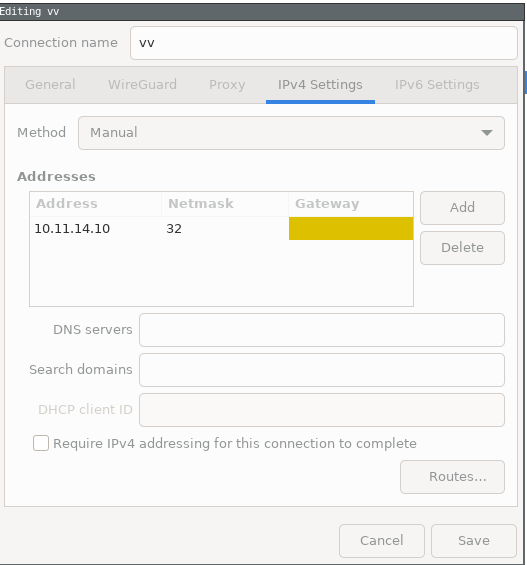
– Set “Allowed IPs” to an ip inside the wireguard subnet (10.11.14.0/24). For this peer we will use 10.11.14.10/32. If you add another peer this address will need to be unique. So the next peer can use .11/32.
Wireguard uses a ip to pubkey mechanism called cryptokey routing. In this case any traffic destined for 10.11.14.10 will be encrypted with this peers public key “…L7iw=” and sent to its most recent endpoint address.
– Change the “Persistent Keep Alive” to 25 seconds, which is recommended for traversing NAT. If your not behind NAT leave it blank.
Optionally, you can add a peer directly to /etc/config/network
After adding a peer the wg0 interface needs to be restarted!
Now we are ready connect as a peer to this server. This can be done a number of ways. Wireguard has adopted a modular model like most GNU projects. They don’t concern themselves with the configuration or key distribution.
Here is a quote from the project “WireGuard securely encapsulates IP packets over UDP. You add a WireGuard interface, configure it with your private key and your peers’ public keys, and then you send packets across it. All issues of key distribution and pushed configurations are out of scope of WireGuard; these are issues much better left for other layers, lest we end up with the bloat of IKE or OpenVPN“
There are a few client connection options. You can do this manually (or scripted) using ip and wg or there is a helper script called wg-quick.
This is part of the wireguard-tools package on Debian. I recommend wg-quick because its easy and slick. Create a config file called something like jasonvpn.conf either in your home directory someplace or in /etc/wireguard/
I prefer the vpn config in my home directory. I place mine in a directory called ~/wg/
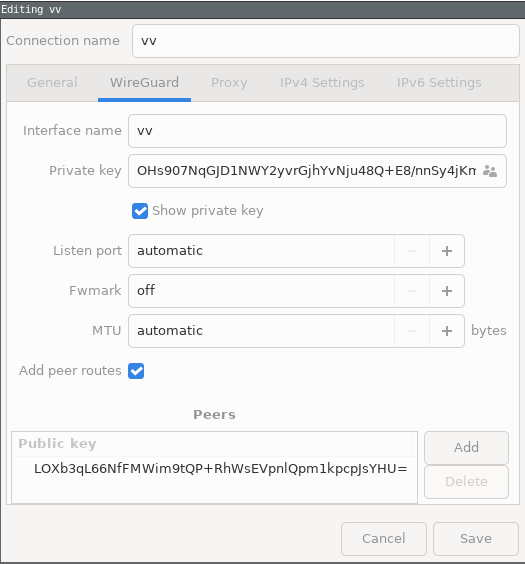
Here is the client config with some options commented out (#) for reference. Save this to a file called whatever.conf and run wq-quick up wg/whatever.conf
[Interface]
Address = 10.11.14.10/32
PrivateKey = OHs907NqGJD1NWY2yvrGjhYvNju48Q+E8/nnSy4jKmE=
#DNS = 10.11.14.1
[Peer]
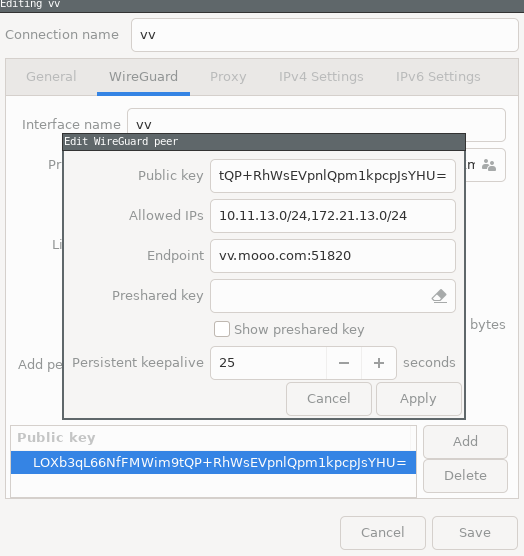
PublicKey = LOXb3qL66NfFMWim9tQP+RhWsEVpnlQpm1kpcpJsYHU=
Endpoint = [wireguard server IP or hostname]:51820
#AllowedIPs = 0.0.0.0/0, ::/0
AllowedIPs = 10.11.13.0/24, 172.21.13.0/24
# This is for if you're behind NAT
PersistentKeepalive = 25
Take note that the [Peer] PublicKey is the servers (openwrt gateway) public key and the [Interface] PrivateKey is the private key we generated for Jason. The corresponding public key for Jason is what we added to the servers Peer section.
The above “AllowedIPs” will allow for split tunnel, where the client can connect to remote subnet 10.11.13.0/24 and 172.21.13.0/24 and any other traffic will route out of their default gateway. If you want to route all traffic through the vpn then set “AllowedIPs = 0.0.0.0/0, ::/0”
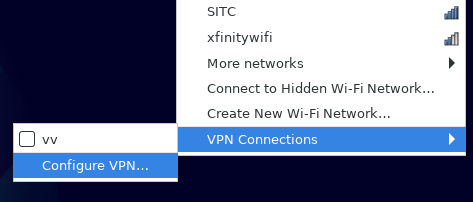
Lets test the above whatever.conf connection. Instead of calling it whatever.conf I have called it vv.conf and saved it in ~/wg/ Now lets start the vpn
sudo wg-quick up wg/vv.conf
Warning: `/home/jason/wg/vv.conf' is world accessible
[#] ip link add vv type wireguard
[#] wg setconf vv /dev/fd/63
[#] ip -4 address add 10.11.14.10/32 dev vv
[#] ip link set mtu 1420 up dev vv
[#] ip -4 route add 172.21.13.0/24 dev vv
[#] ip -4 route add 10.11.13.0/24 dev vv
This is a concise tutorial, it is not meant to be a hand holding step by step guide. Please comment or contact me if you find errors.
Prerequisites: Setup a domain/sub domain with an A record to the ip of the server or a CNAME to a “dynamic DNS” hostname. I recommend https://freedns.afraid.org. The server needs to have ports 80 and 443 reachable to the public. The DNS must be propagated for letsencrypt to be successful.
Make sure the md5 matches md5sum latest-22.tar.bz2 curl https://download.nextcloud.com/server/releases/latest-22.tar.bz2.md5
Extract the tar file and change permissions tar xfv nextcloud-22.x.tar.bz2 mv nextcloud/ /var/www/example.com/ chown www-data:www-data -R /var/www/example.com/
Setup Apache
Create a apache virtual site cp /etc/apache2/sites-available/000-default.conf /etc/apache2/sites-available/example.com.conf
edit /etc/apache2/sites-available/example.com.conf uncomment and change “ServerName example.com“
change the document root DocumentRoot /var/www/example.com
change log location if you would like ErrorLog ${APACHE_LOG_DIR}/example.com_error.log
CustomLog ${APACHE_LOG_DIR}/example.com_access.log combined
a2ensite example.com
a2enmod php7.4 rewrite headers env dir mime userdir dav ssl
  <Directory /var/www/example.com/>
    Require all granted
    AllowOverride All
    Options FollowSymLinks MultiViews
    <IfModule mod_dav.c>
      Dav off
    </IfModule>
  </Directory>
To avoid certain race conditions between the /etc/apache2/sites-available/example.com.conf and /etc/apache2/sites-available/000-default.conf I prefer to remove example.com.conf and move the http->https redirect into the 000-default.conf
cat /etc/apache2/sites-available/example.com.conf
….snip… # include a line for only one particular virtual host. For example the # following line enables the CGI configuration for this host only # after it has been globally disabled with “a2disconf”. #Include conf-available/serve-cgi-bin.conf RewriteEngine on RewriteCond %{SERVER_NAME} =example.com RewriteRule ^ https://%{SERVER_NAME}%{REQUEST_URI} [END,NE,R=permanent] </VirtualHost>
# vim: syntax=apache ts=4 sw=4 sts=4 sr noet
copy the rewrite rule at the bottom:
RewriteEngine on
RewriteCond %{SERVER_NAME} =example.com
RewriteRule ^ https://%{SERVER_NAME}%{REQUEST_URI} [END,NE,R=permanent]

edit and paste into the default conf
vi /etc/apache2/sites-enabled/000-default.conf
Create a database, user and password for nextcloud
mariadb -uroot
CREATE USER 'nextcloud'@'localhost' IDENTIFIED BY 'PASSWORD';
CREATE DATABASE IF NOT EXISTS nextcloud;
GRANT SELECT, INSERT, UPDATE, DELETE, CREATE, DROP, INDEX, ALTER, CREATE TEMPORARY TABLES ON nextcloud.* TO 'nextcloud'@'localhost';
FLUSH privileges;
The reason I use x11vnc is that it connects to the existing graphical session. Most other vnc servers will spawn an entirely new graphical session. While that is super cool, I don’t want that feature. This is for remote support, where I want the user and the supporter to share the same session. I use the ‘-auth guess’ to have x11vnc guess the XAUTHORITY file‐name and use it appropriately. This avoids the annoying hard coding of gdm, lightdm, xdm or specific users .Xauthority.
Install x11vnc # apt-get install x11vnc
The following should work for any distro that uses systemd, just the apt bits are Debian specific.
Generate the password and store it under etc so no users can change this password, only root. You can do this under your users home so that its not managed by root. In my case I didn’t want the user to be able to change or accidentally delete the password. # x11vnc -storepasswd /etc/x11vnc.pwd
edit (create new) the following file use whatever text editor you prefer, here I use vi # vi /etc/systemd/system/x11vnc.service
And add the following, making any changes you want to the x11vnc ExecStart See the man page for explanations of the switches
The new versions of OpenWRT (18 and newer) have the ability to add vlan interfaces directly from LuCI (web gui). You can now skip the manual editing of the /etc/config/network file.
Using 802.1q in OpenWRT is very difficult when working on a device that doesn’t have a built-in switch or the when the switch chipset isn’t supported.
Creating VLANS is not possible via the web interface (luci) or using the “config switch_port” options in /etc/config/network. The Luci web gui will not have the “Network -> Switch” option available.
In this example, we add a public interface and vlan 2 on ports eth0 and eth1.
Start by getting into the device: ssh root@192.168.1.1 vi /etc/config/network
config interface 'public'
        option type 'bridge'
        option proto 'static'
        option ifname 'eth0.2 eth1.2'
        option ipaddr '172.168.1.1'
        option netmask '255.255.255.0'

config device 'eth0_2'
        option name 'eth0.2'

config device 'eth1_2'
        option name 'eth1.2'
This creates three interfaces eth0.2, eth1.2 and both are bridged into the interface br-public.
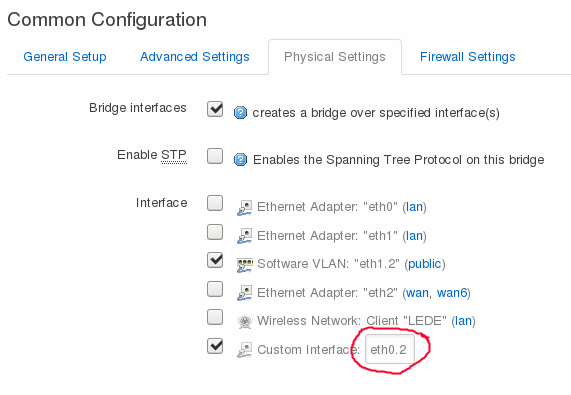
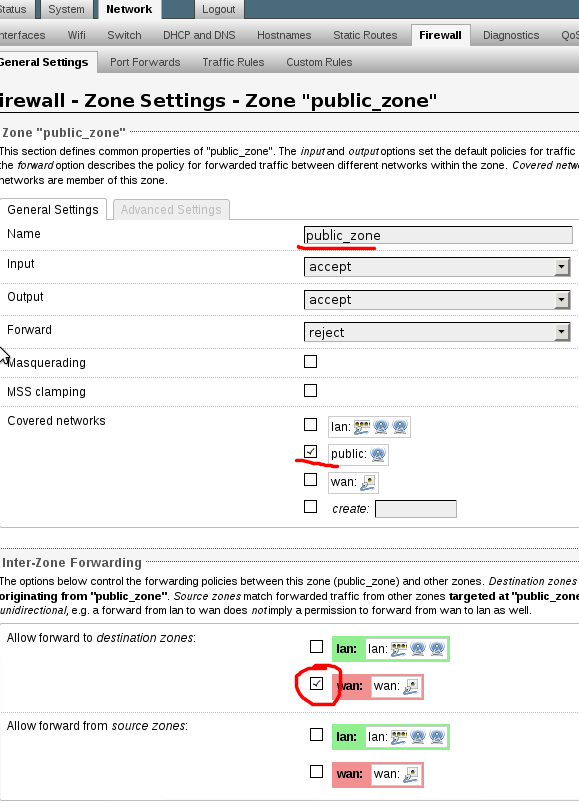
You can use luci to configure the interface if you use the “custom interface” and manually refer to the vlan like this:
Just be sure you’ve already added the necessary VLAN to /etc/config/network:
config device 'eth0_2'
        option name 'eth0.2'
After this, the VLAN will be defined but not show up in luci. You will need to specify it using the “custom interface” as shown in the red circle above.
For those unfamiliar: SMSSecure (now called Silence) is a text messaging application that supports encryption. It has exceptional integration on your phone and will handle your non-encrypted friends acquaintances texts as well. https://smssecure.org
I recommend using fdroid to install it. F-droid is a Free Software repository for Android. https://f-droid.org
UPDATE: You can now export an encrypted copy of Silence. This export includes your encryption keys. From your old phones Silence “app”lication, under the three horizontal “…” -> “Import / Export” -> “Export encrypted backup”. This exports to the phones /sdcard/SilenceExport or from mtp “mtp://[usb:xxx,xxx]/Internal storage/SilenceExport”. Copy this directory to the new phone, to the equivalent path (/sdcard/). Install Silence on the new phone. In my experience the first-run import prompt didn’t work so I had to do it manually. Click the three horizontal “…” -> “Import / Export” -> “Restore encrypted backup”. Your done!
I wanted to do this transfer using mtp but neither thunar or nautilus could “see” the SilenceExport directory. I had to do the following:
plug in old phone and copy the export to my laptop: adb pull /sdcard/SilenceExport/
plug in the new phone: adb push SilenceExport/
Remember you have to authorize your laptop from the phone.
THE FOLLOWING INSTRUCTIONS ARE CONSIDERED OUT OF DATE yet still useful for some.
When moving to a new phone you can export a plain text copy of all your sms texts for import on the new phone. This is fine but has many drawbacks. The export feature of smssecure does not export a users encryption keys. Here are instructions on doing this yourself. Its really not as bad as it might seem and is worth doing to avoid re-keying with every friend you text with. You can also avoid exporting sensitive txt’s to plain-text.
PREREQ’s:
Install SMSSecure on the new phone.
You will need adb access to both phones.
Enable developer options by going into Settings -> About phone -> then press “Build number” 7 times.
Allow adb root access from “developer options -> Root access” “Apps and ADB”. Otherwise you will get a permission error like so:
shell@ville:/ $ su -
Permission denied
Also, be sure your computer can see the phone: [jason@local ~] $ adb devices
List of devices attached
393520931D5B00EC device
If usb is broken you can use ADB over the network. Enable it under Developer options -> Android debugging -> ADB over network. Connect to your local wireless first and take out your sim card before enabling. Otherwise your phone will be fully reachable over the cell network/public internet.
Now connect to the phone over the network: [jason@local ~] $ adb connect 192.168.123.12:5555
You can continue as if it was plugged in directly…
To disconnect from the phone use this: [jason@local ~] $ adb disconnect 192.168.123.12:5555
STEPS:
I wasn’t able to directly copy the smssecure directory to my computer. It errors with zero files transferred:
Next, we will copy the org.smssecure.smssecure directory to the new phone:
Note: I attempted to copy directly to the new phone at /data/data but there was a permission denied:
[jason@local ~] $ adb push org.smssecure.smssecure/ /data/data/
push: org.smssecure.smssecure/databases/messages.db-journal -> /data/data/databases/messages.db-journal
failed to copy 'org.smssecure.smssecure/databases/messages.db-journal' to '/data/data/databases/messages.db-journal': Permission denied
Instead copy it to the /sdcard/ of the new phone, first: UPDATE: This doesn’t work anymore
The brilliant developers of adb didn’t write in support for adb push to be recursive? We have to get creative as usual with Android. Use zip if you have unzip on your phone.
[jason@local ~] $ zip -r org.smssecure.smssecure.zip org.smssecure.smssecure/

And then,
adb push org.smssecure.smssecure.zip /sdcard/
adb shell
cd /sdcard/
unzip org.smssecure.smssecure.zip
Before we proceed lets check what permissions the org.smssecure.smssecure directory is currently set to (from the phones shell). In this case its chown u0_a63.u0_a63 and chmod 755:
root@crespo:/ # ls -ld /data/data/org.smssecure.smssecure/
drwxr-xr-x u0_a63   u0_a63            2015-12-06 21:35
Keep note of this for later.
Using the new phone’s root shell you will delete the existing (un-used) directory and copy your smssecure directory (with all your text’s) from sdcard to /data/data:
Note: If you try using move (mv) instead of copy (cp) and your sdcard is on a separate partition you will get this error: root@maguro:/ # mv /sdcard/org.smssecure.smssecure/ /data/data/
failed on '/sdcard/org.smssecure.smssecure/' - Cross-device link
255|
Back to permissions:
After the data is copied to the new phone the directory and file permissions will be wrong (owned by root):
Be sure to reboot your phone.
Note: My SMSSecure disappeared and I needed to re-install. Everything was there after I re-installed and it survived subsequent reboots.
Instead of encrypting your entire drive and operating system you can encrypt just the data that matters, /home/
Full disk encryption (FDE) vs. data only /home/ + swap
– FDE cannot survive a remote reboot because it asks for the password before the system is fully running.
– FDE is more secure in the sense that it encrypts any possible user data. Temporary or cached files in /tmp/ or /var/ and swap will be automatically encrypted. Meta data or sensitive file names can be leaked with programs like mlocate or databases stored under /var/.
– Data-only encrypting with pam_mount is seamless, allowing someone to use a single password to simultaneously login and decrypt their data. (Psssst, its two passwords. One for login and one for decrypting. If they match, two birds one stone).
This is a vast subject and I have barely touched on it. Check out some other resources that can help formulate a proper solution for your needs. https://en.wikipedia.org/wiki/Disk_encryption https://wiki.archlinux.org/index.php/Disk_encryption
Lastly, if you just want simple file/directory encryption (as opposed to file system encryption as laid out here) you might like EncFS.
At the end of the day we all have no excuse for not using encryption so just go ahead and implement something reasonable. And don’t use non-free encryption!
1. Backup /home to external drive
2. Install cryptsetup, libpam-mount
3. Format home partition
4. Open encrypted partition, make a filesystem inside and copy data back
5. Edit /etc/security/pam_mount.conf.xml
6. Remove “/home” from /etc/fstab
7. Change your password to match the crypt password
8. Alternately, encrypt swap
1. rsync -av /home /backup
2. apt-get install cryptsetup libpam-mount
3.
umount /home/ cryptsetup luksFormat /dev/sdaX
4. cryptsetup luksOpen /dev/sdaX home
mkfs.xfs -L home /dev/mapper/home
mount /dev/mapper/home /home/ rsync -av /backup/home/ /home
5.
Backup the default config cp /etc/security/pam_mount.conf.xml /root/
add the following after “Volume definitions”. vi /etc/security/pam_mount.conf.xml
I use a clever program called cryptdisks_[start/stop] to start and stop these crypts. You need to stop your existing, unencrypted swap with swapoff -a
Now start the crypt cryptdisks_start sda3_crypt
This creates /dev/mapper/sda3_crypt
Now replace your existing /etc/fstab swap line with something like the following:
/dev/mapper/sda3_crypt none swap sw 0 0
swapon -a
this turns on the swap, now its encrypted!
swapon -s
Filename				Type		Size	Used	Priority
/dev/dm-0                              	partition	9769980	0	-1
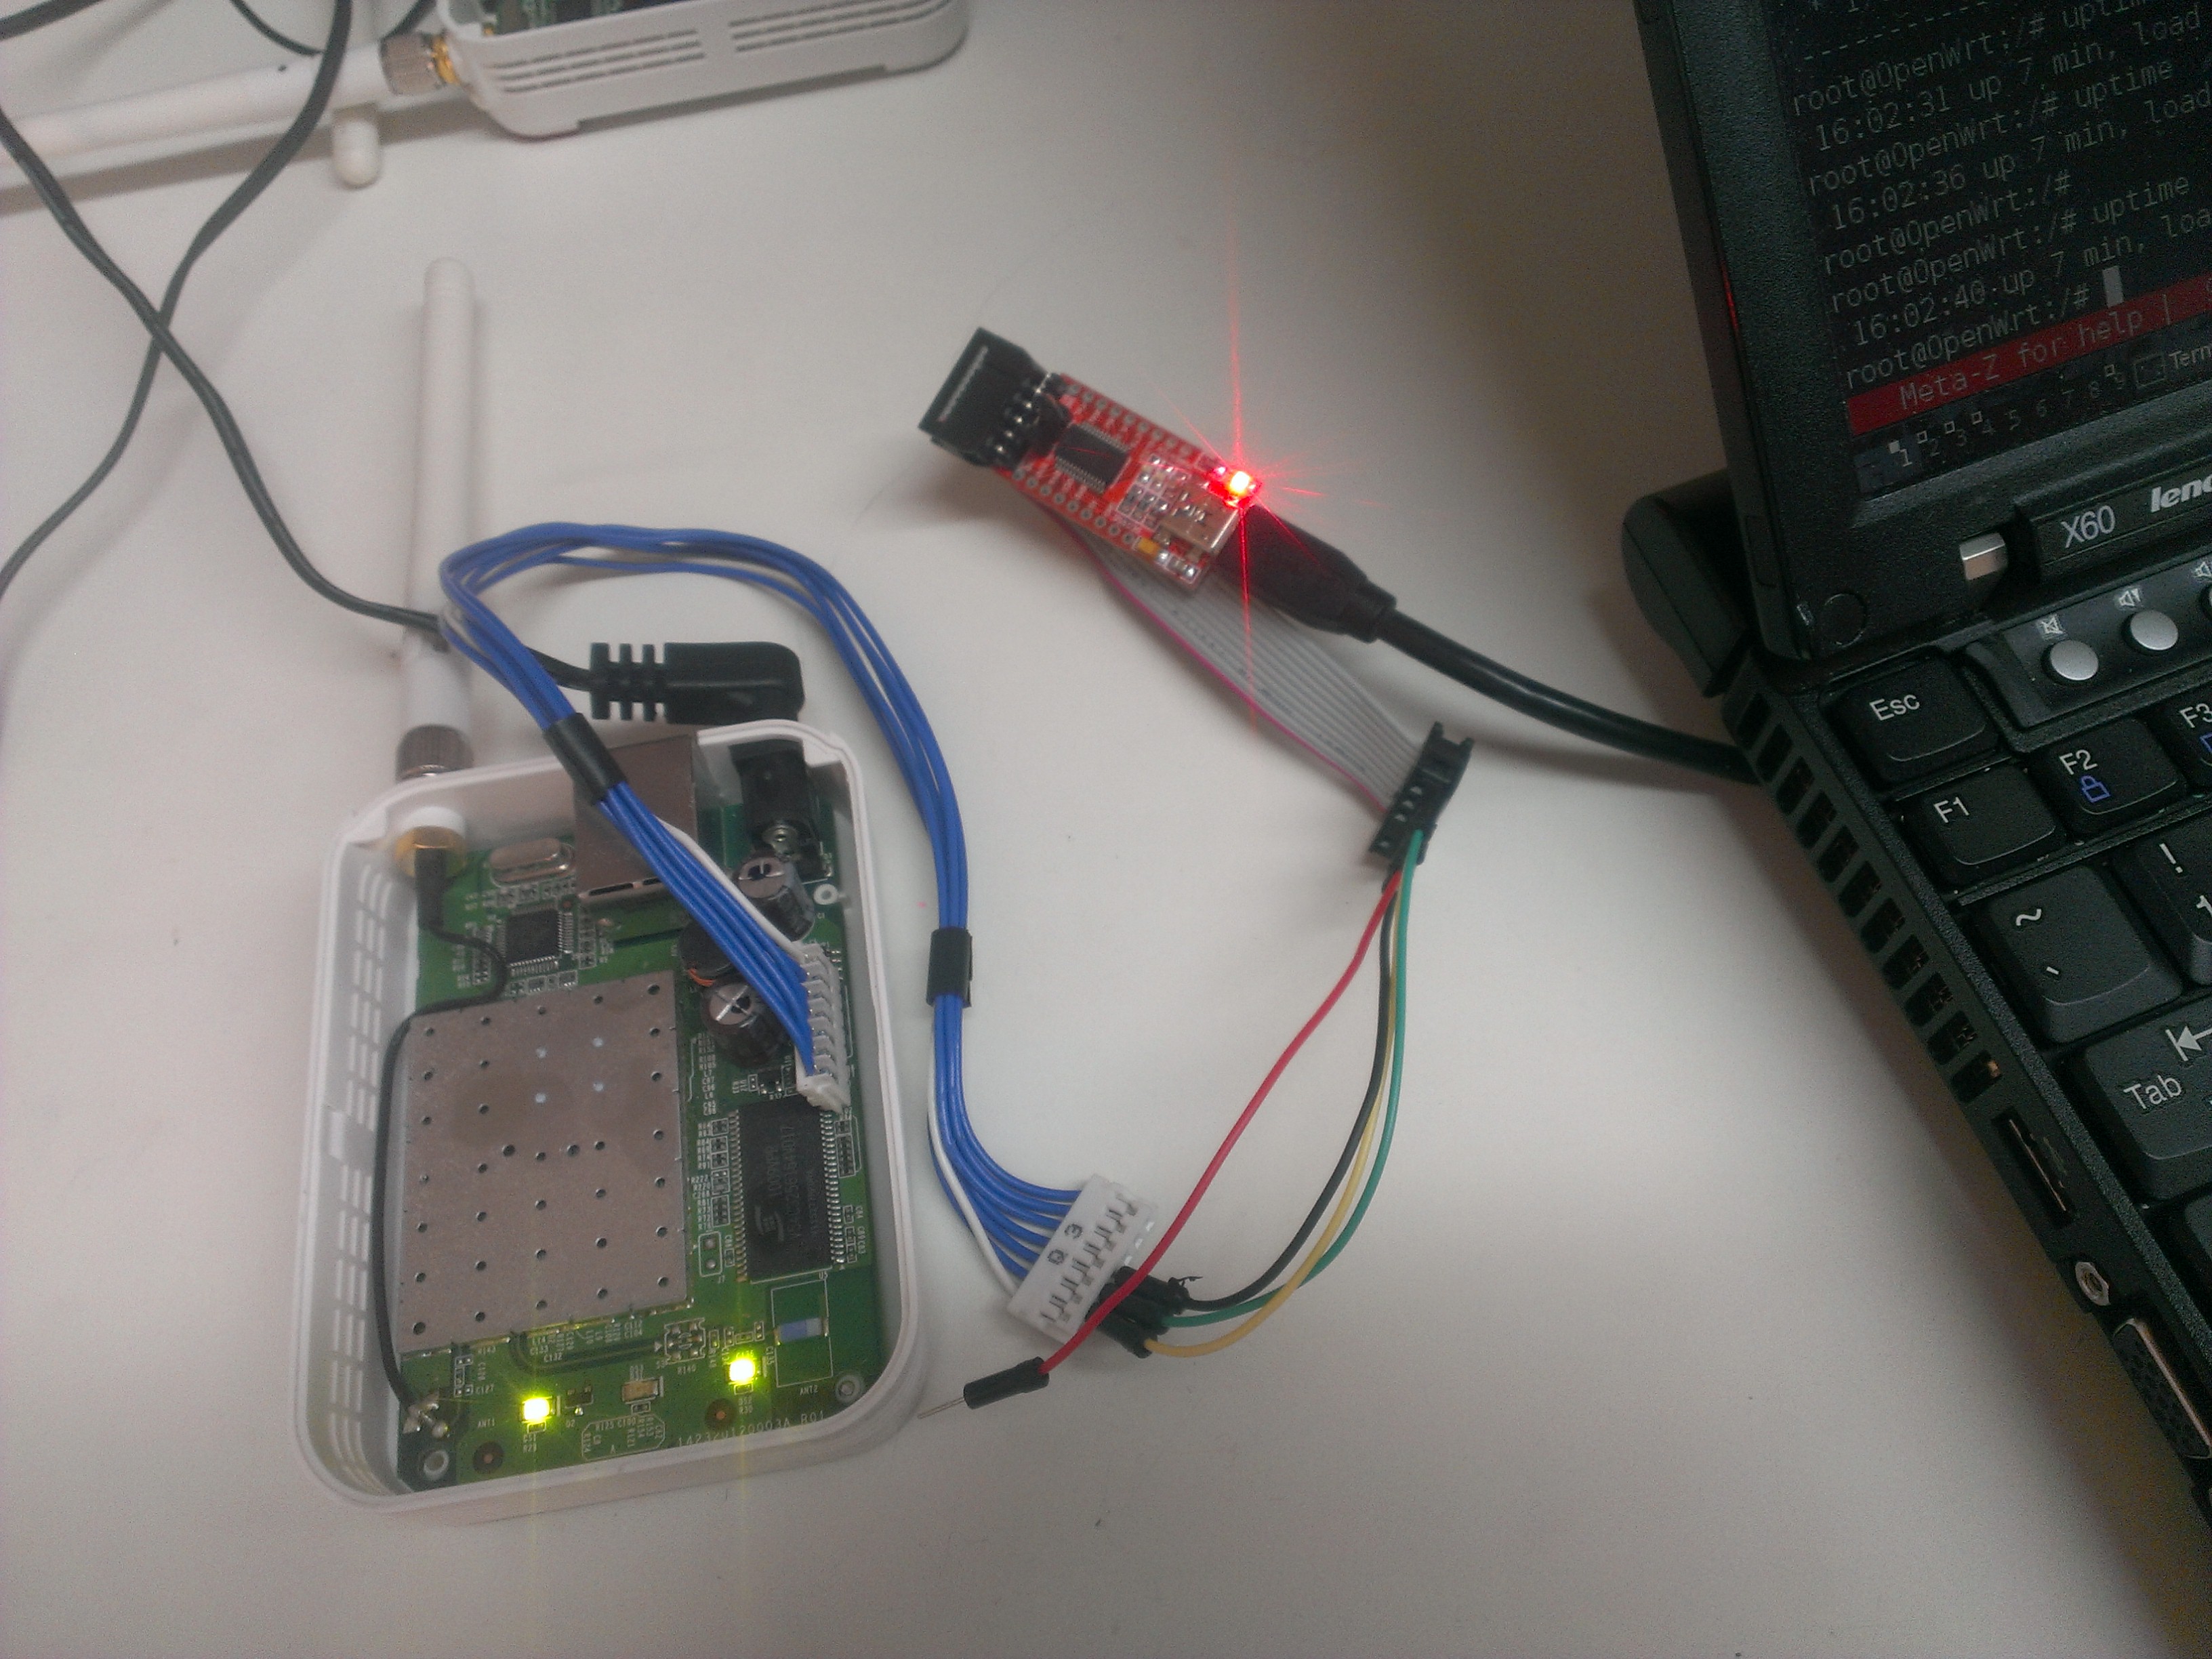
I have many open-mesh OM1P units laying around from failed wireless projects. Needless to say I’m not a big fan of open-mesh and have some other projects in mind for this hardware. It was a painful process but well worth it. Now I have nice little OpenWRT units for any hacking pleasure.
I have made a concise synopsis of the openwrt wiki page for flashing proper firmware on the OM1p/Fon/Fonera/Accton/etc. Please visit http://wiki.openwrt.org/toh/fon/fonera#openwrt for more detail.
download linux onto the om1p:
RedBoot> load -r -b %{FREEMEMLO} openwrt-atheros-vmlinux.lzma
Using default protocol (TFTP)
Raw file loaded 0x8003f800-0x8011f7ff, assumed entry at 0x8003f800
initialize the current flash partition, this will erase openmesh firmware, yay!:
RedBoot> fis init
About to initialize [format] FLASH image system - continue (y/n)? y
*** Initialize FLASH Image System
... Erase from 0xa87e0000-0xa87f0000: .
... Program from 0x80ff0000-0x81000000 at 0xa87e0000: .
Now flash the kernel image to memory:
RedBoot> fis create -e 0x80041000 -r 0x80041000 vmlinux.bin.l7
... Erase from 0xa8030000-0xa8110000: ..............
... Program from 0x8003f800-0x8011f800 at 0xa8030000: ..............
... Erase from 0xa87e0000-0xa87f0000: .
... Program from 0x80ff0000-0x81000000 at 0xa87e0000: .
Now load the rootfs:
RedBoot> load -r -b %{FREEMEMLO} openwrt-atheros-root.squashfs
Using default protocol (TFTP)
Raw file loaded 0x8003f800-0x8021f7ff, assumed entry at 0x8003f800
And then flash the rootfs:
RedBoot> fis create rootfs
... Erase from 0xa8110000-0xa82f0000: ..............................
... Program from 0x8003f800-0x8021f800 at 0xa8110000: ..............................
... Erase from 0xa87e0000-0xa87f0000: .
... Program from 0x80ff0000-0x81000000 at 0xa87e0000: .
Reboot the om1p:
RedBoot> reset
You will see OpenWRT booting and creating filesystems and such.
...
jffs2_scan_eraseblock(): End of filesystem marker found at 0x0
jffs2_build_filesystem(): unlocking the mtd device... done.
jffs2_build_filesystem(): erasing all blocks after the end marker... done.
mini_fo: using base directory: /
mini_fo: using storage directory: /overlay
BusyBox v1.15.3 (2011-11-24 02:38:24 CET) built-in shell (ash)
Enter 'help' for a list of built-in commands.
  _______                     ________        __
 |       |.-----.-----.-----.|  |  |  |.----.|  |_
 |   -   ||  _  |  -__|     ||  |  |  ||   _||   _|
 |_______||   __|_____|__|__||________||__|  |____|
          |__| W I R E L E S S   F R E E D O M
 Backfire (10.03.1, r29592) ------------------------
  * 1/3 shot Kahlua    In a shot glass, layer Kahlua
  * 1/3 shot Bailey's  on the bottom, then Bailey's,
  * 1/3 shot Vodka     then Vodka.
 ---------------------------------------------------
root@OpenWrt:/#
Now we need to set a heartbeat for the hardware watchdog otherwise the om1p reboots every 5 minutes.
==== key signing ====
You can host the certificate authority on the vyos device itself. This is obviously not as secure as hosting it on a separate system. If someone was to get into the vyos they would have access to all your keys and would be able to sign new keys against the CA. Nonetheless, it is convenient and secure-enough for many sites. This is how it can be done.
From the VyOS, copy the easy-rsa directory into /config, where it won’t get lost on an upgrade.
cp -rv /usr/share/doc/openvpn/examples/easy-rsa/2.0/ /config/easy-rsa2
vi /config/easy-rsa2/vars
edit the options at the bottom of /config/easy-rsa2/vars to personalize them. Increasing KEY_SIZE to 2048 is recommended. Also, you can increase the certificate authority and key expiration. These are the defaults:
 ...
# Increase this to 2048 if you
# are paranoid.  This will slow
# down TLS negotiation performance
# as well as the one-time DH parms
# generation process.
export KEY_SIZE=1024

# In how many days should the root CA key expire?
export CA_EXPIRE=3650

# In how many days should certificates expire?
export KEY_EXPIRE=3650

export KEY_COUNTRY="US"
export KEY_PROVINCE="CA"
export KEY_CITY="SanFrancisco"
export KEY_ORG="Fort-Funston"
export KEY_EMAIL="me@myhost.mydomain"
now load the variables
$ cd /config/easy-rsa2/
$ source ./vars
start fresh in case there is something old lingering around in there. This will delete all keys, etc.
Now you can build the key for the client and distribute to them
use ./build-key to generate a certificate that will connect to the vpn without a pass-phrase and ./build-key-pass if you want the user to enter a pass-phrase before connecting. ./build-key-pass is more secure in case someone steals your certificate and key they will still need to enter a password to connect.
$ ./build-key jimmy
answer all questions accordingly and be sure to answer yes to “Sign the certificate?” the “1 out of 1 certificate requests certified, commit?”
Now copy the keys and certs and create a config for Jimmy to remote in with. This is how I do it.
first make a directory for the client in /config/easy-rsa2/keys
cd /config/easy-rsa2/keys
mkdir jimmy
cp jimmy* jimmy/
cp ca.crt jimmy/
create a client config with your favorite text editor,
vi jimmy/jsvpnserver.ovpn
and add the following
client
proto udp
remote-cert-tls server
verb 2
dev tun0
cert jimmy.crt
key jimmy.key
ca ca.crt
remote [vpn-server host or ip] 1194
From your local computer download the config directory (jimmy) from the vpn server
this copies the jimmy directory into the current directory on your computer (the period designates current directory). If your on MS Windows you will need to use cygwin or putty-scp to do this. Also, if using MS Windows you will need to run unix2dos on those files
from your computer where you downloaded the jimmy folder to.
The server subnet needs to be a different subnet from your LAN. Set it to something unique that will be unlikely on any remote networks your clients will be on.
The “–push route 10.101.101.0 255.255.255.0” needs to be changed to the subnet on the LAN of the router. The one you will VPN in to access.
set interfaces openvpn vtun0 mode server
set interfaces openvpn vtun0 server subnet 10.206.109.0/24
set interfaces openvpn vtun0 server name-server 10.101.101.1
set interfaces openvpn vtun0 server domain-name jasonschaefer.com
set interfaces openvpn vtun0 server push-route 10.101.101.0/24
set service dns forwarding listen-on vtun0
set interfaces openvpn vtun0 tls cert-file /config/auth/js-server.crt
set interfaces openvpn vtun0 tls key-file /config/auth/js-server.key
set interfaces openvpn vtun0 tls ca-cert-file /config/auth/ca.crt
set interfaces openvpn vtun0 tls dh-file /config/auth/dh1024.pem
#Set the firewall to allow openvpn through
set firewall name wan-local rule 40 action accept
set firewall name wan-local rule 40 destination port openvpn
set firewall name wan-local rule 40 protocol udp
commit
save
Thats it! Your done!
STATIC CLIENT ADDRESS
The static ip address for each client is done with this command:
set interfaces openvpn vtun0 server client leroy ip 10.206.109.123
The name “leroy” is the Common Name of the certificate. After this is committed leroy will receive .123 on his laptop each time he connects to the vpn.
ROUTING VARIOUS LAN’s OVER VPN
The routing between a remote LAN (iroute) is done like this:
set interfaces openvpn vtun0 server client leroyhome ip 10.206.109.0.3
set interfaces openvpn vtun0 server client leroyhome subnet 10.101.103.0/24
The “subnet” option is openvpn’s internal route (iroute) function. This tells openvpn what the remote LAN subnet is. In this example, 10.101.103.0/24 is leroys house LAN.
Now you can add a static route in order to route to this remote LAN.
set protocols static route 10.101.103.0/24 next-hop 10.206.109.1
10.206.109.1 is the openvpn routers interface vtun0 ip address.
If your designing a network with multiple remote sites its convenient to make their addresses contiguous and route to them all with a single route.
active site files in /config/auth/
ca.crt,
site2site_active.key,
site2site_active.crt
passive site files in /config/auth/
ca.crt,
site2site_server-passive.key,
site2site_server-passive.crt,
dh1024.pem
==================
#site to site openvpn
set interfaces openvpn vtun9
set interfaces openvpn vtun9 local-address 172.16.9.[1 | 2]
set interfaces openvpn vtun9 remote-address 172.16.9.[1 | 2]
set interfaces openvpn vtun9 remote-host [remote-vpn-host]
#standard openvpn port is 1194, best used for client/server mode. prevents ovpn config from needing port setting
set interfaces openvpn vtun9 local-port 1195
set interfaces openvpn vtun9 remote-port 1195
set interfaces openvpn vtun9 mode site-to-site
set interfaces openvpn vtun9 tls ca-cert-file /root/ca.crt
#the passive site cert/key needs to be signed as a server!
set interfaces openvpn vtun9 tls key-file /root/[passive.key | active.key ]
set interfaces openvpn vtun9 tls cert-file /root/[passive.crt | active.crt]
set interfaces openvpn vtun9 tls role [active | passive]
#dh1024.pem is required on passive host only!
set interfaces openvpn vtun9 tls dh-file /root/dh1024.pem
commit;save
#open firewall for openvpn
set firewall name wan-local rule 20 action accept
set firewall name wan-local rule 20 destination port 1195
set firewall name wan-local rule 20 protocol tcp_udp
#set static routes to networks on other side of vpn, if any
set protocols static route 192.168.7.0/24 next-hop 172.16.9.[1 | 2]
set protocols static route 192.168.8.0/24 next-hop 172.16.9.[1 | 2]
commit;save
DYNAMIC DNS
How to reach your vpn server and avoid using a static ip. We will be using afraid.org to automatically update a hostname’s A record with the public ip of your Vyos VPN server.
You will need to register for an account at https://freedns.afraid.org. Then create a subdomain, for this example it will be myvpnserver.mooo.com. Go to the “Dynamic DNS” section and copy the “Direct URL”.
Create a script under /config/scripts on your Vyos. vi /config/scripts/myvpnserver.mooo.com.sh
#!/bin/bash

/usr/bin/curl -k [paste your direct url here]
Make it executable chmod 755 /config/scripts/myvpnserver.mooo.com.sh
Now tell Vyos to run this with cron. set system task-scheduler task dynamicDNS executable path /config/scripts/myvpnserver.mooo.com.sh
set system task-scheduler task dynamicDNS interval 15m
REVOKE KEYS ON VYOS
vyos@router:~$ cd /config/easy-rsa2/
vyos@router:/config/easy-rsa2$ ./revoke-full jimmy
Using configuration from /config/easy-rsa2/openssl.cnf
Revoking Certificate 0E.
Data Base Updated
Using configuration from /config/easy-rsa2/openssl.cnf
jimmy.crt: /C=US/ST=NM/L=SantaFe/O=Blah/CN=jimmy/emailAddress=jimmy@localhost.local
error 23 at 0 depth lookup:certificate revoked
The error 23 at 0 … is normal and expected.
Now copy the updated CRL (certificate revocation list) to /config/auth vyos@router:/config/easy-rsa2$ cp keys/crl.pem /config/auth/
If this is the first revocation you need to add it to the config as well:
vyos@router:~$ configure vyos@router# set interfaces openvpn vtun0 tls crl-file /config/auth/crl.pem vyos@router# save; commit; exit
Saving configuration to ‘/config/config.boot’…
Done
No configuration changes to commit
exit
VERIFY REVOKED CERTIFICATES
You can verify the revoked keys with the openssl command vyos@router:~$ openssl crl -in /config/auth/crl.pem -text
…
Revoked Certificates:
    Serial Number: 08
        Revocation Date: Jan 30 00:19:24 2016 GMT
    Serial Number: 0E
        Revocation Date: Jul 13 22:51:50 2016 GMT
…
In the above example keys 08 and 0E have been revoked vyos@router:~$ cat /config/easy-rsa2/keys/index.txt
…
V	230804225528Z		        02	unknown	/C=US/ST=NM/L=SantaFe/O=SITC/CN=jason/emailAddress=jason@local
R	230806213443Z	160130001924Z	08	unknown	/C=US/ST=NM/L=SantaFe/O=Blah/CN=john/emailAddress=john@localhost
R	260711225142Z	160713225150Z	0E	unknown	/C=US/ST=NM/L=SantaFe/O=Blah/CN=jimmy/emailAddress=jimmy@localhost.local
…
From this file index.txt, you can ascertain which serial numbers belong to which users!
After lots of laborious manual installs and much motivation from my buddy Damian of Mindshare, I decided to write a little script to quickly install and setup a typical environment for WordPress.
This script does the following:
– install apache, php and mysql
– activate typical apache modules
– create directories
– download and un-tar WordPress
– set permissions for wordpress doc root et al
– create database, user, pass and grant to db.
– auto setup typical VirtualHost site file in apache for both http and https
– generate a self signed certificate
Here is the bash script -> http://jasonschaefer.com/stuff/setupwp.sh.txt
download, rename, and chmod 755 and run it like so “./setupwp.sh hostname”
Be sure to understand what the script is doing before you run it :-)
This outlines a typical VPN implementation with server, clients and routing. Using Attitude Adjustment 12.09. Although, this should work on any new version of OpenWRT. Last tested on version 17.
Start by ssh’ing into the router and installing packages.
Create a “openvpnconfig” directory under config and move the easy-rsa directory into it. The nice thing about this setup is that backups will include all openvpn relevant files automatically, because they are under /etc/config/
root@myWRT:~# mkdir /etc/config/openvpnconfig
root@myWRT:~# mv /etc/easy-rsa/ /etc/config/openvpnconfig/
root@myWRT:~# cd /etc
root@myWRT:~# ln -s config/openvpnconfig/easy-rsa
(this creates a relative symlink)
== CERTIFICATE AUTHORITY FOR OPENVPN ==
edit the following or don’t if you want to enter it manually on certificate creation.
At the end of the /etc/easy-rsa/vars file:
# These are the default values for fields
# which will be placed in the certificate.
# Don't leave any of these fields blank.
export KEY_COUNTRY="US" <-*edit*
export KEY_PROVINCE="CA" <-*edit*
export KEY_CITY="SanFrancisco" <-*edit*
export KEY_ORG="Fort-Funston" <-*edit*
export KEY_EMAIL="me@myhost.mydomain"
export KEY_EMAIL=mail@host.domain
export KEY_CN=changeme <-*edit - servers hostname*
export KEY_NAME=changeme
export KEY_OU=changeme
export PKCS11_MODULE_PATH=changeme
export PKCS11_PIN=1234
root@myWRT:~# clean-all (run this to ensure your starting with a clean slate)
root@myWRT:~# build-ca
root@myWRT:~# build-dh (very slow.. this can be run elsewhere and copied over to the openwrt vpn server **)
root@myWRT:~# build-key-server server (don’t set a challenge password, Answer yes to sign the certificate and yes to commit.)
** building diffie hellman “build-dh” on a fast computer and copying to slow router/computer:
run ps while you are running build-dh to see what command is being used. 12158 root 3304 R openssl dhparam -out /etc/easy-rsa/keys/dh2048.pem 2048
don’t forget to ctrl + c your build-dh command
now go to your fast laptop:
jason@laptop:~$ openssl dhparam -out dh2048.pem 2048
jason@laptop:~$ scp dh2048.pem root@10.11.13.1:/etc/config/openvpnconfig/easy-rsa/keys
Moving on to the config files:
Instead of using UCI syntax we can break this out to be more openvpn standard and troubleshooting friendly. Also, I have added the ability to set static ip’s for the openvpn clients.
== OPENVPN SERVER CONFIG ==
Overwrite /etc/config/openvpn with the following config
The following is the openvpn server config (which is called by /etc/config/openvpn) in /etc/config/openvpnconfig/openvpnWRT.conf
float
port 1194
proto udp
dev tun
comp-lzo yes
cipher AES-256-CBC
tls-version-min 1.2
tls-cipher TLS-DHE-RSA-WITH-AES-256-GCM-SHA384:TLS-DHE-RSA-WITH-AES-256-CBC-SHA256:TLS-DHE-RSA-WITH-AES-128-GCM-SHA256

dh   easy-rsa/keys/dh2048.pem
ca   easy-rsa/keys/ca.crt
key  easy-rsa/keys/server.key
cert easy-rsa/keys/server.crt
#crl-verify /etc/config/openvpnconfig/easy-rsa/keys/crl.pem
ifconfig-pool-persist /tmp/ipp.txt
client-config-dir clients
status /var/log/openvpn-status.log

##Don't enable unless you disable all static ip options below#
#server [10.10.84.0 255.255.255.0]

##begin VPN options for static ip mode (mode server)##
mode server
tls-server
topology subnet
push "topology subnet"
ifconfig 10.11.14.1 255.255.255.0
route-gateway 10.11.14.1
push "route-gateway 10.11.14.1"
ifconfig-pool 10.11.14.10 10.11.14.254 255.255.255.0
##end VPN options for static ip##

##general LAN options##
push "route 10.11.13.0 255.255.255.0"
push "dhcp-option DOMAIN lan.local"
push "dhcp-option DNS 10.11.13.1"
client-to-client

mute 5
log /tmp/openvpn.log
verb 5

keepalive 10 120
persist-key
persist-tun
If you want to enable the static client ip assignments, be sure to uncomment the client-config-dir above and make a directory as such.
root@myWRT:~# mkdir /etc/config/openvpnconfig/clients
write a file inside the clients directory with the same name as the “common name” of the openvpn client certificate.
For example, /etc/config/openvpnconfig/clients/jason ifconfig-push 10.11.13.123 255.255.255.0
This will reserve 10.11.13.123 for user jason.
Enable and start the service:
root@myWRT:~# /etc/init.d/openvpn enable
root@myWRT:~# /etc/init.d/openvpn restart
check for errors
root@myWRT:~# cat /tmp/openvpn.log
Sometimes its helpful to run it by hand, for troubleshooting.
root@myWRT:~# cd /etc/config/openvpnconfig/
root@myWRT:~# openvpn openvpnWRT.conf
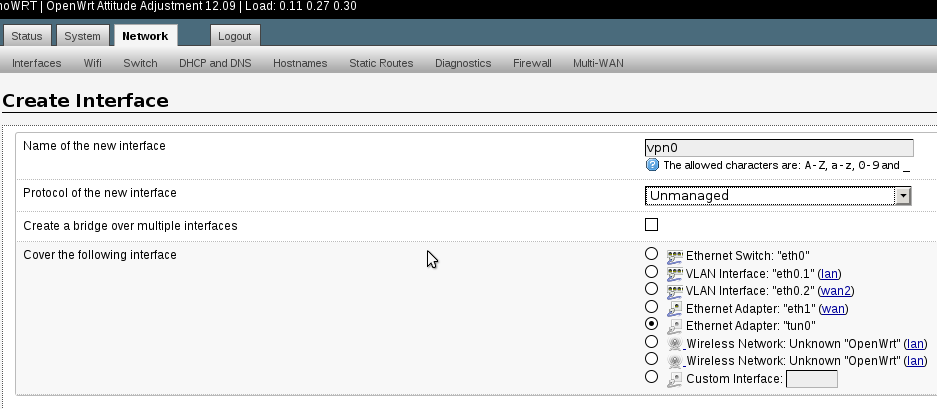
== NETWORKING SETUP ==
Now lets setup the tun interface so that we can add zones
in /etc/config/network or in LuCI.
config interface 'vpn0'
	option proto 'none'
	option ifname 'tun0'
== FIREWALL ZONE ==
Create a zone called openvpn_zone with vpn0 network.
in /etc/config/firewall
config zone
	option input 'ACCEPT'
	option output 'ACCEPT'
	option name 'openvpn_zone'
	option network 'vpn0'
	option forward 'REJECT'
We now explicitly declare the forwards like this.
openvpn_zone to lan zone allow
config forwarding
	option dest 'lan'
	option src 'openvpn_zone'
openvpn_zone to wan allow, if you want openvpn clients to use the wan for example if using redirect-gateway
config forwarding
	option dest 'wan'
	option src 'openvpn_zone'
openvpn_zone to lan allow
config forwarding
	option dest 'openvpn_zone'
	option src 'lan'
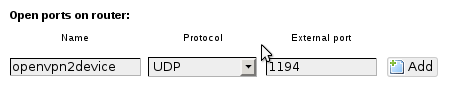
== FIREWALL TRAFFIC RULE ==
Allow the openvpn server to accept connections from clients out in the world.
config rule
	option target 'ACCEPT'
	option src 'wan'
	option proto 'udp'
	option dest_port '1194'
	option name 'openvpn2device'
	option enabled '0'
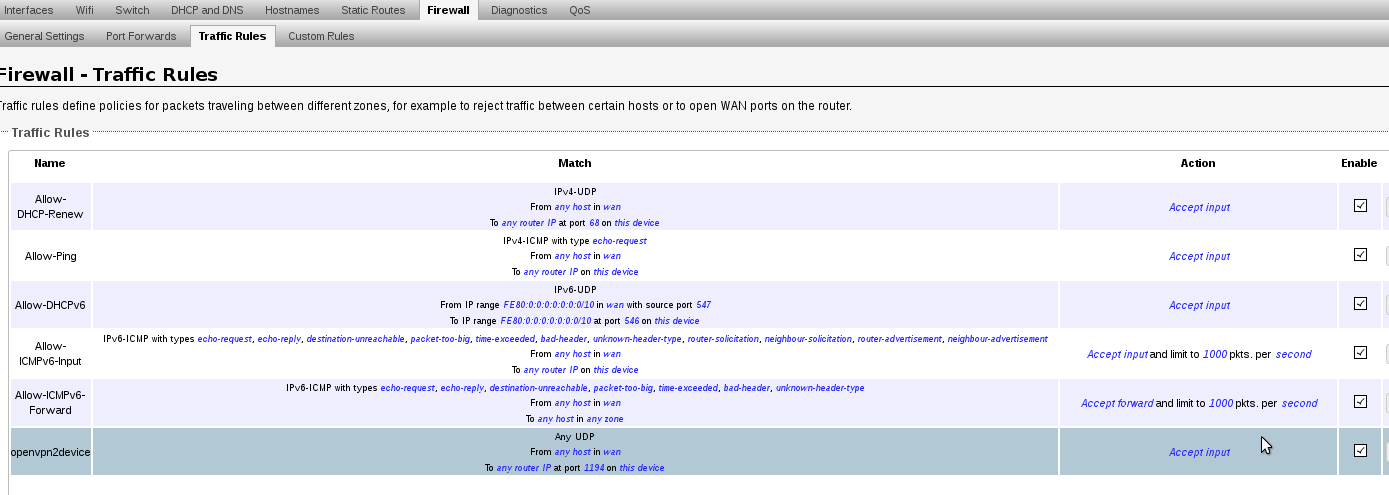
An overview of traffic rules
** NOTE: Occasionally, I have had to reboot for the above zone’s to work **
== Optional firewall rules to use, instead of using the zones. Not recommended ==
in /etc/firewall.user
# This file is interpreted as shell script.
# Put your custom iptables rules here, they will
# be executed with each firewall (re-)start.

# Allow all traffic in and out of the tun interface.
iptables -A input_rule      -i tun+ -j ACCEPT
iptables -A output_rule     -o tun+ -j ACCEPT
# This rule will allow traffic towards internet from tun
iptables -A forwarding_rule -i tun+ -j ACCEPT
iptables -A forwarding_rule -o tun+ -j ACCEPT
== USER CONFIGURATION ==
root@myWRT:~# build-key jason
or you can run build-key-pass to issue a key that asks the user to enter the password before it is used (more secure).
Once you have completed the build-key, being sure to answer yes to signing the certificate and commit.
Now you need to get the keys for jason and the ca.crt (not ca.key!). Each client needs these files to connect.
You can secure copy them to your computer similar to this:
root@myWRT:~# scp /etc/config/openvpnconfig/easy-rsa/keys/jason.* you@[your computer]:jason-vpn
root@myWRT:~# scp /etc/easy-rsa/keys/ca.crt you@[your computer]:jason-vpn
Then create the client config in the same directory as the crt’s and keys. Call it jason.ovpn and place it in our jason-vpn directory. This is what you will populate jason.ovpn with:
nobind
float
comp-lzo
cipher AES-256-CBC
dev tun
remote [your-server-name] 1194 udp
client
tls-exit
ca ca.crt
cert jason.crt
key jason.key
remote-cert-tls server
mute 5
resolv-retry infinite
#explicit-exit-notify
keepalive 10 60
ping-timer-rem
persist-tun
persist-key
#redirect-gateway def1
Test the server by connecting from off-site.
cd into your local config directory where your certs, keys and .ovpn config are. sudo openvpn jason.ovpn
enter your sudo password
You should see something like this at the end of the openvpn output:
Fri Feb 28 22:19:01 2014 /sbin/ifconfig tun0 10.11.14.4 netmask 255.255.255.0 mtu 1500 broadcast 10.11.14.255
Fri Feb 28 22:19:01 2014 /sbin/route add -net 10.11.13.0 netmask 255.255.255.0 gw 10.11.13.1
Fri Feb 28 22:19:01 2014 Initialization Sequence Completed
and you will see a newly built tun interface
# ip a

38: tun0:  mtu 1500 qdisc pfifo_fast state UNKNOWN qlen 100

    link/none

    inet 10.11.14.4/24 brd 10.11.14.255 scope global tun0

       valid_lft forever preferred_lft forever
and the correct route has been pushed to you
root@myWRT:~# ip r
10.11.13.0/24 via 10.11.13.1 dev tun0
== REVOKING A USERS KEY ==
uncomment the following line in /etc/config/openvpnconfig/openvpnWRT.conf: crl-verify /etc/config/openvpnconfig/easy-rsa/keys/crl.pem
run “revoke-full” with users key as argument:
revoke-full [key-to-revoke]
or run my script easyrsa-user-setup-openwrt.sh [username] revoke
then restart the vpn service so changed take effect:
root@myWRT:~# /etc/init.d/openvpn restart
Let me know in the comments or use the contact form if you find errors or need clarification. This is a concise tutorial and might need some clarification.
In this scenario we will be implementing a openWRT as a wireless access point only. One wireless essid will be LAN accessible and the other will be segregated from the LAN but able to access the WAN. The openWRT in this example will not be the gateway to the network. Another device is the gateway and there is an existing dhcp server.
                            PUBLIC wifi
                         172.16.134.0/24
                                  |
                     public gateway and dhcp server
                            172.16.134.1
                                  \
                   Source NAT to 10.101.101.10
                                              \
ISP <-Gateway-> LAN wired 10.101.101.0/24 <-openWRT->
                                              /
                           LAN wifi (wpa2+aes)
                           10.101.101.0/24
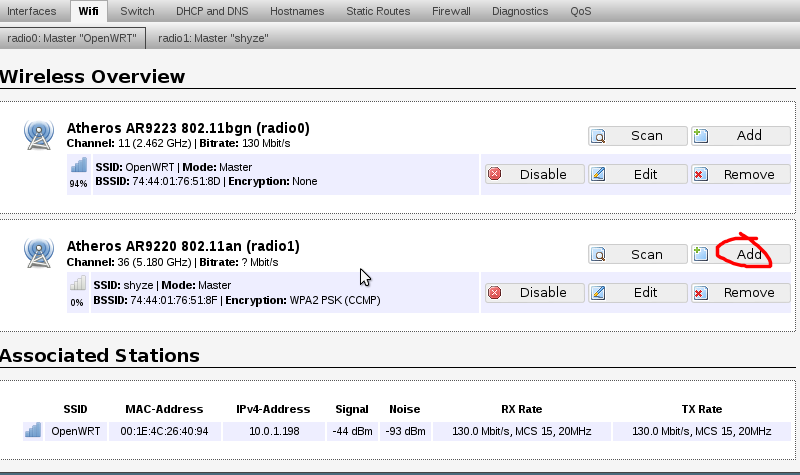
1. Add a new wireless access point
2. Settings for the new wireless access point. Create a new network interface of “public”. Don’t use any encryption, as this is for general public use.
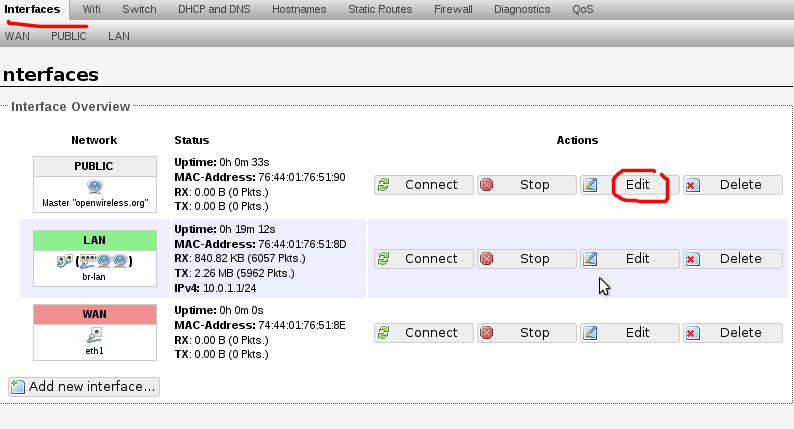
3. Edit network interface for the public network
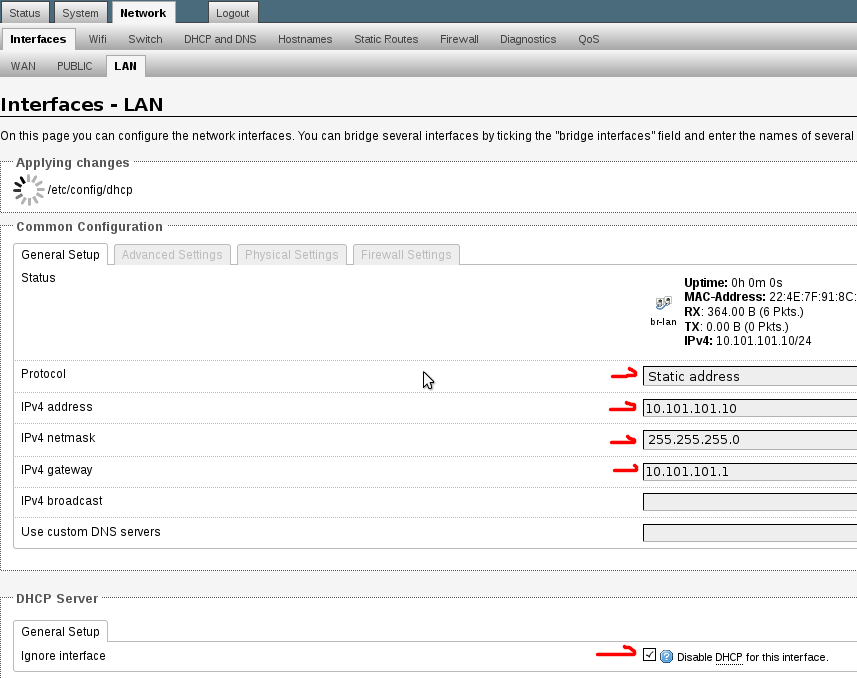
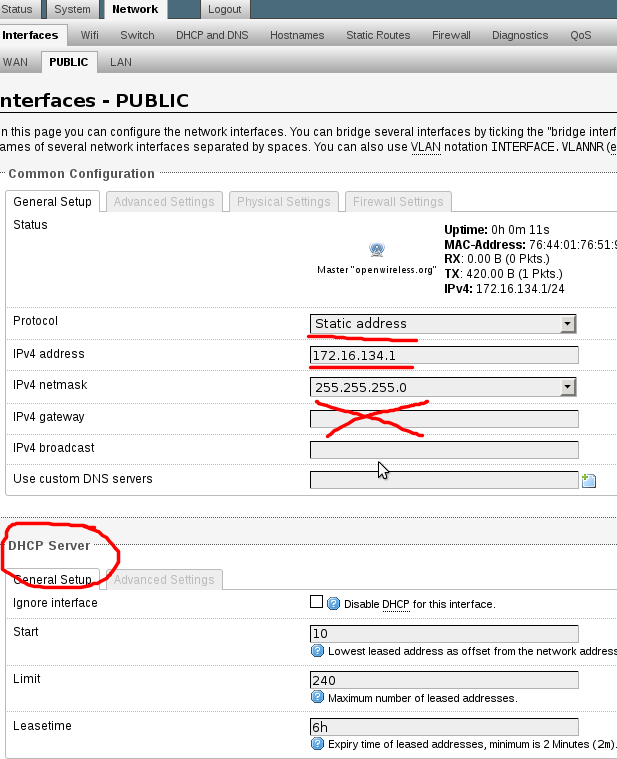
4. Edit PUBLIC interface settings. Set to static address and enable DHCP server for this new network.
5. Edit the LAN interface. Set the lan interface to an un-used ip of the existing network. Don’t set to “dhcp client” as you will lose connectivity and need to perform a recovery on your openwrt device. Be sure to disabled the DHCP server as the existing network already has one.
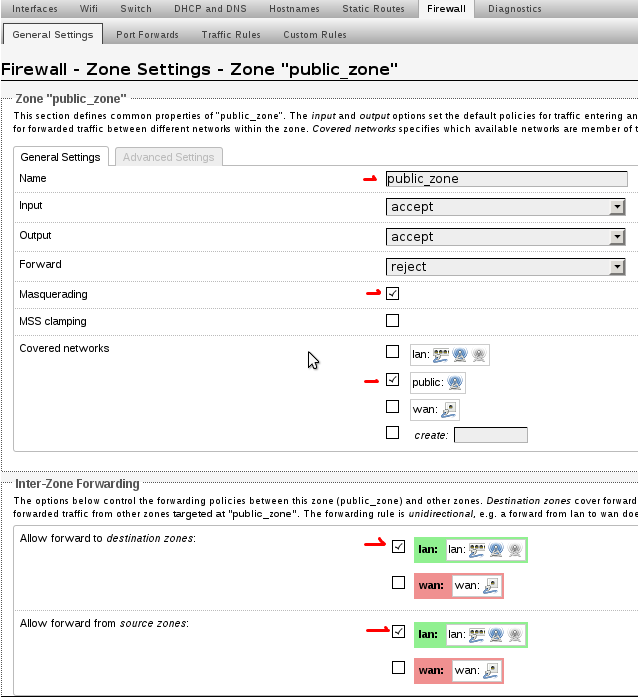
6. Add a new zone and call it “public_zone”. Masquarade it and put it in the public network. Allow forwarding to and from “lan” zone. We will limit this later with specific firewall rules.
7. This is what the general firewall zones should look like
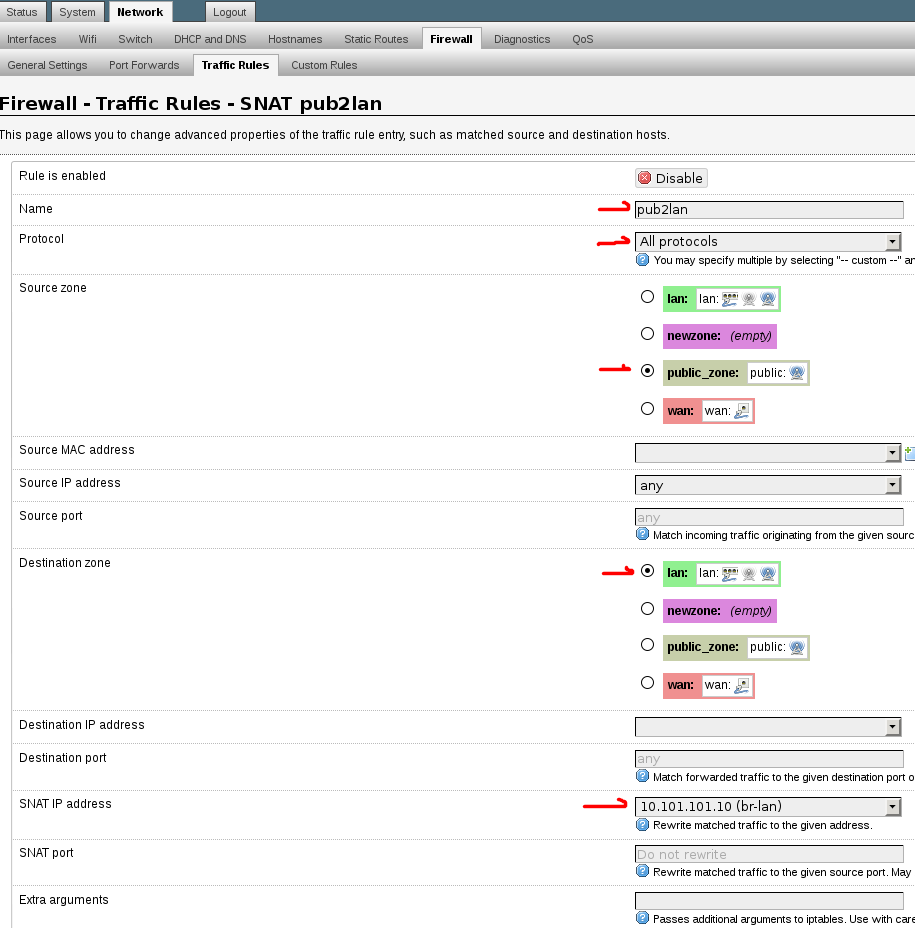
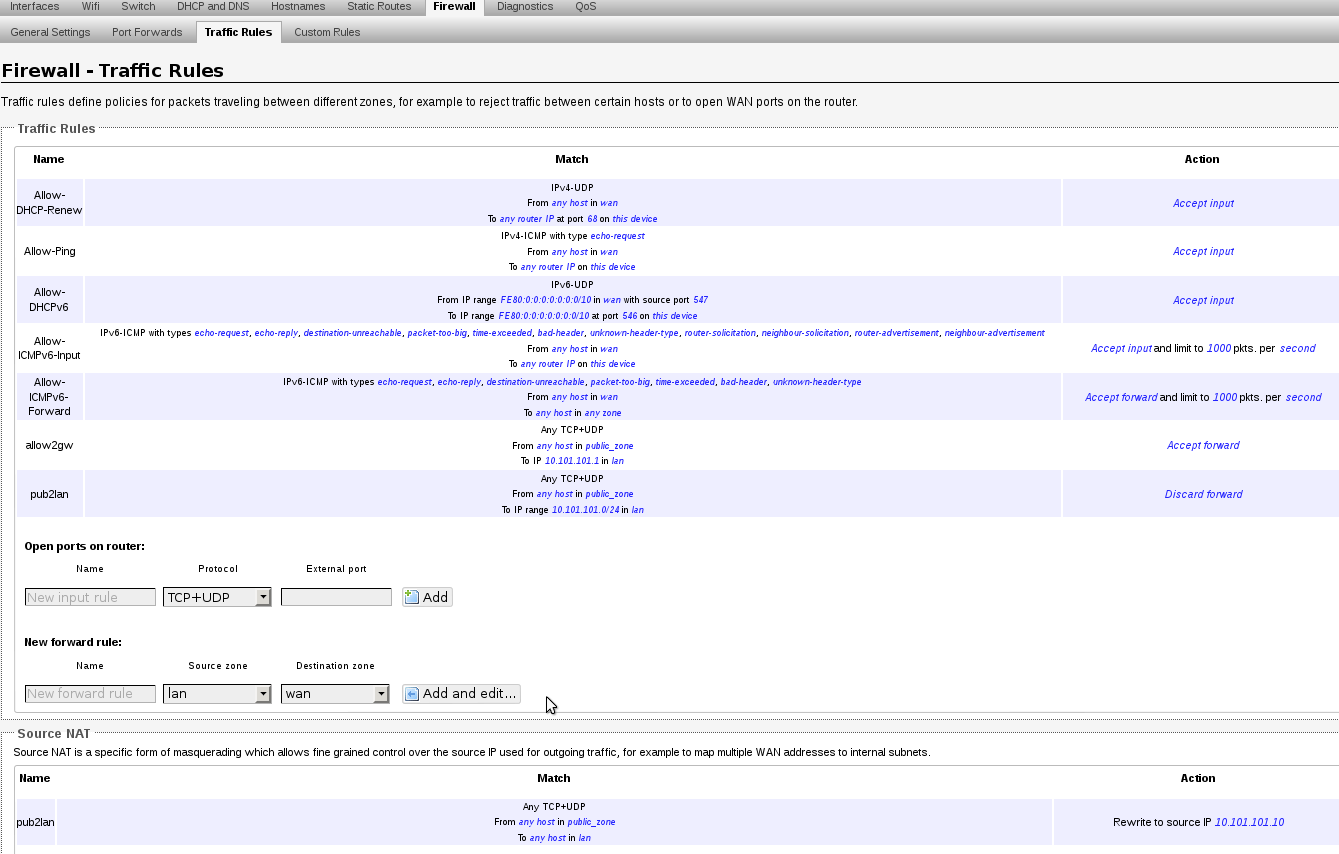
8. Under the Firewall -> Traffic Rules section add a new Source NAT Rule. Call it “pub2lan“. Set the “Source zone” to “public_zone” and the “Destination zone” to “lan” and set the drop down option “To source IP” to br-lan interface, in this example its 10.101.101.10. Leave “To source port” blank. This SNAT rule will translate all traffic on the public wireless network of 172.16.134.0/24 into the IP of 10.101.101.10. This is the redirect rule from /etc/config/firewall
config redirect
option target 'SNAT'
option src 'public_zone'
option dest 'lan'
option proto 'all'
option name 'pub2lan'
option src_dip '10.101.101.10'
option enabled '1'
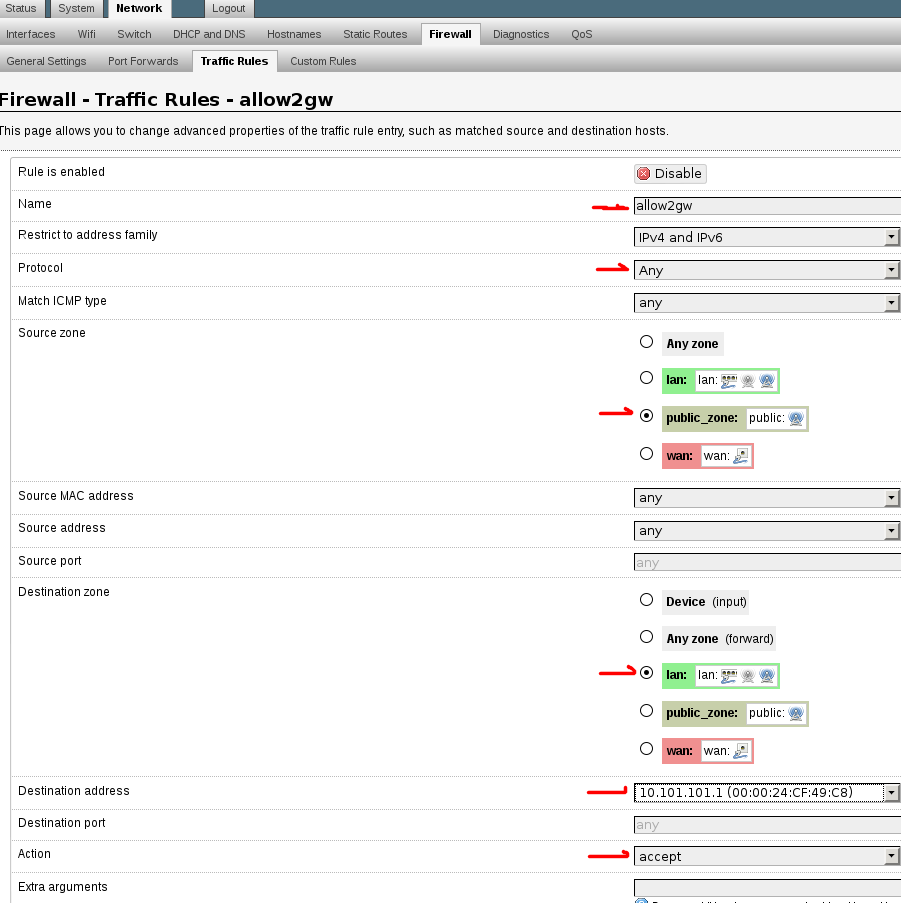
9. Setup a “New forward rule:” Set name to allow2gw or similar. Source zone to “public_zone” Destination zone to “lan” Click “Add and edit…” Protocols should be “Any”, Destination address is the gateway of the network. In this case 10.101.101.1. The following is the /etc/config/firewall rule for reference. This will allow traffic from the public_zone to reach the gateway of the network.
config rule
option target 'ACCEPT'
option proto 'all'
option name 'allow2gw'
option src 'public_zone'
option dest 'lan'
option dest_ip '10.101.101.1'
10. Setup a “New forward rule”. Set the name to drop2lan or similar. Set the Source zone to “public_zone” and Destination zone to “lan”. Click “Add and edit…” Set Protocol to “Any”, Destination address to custom and enter the subnet of the LAN. In this case its 10.101.101.0/24, set “Action” to “drop”. You can add more rules like this one to limit access to other networks or hosts as needed.
config rule
option name 'drop2lan'
option src 'public_zone'
option proto 'all'
option target 'DROP'
option dest 'lan'
option dest_ip '10.101.101.0/24'
11. Firewall Traffic Rule overview. There is an error on this view. The following rules have “option proto ‘all’” set and the luci web interface shows “Any TCP+UDP”. This is simply a bug in the luci interface and can be ignored. The order of these rules is very important. In this case you can see we added the “Allow to 10.101.101.1” before the “Drop to 10.101.101.0/24”. If reversed, the lan including the gateway would not be accessible from the public wireless AP. Therefore, you would not be able to reach the Internet.
In this post I will outline how to use zones to create public firewalled networks. A device that can bring up multiple interfaces per radio is very attractive here. One essid for private wireless and another for open public wireless. The Atheros ath9k chipsets are very well supported in this regard because they are free software.
This post is different than my older post where we have a private LAN behind our WAN interface that we need to protect… In this scenario we have our ISP connected directly to the openWRT WAN port and we need to bring up a public wireless that is segregated from the LAN. Like so:
                                         "public wifi"
                                                 /
ISP <-openWRT fw-> LAN 192.168.1.0/24 <-public_zone-> PUBLIC 172.16.134.0/24
                        \
                 "private LAN wifi"
Obviously the zone can be utilized however you like. Another common option would be to firewall a open wireless network from the LAN. And forgo the insecure nature of a “secured” wireless altogether. The OpenWRT could be running openvpn, that you connect to over the “insecure” wireless, now thats secure!
The following steps are done via the web interface (luci).
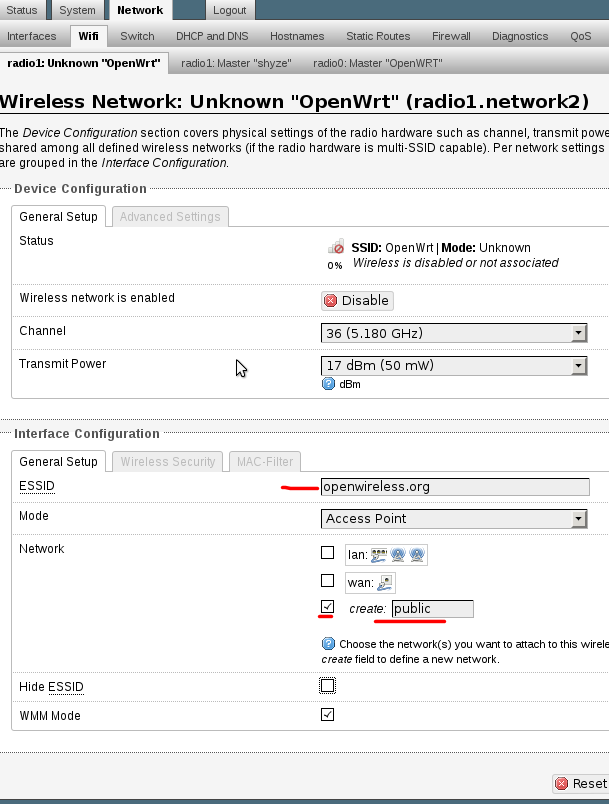
1. Start by adding a new wireless interface. In this case to the 5ghz radio. You can do this again for the 2.4ghz radio.
2. Set the essid and network name “public”. This will allow us to use firewall zones to segregate the networks, rather than excluding individual rfc1918 subnets like in the first example.
3. Edit the interface “PUBLIC” so that we can set it as a static ip.
4. Change the protocol to “static address” set a ip for it and a subnet. DO NOT set a gateway. This will write a new default gateway to the routing table and cause the internet to break occasionally. Setup a dhcp server for this network.
5. In the firewall section. Setup a zone called something like “public_zone” and assign it to the “public” network. And allow it to forward to “WAN” zone.
6. This is what the general firewall zone’s should look like now.
Be sure to test it. Connect to the public and try and nmap a known host on the private and vice versa. A few times I have needed to reboot the router for everything to start working properly. It could be because I tinkered too much and caused a hickup. Just something to keep in mind..
That said, if you want to setup pptp on the openwrt here is a guide.
The router is Backfire 10.03.1 at address 192.168.11.1/24. This configuration will setup the PPtP VPN server and it should be pointed out that its not a very secure VPN. Basically, it requires that someone capture the authentication handshake of a pptp connection. Then extract the keys and crack the hashes or bruteforce. There is a service that was released last year that will crack these keys and produce the authentication hash, that can auth as the password. This was done to encourage people to stop using this lame technology. Here is a great write up that will answer all questions https://www.cloudcracker.com/blog/2012/07/29/cracking-ms-chap-v2/
With the above insecurity disclaimer and a note that this really shouldn’t be used for anything requiring real security. I proceed..
debug
logfile /tmp/pptp-server.log
192.168.11.1:
auth
name "pptp-server"
lcp-echo-failure 3
lcp-echo-interval 60
default-asyncmap
mtu 1482
mru 1482
nobsdcomp
nodeflate
proxyarp #required to be able to connect to the lan subnet without being directly connected.
#noproxyarp
#nomppc
mppe required,no40,no56,stateless
require-mschap-v2
refuse-chap
refuse-mschap
refuse-eap
refuse-pap
ms-dns 192.168.11.1
== /etc/ppp/chap-secrets ==
#USERNAME PROVIDER PASSWORD IPADDRESS
jason * testypass *
== /etc/firewall.user ==
# This file is interpreted as shell script.
# Put your custom iptables rules here, they will
# be executed with each firewall (re-)start.
# Allow all traffic in and out of the ppp interface. No reason to specify nets.
iptables -A input_rule -i ppp+ -j ACCEPT
iptables -A output_rule -o ppp+ -j ACCEPT
# This rule will allow traffic towards internet
iptables -A forwarding_rule -i ppp+ -j ACCEPT
UPDATE: The easiest way to do this is through the web interface (LuCI). System -> Administration -> SSH-Keys. Paste your public key (~/.ssh/id_rsa.pub) and click “Add key”
I’ve been using so many openwrt devices lately I wanted to setup my public ssh key on each device so I can auto login. Also, I can setup a really unfriendly password for the root account that is very secure and use my public key to authenticate. Convenient and secure? What a concept!!
Since this is dropbear and not openssh the typical ~/.ssh/authorized_keys file doesn’t work. Instead you need the authorized_keys file to be in /etc/dropbear/
This is how I do it quickly and efficiently.
Using the ssh-copy-id command to copy your public key to the remote devices authorized_keys. This is the same you would do to copy your public key to your server or such. Thanks to Sam for turning me onto this most valuable tool.
From your local user account (must have a public/private key, see ssh-keygen if you need to generate keys)
$ ssh-copy-id root@192.168.1.1
enter current password, the following will display if you entered password correctly
Now try logging into the machine, with "ssh 'root@192.168.1.1'", and check in:

~/.ssh/authorized_keys

to make sure we haven't added extra keys that you weren't expecting.
now ssh to the device and move the authorized_keys to dropbear directory
logout and ssh back to 192.168.1.1. This time it will ask for your ssh key passphrase instead of the root password. $ ssh root@192.168.1.1
Enter passphrase for key ‘/home/jason/.ssh/id_rsa’:
If you would like to login without ssh asking for your passphrase you can use ssh-agent to store your identity. Use ssh-add to add to ssh-agent.
$ ssh-add
Enter passphrase for /home/jason/.ssh/id_rsa:
Now ssh to 192.168.1.1 again, this time it doesn’t ask for a password!
$ ssh root@192.168.1.1
BusyBox v1.15.3 (2011-11-24 00:44:20 CET) built-in shell (ash)
Enter 'help' for a list of built-in commands.

_______                     ________        __
|       |.-----.-----.-----.|  |  |  |.----.|  |_
|   -   ||  _  |  -__|     ||  |  |  ||   _||   _|
|_______||   __|_____|__|__||________||__|  |____|
|__| W I R E L E S S   F R E E D O M
Backfire (10.03.1, r29592) ------------------------
* 1/3 shot Kahlua    In a shot glass, layer Kahlua
* 1/3 shot Bailey's  on the bottom, then Bailey's,
* 1/3 shot Vodka     then Vodka.
---------------------------------------------------
root@MyOpenWrt:~#
Voilà!
You can also do this via the luci web interface. Its actually very easy. Copy your ~/.ssh/id_rsa.pub and paste it into “System” -> “Administration” -> “SSH-Keys” and then “Save & Apply”. Done
Spam is a constant battle as it is ever changing and always creeping into your Inbox. Spam wrangling is only effective with proper training, SpamAssassin does a decent job out-of-the-box but needs users input to truly be effective. This script will run SpamAssassin’s built in sa-learn tool against users known spam and known ham.
With my setup — A spam message is received (postfix) and identified as spam (spamassassin), it will be moved to the users Junk directory per the Sieve (dovecot) rule at the bottom of this post. If a spam message is received and not matched as such, it will be delivered to the Inbox. The user will identify it and manually move it to the Junk directory. I like to configure Thunderbird to “Move new junk messages to: “Junk” folder on: … in Account Settings.” Now a user marks a message as Junk, it automatically gets moved.
When this script runs it will mark messages in the Inbox as ham and messages in the Junk directory as spam. The command “sa-learn –sync” adds these results to the Bayes database that SpamAssassin consults when determining a spam score for each received message. This database is optionally backed up in the event a mistake was made and you need to revert back to previous versions. The script logs to /var/log/train-mail.log, information about how much spam and ham is being added, how many total messages have been processed and stats on the auto clean feature built into sa-learn can be gleaned. Additionally, I setup a spam cleanup using find and rm.
If sa-learn scans a mail as ham when it is spam, or vice versa, simply move the messages to the correct directory (Inbox=ham/Junk=spam), and the mistake will be corrected on the next run. SpamAssassin will automatically ‘forget’ the previous indications.
Its important to have an equal part ham to spam. As a result I run this script daily in an effort to capture users ham before they delete it or sort it into sub folders. Another thing to be aware of is that typically you should aim to train with at least 1000 messages of spam, and 1000 ham messages, if possible. More is better, but anything over about 5000 messages does not improve accuracy significantly in SpamAssassins tests.
Obviously a lot of these options are site/user specific. This is a good foundation to use as-is or build from.
#!/bin/bash

#specify one or more users, space padded [user=(user1 user2 user3)] or empty [user=()] to include all users. All users is considered uid ≥ 1000.
user=()

#After how many days should Spam be deleted?
cleanafter=30

#backup path, comment out to disable backups
bk=/home/backup/sa-learn_bayes_`date +%F`.backup

log=/var/log/train-mail.log
#log=/dev/stdout

echo -e "\n`date +%c`"  >> $log 2>&1

if [ -z ${user[@]} ]; then
echo user is empty, using all users from system
user=(`awk -F':' '$3 >= 1000 && $3 < 65534' /etc/passwd |awk -F':' '{print $1}'`)
fi

for u in ${user[@]}; do
if [ ! -d /home/$u/Maildir ]; then
echo "No such Maildir for $u" >> $log 2>&1
else
echo "Proceeding with ham and spam training on user \"$u\""
#add all messages in "junk" directory to spamassassin
echo spam >> $log 2>&1
#change this path to match your spam directory, in this case its "Junk"
#add current and new messages in Junk directory as spam
sa-learn --no-sync --spam /home/$u/Maildir/.Junk/{cur,new} >> $log 2>&1
echo ham >> $log 2>&1
#only add current mail to ham, not new. This gives user a chance to move it to spam dir.
sa-learn --no-sync --ham /home/$u/Maildir/{cur} >> $log 2>&1
fi
done

#sync the journal created above with the database
echo sync >> $log 2>&1
sa-learn --sync >> $log 2>&1
if [ $? -eq 0 ]; then
for u in ${user[@]}; do
echo "deleting spam for $u older than 30 days" >> $log 2>&1
find /home/$u/Maildir/.Junk/cur/ -type f -mtime +$cleanafter -exec rm {} \;
done
else
echo "sa-learn wasn't able to sync. Something is broken. Skipping spam cleanup"
fi

echo "Statistics:" >> $log 2>&1
sa-learn --dump magic >> $log 2>&1
echo ============================== >> $log 2>&1

if [ -n $bk ]; then
echo "backup writing to $bk" >> $log 2>&1
sa-learn --backup > $bk
fi
Here is my sieve rule for moving messages that are marked as spam to my Junk directory. I setup roundcube for people to manage their sieve filters.
I have a Dreamhost VPS account and have been running out of memory and experiencing the dreaded forced reboots dh impose. I found it difficult to identify the offending sites that take up all that memory on my server. Every time I login and run top it was too late or I would find a website being crawled by a search bot. How to find a trend over time, without getting too complicated? My solution was to track the memory usage with ps and write that to individual files, then sort all those files and derive the top offenders in one list. Which is web accessible (or not) for easy viewing later. If my VPS reboots, I can go back to the individual files before the forced reboot and get details of whats causing the problem.
#!/bin/bash

#no trailing slash. Be sure this dir exists.
path=/home/jason/jasonschaefer.com/memusages

logfile=index.txt

#how many days to keep files, remove after..
removeafter=5

# ps -[e]everything, [o]format
# rss is resident set size in kilobytes
# user:20 username with 20 char space so it won't revert to uid on usernames longer than 8 chars
# cmd:40 running command with 40 char column, stime=start time of cmd
# [h]hide headers, --sort=rss sorts on rss column
/bin/ps -eo rss,user:20,cmd:40,stime,pid h --sort=rss > $path/mem`date +"%F_%k-%M"`.txt

# sort unique, numeric on column 5 the pid, so we don't show duplicate processes.
# then sort numeric, reverse on column 1 the memory usage, write the top 200 lines to our logfile.
/usr/bin/sort -u -n -k 5 $path/mem*.txt | /usr/bin/sort -n -r -k 1 | head -n 200 > $path/$logfile

#find files older than $removeafter days and remove them
/usr/bin/find $path -mtime $removeafter -exec rm -fr {} \;
Don’t forget to make it executable
chmod 755 /home/jason/memusages.sh
Then setup to run in cron, to run every ten minutes of every hour, every day, every month and every day of week. Change as needed.. I have it running every minute right now. Depending on your setup you may need to run this as root to see all system processes.
crontab -e
*/10 * * * * /home/jason/memusages.sh
Here is a bash script that I use to do simple and transparent backups of all sorts of data.
I use it primarily to backup to multiple external hard drives, plugged in via USB. It uses regular mount or gnome volume manager. It also sends logs via email using “mail” and a local MTA like postfix. Please modify to fit your needs. Leave a comment if you want. Its also here http://jasonschaefer.com/stuff/jsbk.sh.txt
Here is my batch script I use for MS Windows boxen. Batch scripting is nasty but surprisingly this script has come in handy many a time. Here is a direct link http://jasonschaefer.com/stuff/jsbkwin.bat.txt
[] Vim reference :e filename (open filename)
:q! (quit, don’t save)
:w (write/save)
:wq (write and quit)
:x (write if changed, otherwise exit)
:changes (show list of edits in the buffer)
a (insert after)
A (insert after line)
h j k l (left, down, up, right)
$ (move to end of line)
^ or 0 (move to beginning of line)
G (move to end of file)
gg (move to top of file)
gUU (uppercase entire line)
guu (lowercase entire line)
gUw (uppercase a word, u lowers)
:n (move to “n” line, n=number)
x (delete to the right)
X (delete to the left)
D (delete to the end of line)
dd (delete current line)
yy (yank/copy current line)
V (begin highlight, up and down to select “y” to yank selection)
vn (yank “n” lines below cursor, n=number)
p (put/paste)
u (undo)
ctrl+r (redo)
/string (search for “string”)
n (search for next string match) :s/yellow/green/gc (replace yellow with green on current line, g is for global, each match is replaced in a line, instead of the first match in a line. c is for confirm/ask) :%s/yellow/green/g (replaces yellow with green on the entire page) :%s:/usr/local/bin:/opt/users/bin:g (use something other than / as delineation so you don’t have to escape “/”. Like this nasty example: :s/\/usr\/local\/bin/\/usr\/loca\/bin) :%s#http://jasonschaefer.com#https://jasonschaefer.com#g (Switch the delimiter to # for strings with : and / to avoid annoying escapes!) :2,$s/ */ /g (After the 2nd line, replace 1 (2 spaces with a *) or more spaces with 4 spaces, globally)
strftime $ echo the day and time is currently `date +"%a at %T"` https://foragoodstrftime.com/
Sat, Jun 23 22:01:40 “%a, %b %d %T”
Sat, Jun 23 2018 7:04 PM “%a, %b %d %Y %l:%M %p”
[] bash tricks
stop bash history: unset HISTFILE
[] find command find . -name "name" -exec [command goes here] {} \; find . -type d -exec chmod 750 {} \;
recursively changes type directories to user=rwx, group=r-x, other=— find . -type f -exec chmod 664 {} \;
recursively changes type file user=rw-, group=rw-, other=r– (so that files are not executable) find /home/BACKUP -mtime +14 -exec rm -fr {} \;
-mtime options:
n exactly n days
+n more than n days
-n less than n days
find files that are newer than specified date time:
find /path/ -newermt 2018-01-15
use -ls to output long listing of matches
find /path/ -newermt “may 21 2018 16:00” -ls
yesterday or today can be used instead
find files between a date reference
finds files between 16:00 and 16:47 on may 21
find /path/ -newermt “may 21 2018 16:00” ! -newermt “may 21 2018 16:47”
to convert all backslash \ to forward slash / find . -type f -iname *.xml -exec sed -i 's:\\:/:g' {} \;
find hard links (directories have multiple links so use type file and not with 1 link)
find /path -type f ! -links 1
find directories, with emails, with less than 330 files (emails)
find /home/user/Maildir/ -type d -name cur -exec tree -RaFC –filelimit 330 {} \;
find quantity (310-320) of files under any directory named cur
find /home/user/Maildir -type d -name cur -exec bash -c “echo -n ‘{} ‘; ( ls ‘{}’/ | wc -l )” \; | grep ‘ 3[12][0-0]$’
find -exec has two variants:
this variant runs the command (echo in this case) once per match -exec echo '{}' \;
echo ./match1
echo ./match2
echo ./1match
and this runs the command once against all matches -exec echo '{}' \+
echo ./match1 ./match2 ./1match
[] Image Conversions and Resizing in batch groups
This will resize all jpg’s in the current directory “.” to 1024×768 and put them in the directory small find . -iname "*.jpg" | xargs -l -i convert -resize 1024x768 {} small/{} or a better use of find and convert would be
find -iname "*.jpg" -exec convert -resize 20% {} {}_small.jpg \;
You can replace the “convert -resize” with convert -quality 85% to compress the images instead.
merge multiple images into one pdf convert blah-page1.png blah-page2.png blah.pdf
wildcards work convert *.png blah.pdf
convert is a part of imagemagick
[] Edit EXIF data on images
Using exiftool to shift wrong date caused by a camera with the wrong time. man Image::ExifTool::Shift.pl for a manual.
example: exiftool "-AllDates+=1:0:21 0:0:0" *.JPG
This adds (+=) 1 year, 0 months and 21 days, 0 hrs, 0 min, 0 sec to all files ending in .JPG
[] tar
tar with various exclude examples tar zcfv backup-website.tar.gz --exclude=stuff --exclude=path/to/stuff --exclude="more stuff with spaces in the name" --exclude=*.wild /home/website
[] chmod tricks
chmod can be used in a way where it preserves executable permissions, if they are already present. using upper X chmod -R u=rwX,g=rwX,o=rX /path/to/
This recursively (-R) sets user and group to rw- dirs and files that don’t already have executable permissions (the X is similar to x but preserves executable perms if they were preexisting). If the dir or file has any executable permissions then it sets user and group to rwx. This can be handy if you want to change lots of files and dirs at once but not make files executable. For instance, chmod -R u=rwx,g=rwx would blanket files and dirs making them all executable. Of course, using find with type and exec can more explicitly set permissions. But it will reset any executable files as well. Thus the benefit of chmod and X.
To see what files are executable, if any, do find /path/ -executable -type f
Proper permissions for wordpress: chown www-data:wwwmaster -R /home/www/ find /home/www/ -type f -exec chmod g=rws {} \; find /home/www/ -type d -exec chmod g=rwxs {} \;
[] How to recursively force a group permission + umask per user on gnu/linux.
First you can recursively set the desired owner and group. Recursive is optional, only needed if you have sub dirs. chown -R root.users /path/to/dir
Then force all files and directories created under /path/to/dir to be owned by the creator and the group will be set to “users” group. Notice the chmod g+rwxs is adding the (s)etGID bit for the group. find /path/to/dir -type d -exec chmod g+rwxs {} \;
You will notice that when a user now creates files or directories under /path/to/dir they come out as (on a typical system) -rw-r--r-- 1 jason users 0 Aug 29 16:49 this is a file
drwxr-sr-x 2 jason users 6 Aug 29 16:49 this is a directory
You will need to change your umask. You can find it under your home directory in ~/.profile
Uncomment or add umask 002 so that the group “users” will be able to read your files and execute your directories.
[] changing default new file or directory permissions, umask on debian wordaround for http://bugs.debian.org/cgi-bin/bugreport.cgi?bug=646692
change /etc/login.defs UMASK 022 (equivalent to 644/rw-r–r– files and 755/rwxr-xr-x directories)
to UMASK 002 (equivalent to 664/rw-rw–r– files and 775/rwxrwxr-x directories)
If that doesn’t work. Enable the pam_umask module like this. echo "session optional pam_umask.so usergroups" >> /etc/pam.d/common-session
[] Cleanup /etc/passwd and /etc/group
sort /etc/passwd in place pwck -s
sort /etc/group in place grpck -s
[] Rename multiple files
remove space from all files ending in .mp3 rename 's/ //'g *.mp3
rename all files ending in .ZIP to .zip
rename 's:\.ZIP:\.zip:' *.ZIP
[] search and replace text within a group of files
find /etc/NetworkManager/system-connections/ -exec sed -i "s/mac-address=0:1e:4c:27:40:00/mac-address=EC:55:F9:0F:5D:00/g" {} \; use -name, -type to refine the match if you need.
jedit is a gui program that can do this.
[] migrating Network Manager system-connections to new computer
You can replace the interface-name and the mac-address as shown above or remove them entirely.
sed -i ‘/^interface-name/d’ /etc/NetworkManager/system-connections/*
sed -i ‘/^mac-address/d’ /etc/NetworkManager/system-connections/*
On the new machine “systemctl stop NetworkManager” and “rsync -a” them to the new machine. Then start network manager “systemctl start NetworkManager”
[] SSH stuffs
copy your ssh public key to remote hosts ~/user/.ssh/authorized_keys file ssh-copy-id user@host
Use ‘ssh-add’ to add your private key to the ssh-agent, so you don’t need to type your passphrase each time you ssh someplace.
create a listen socket on your local computer, that redirects port to a host on remote network (10.9.8.2) ssh -L localhost:3389:10.9.8.2:3389 user@host -L [bind_address:]port:host:hostport
(now you can rdesktop to localhost and it will connect to the remote 10.9.8.2) rdesktop -g90% localhost
create a remote socket that forwards port 2222 on localhost of server to port 22 on initiating host.
Useful for remote support sessions. ssh -R localhost:2222:localhost:22 user@hostname -R [bind_address:]port:host:hostport
(now you can ‘ssh -p2222 localhost’ from the server and reach the host)
create a socks4/5 proxy over ssh ssh -D8080 user@hostname
(now you can configure your browser to use socks5 proxy at localhost:8080 and you can reach the remote networks web servers, or just use it to securely proxy your web traffic through the remote hosts internet connection)
[] Sending mail with telnet: telnet hostname 25
helo me
mail from:myaddress@mydom.com
rcpt to:youraddress@yourdom.com
data
This is a test
.
(thats a newline [enter] – period – and another newline [enter])
echo Cleanup .bak files older than 7 days forfiles /p d:\backup /m *.bak /d -7 /c "cmd /c del /q @path"
echo Set variable date as yyyymmdd set date=%date:~-4,4%%date:~4,2%%date:~-7,2%
echo %date%
[] Filesystem stuff
make clone image of sda dd if=/dev/sda of=/dev/sdb bs=4096 conv=notrunc,noerror
notrunc or ‘do not truncate’ maintains data integrity by instructing dd not to truncate any data.
noerror instructs dd to continue operation, ignoring all input errors. Default behavior for dd is to halt at any error. Useful when imaging damaged drives.
bs=4096 sets the block size to 4k, an optimal size for hard disk read/write efficiency and therefore, cloning speed.
check status of dd transfer (use pgrep to find process id, kill to send user define signal 1, dd progress will be displayed on terminal where dd was run) or pass “status=progress” to dd command
kill -USR1 $(pgrep ^dd)
mount image losetup /dev/loop0 sda.img
mount /dev/loop0 /mnt
Initialize all SATA buses: for x in /sys/class/scsi_host/host*; do echo "- - -" > $x/scan; done
xfs filesystem and xfsprogs
Determine the amount of fragmentation on sda2 xfs_db -c frag -r /dev/sda2
Filesystem re-organizer, by default, with no arguments. It re-organizes files in mounted partitions for 2 hours. Use -t to change the time.) xfs_fsr
These tools reside in the xfsdump package
[] Recover Files
testdisk (recover lost partitions)
photorec (part of the testdisk suite)
foremost sda.img
-t (type doc,jpg,exe etc. all is default)
-a (no error detection, recovers partial files)
-d (indirect block, use for nix filesystems)
-o (output dir)
-T (timestamp output dir)
Interface config for bridging to virtualized client /etc/network/interfaces
wireless interfaces rarely ever support bridging.
# The primary network interface
iface eth0 inet manual
auto br0
  iface br0 inet dhcp
  bridge_ports eth0
  bridge_stp off
  bridge_waitport 0
  bridge_fd 0
Resize/Add storage to kvm image: dd if=/dev/zero of=myvirtualhost.img bs=1M count=78k oflag=append conv=notrunc
notrunc MUST be used or else append will overwrite beginning of image.
Alternately, creates a sparse file which suffers from fragmentation and possible corruption if host system doesn’t provide proper space for the sparse image to fill into. So its not recommended. truncate -s +10G image.raw
Alternate method sparse: qemu-img create -f raw addon.img 10G
be sure to make a backup of original.img
now you can append addon.img to original.img cat addon.img >> original.img
Now, boot the .img vm and use cfdisk to partition the new space. Reboot, and build a filesystem OR boot the instance with a live distro that has gparted and merge/resize the new partition with the old.
Convert a qcow2 image to raw image and remove the sparsity (-S 0 is non-sparse). qemu-img convert -p -O raw -S 0 win7pro.qcow2 win7pro.img
Also, fallocate is a great way to allocate kvm images. “preallocation is done quickly by allocating blocks and marking them as uninitialized, requiring no IO to the data blocks. This is much faster than creating a file by filling it with zeroes” fallocate -l 128GiB virtualhost.img
write zeros to the image so that you can make a sparse copy of the image for backup. Without the zeros the sparse copy won’t have the ability to sparsify dd if=/dev/zero of=virtualhost.img conv=notrunc,fdatasync bs=1M count=128K
preferred method for expanding a disk image (make a backup!!) original.img is 64GB and you want to expand it to 128 fallocate -l 128GiB original.img use gparted to expand the partition and filesystem into the extra space.
Backup virtual images into a sparse file to save space cp --sparse=always winblows7.img SNAPSHOTS/winblows7.img_oct06-2017
Be sure to unsparsify the file if you need to restore it! cp --sparse=never SNAPSHOTS/winblows7.img_oct06-2017 winblows7.img
[] KVM with Windows
The best way to get virtio is on install. Download the block driver floppy image and attach it, I use virt-manager. Set your hard drive to type virtio and start your windows install. It will will prompt you to press f6 to install third party drivers. Then press S (you have a disk from a third party manufacturer, your floppy image)
If you already have a disk type IDE and want it to be virtio (better). Then do this:
1. Create a temporary image kvm-img create -f qcow2 temp-virtio.img 1G
2. Shutdown your virtual machine and attach temp-virtio.img as a hard drive, as type virtio.
3. Attach the virtio-win-x.x.x.vfd (i used the one from fedoraproject.org, see below) to you virtual machine
4. Boot up and install the drivers
5. Shutdown, remove the old hard drive image and re-add it as type virtio
6. Boot up and since you already installed the drivers it will boot. Otherwise, you get BSOD..
(You can remove the temp-virtio.img and floppy image).. All done.
For network drivers.. Shutdown, set the “device model” to virtio. Attach the NETKVM-xxxx.iso as a cdrom. Bootup and install drivers. yay!
When using raw disk images, the “live” backup options are almost non-existent. The pros of raw img performance may outweight the cons of backup. Here is a simple way to backup .img virt images with minimal downtime:
rsync -a --inplace --progress --stats [source.img] [destination.img]
md5sum [source.img]
virsh start [source.img]
md5sum [destination.img]
[] Debian package tricks
list all packages that come from a particular repository, this case “testing”
for p in $(dpkg -l | awk ‘/ii/{ print $2 }’); do for i in $(apt-cache policy “$p” | awk ‘/Installed/{ print $2}’); do apt-cache policy “$p” | grep -A1 ‘\*\*\*\ ‘$i” | if grep -q testing; then echo $p; fi; done; done
[] Windows Policy
run gpedit.msc to edit policy
to backup or move to new host, copy the following
%systemroot%\system32\GroupPolicy\Machine and User dirs
to apply changed policy’s gpupdate /force
[] RDP tricks
plain old vnc is no more, not to say its not useful but xrdp is a super combo rambo pack. when it comes to ease of use, autostart scripts in debian, built in encryption, performance and cross platform the xrdp project rules the roost. Follow these simple steps.
on server: apt-get install xrdp
done;
on client: rdesktop -g95% [server name or ip]
-g is for geometry, look it up in man rdesktop
done; wow!
obviously, you will need rdesktop or some other remote desktop protocol installed on the client.
If you have issues with the arrow up and down keys minimizing and maximizing your X terminal do the following:
In gnome, use gnome-control-center -> Go to keyboard ‘Shortcuts’ tab, ‘Windows’ on the left pane -> select super+up and super+down shortcuts -> press backspace to disable these shortcuts on these actions.
xfreerdp is a fork of rdesktop that has newer features like certificate verification that comes with new versions of MS Windows.
SeamlessRDP http://www.cendio.com/seamlessrdp/ rdesktop -A -s "c:\seamlessrdp\seamlessrdpshell.exe c:\program files\internet explorer\iexplore.exe" -u username -p password hostname
uhhh, for the record I have NEVER gotten this to work properly. Please contact me if you have!
[] Self Signed certificate on debian, the easiest way possible make-ssl-cert /usr/share/ssl-cert/ssleay.cnf /etc/ssl/private/hostcert.crt
This script will ask for a domain and write the certificate. to /etc/ssl/private/hostcert.crt
verify a certificate revocation list openssl crl -text -noout -in crl.pem
recommended ovpn:
remote [host] 1194 udp
float
client
dev tun
mute 5
nobind
comp-lzo
tls-exit
remote-cert-tls server
resolv-retry infinite
explicit-exit-notify
keepalive 10 60
ping-timer-rem
persist-tun
persist-key
#redirect-gateway def1
ca ca.crt
cert [user].crt
key [user].key
[] tshark and tcpdump packet capture
<div title=”Click to select this command”> <div>To run tshark remotely and pipe results back to wireshark locally. Can be tcpdump instead of tshark. Needs root access..</div> <p><code>ssh root@server ‘tshark -w -‘ | wireshark -k -i -</code></p> <div>Examples of filter</div> <div><a href=”http://wiki.wireshark.org/CaptureFilters”>http://wiki.wireshark.org/CaptureFilters</a></div> <div>also check the man page for pcap-filter</div> <div>man pcap-filter</div> <div>Common uses –</div> <div>tshark -i eth0 host 10.0.1.10</div> <div>tshark -i eth0 net 10.0.1.0/24</div> <div>tshark -i eth0 port 80</div> <div>tshark -i eth0 port 80 and host 10.0.1.10 and not port 22</div> <div>tshark -i eth0 tcp port 80 or tcp port 443 -V -R “http.request || http.response”</div>
<p><strong>[] OpenWRT Notes</strong></p> <p>OpenWRT failsafe recovery mode<br> <a href=”http://wiki.openwrt.org/doc/howto/generic.failsafe”>http://wiki.openwrt.org/doc/howto/generic.failsafe</a></p> <p>flashing with atftp (follow the instuctions for particular device at <a href=”http://wiki.openwrt.org/toh/start”>http://wiki.openwrt.org/toh/start</a>)<br> <code>curl -T openwrt-xxxx-xxxxx-squashfs-factory-xxxx.img tftp://192.168.1.1</code><br> or the more complicated annoying way<br> <code>atftp –trace –tftp-timeout=1 –put –local-file openwrt-xxxxx-xxxxx.img 192.168.1.1</code></p> <p>Setup SSL/TLS (https) for Luci web interface and disable insecure plaintext (http)<br> <code>opkg install luci-ssl</code><br> be sure the following is commented out in /etc/config/uhttpd<br> <code># HTTP listen addresses, multiple allowed<br> # list listen_http 0.0.0.0:80<br> # list listen_http [::]:80</code><br> Also change the cert px5g options to be more unique and add more days to the self signed certificate.<br> <code>/etc/init.d/uhttpd restart</code></p> <p><strong><br> Disable/Enable Wireless on a schedule, automatically</strong><br> The first line will use bridge control to remove the wireless interface (wlan0-1) from the lan bridge (br-lan) at 22:30. The next cron will add the interface back at 6:00. Redirect (>) all output to dev null. Substitute wlan0-1 for whichever interface you need to. Add this to crontab:<br> <code>30 22 * * * brctl delif br-lan wlan0-1 >/dev/null 2>&1<br> 0 6 * * * brctl addif br-lan wlan0-1 >/dev/null 2>&1</code></p> <p>use “brctl show” to see which interfaces are in the bridge:</p> <pre>root@OpenWRT:~# brctl show bridge name bridge id STP enabled interfaces br-lan 7fff.c6031578e51d no eth0.1 wlan0 wlan0-1</pre> <p><strong>[] Cron and wget with <a href=”https://freedns.afraid.org/”>Afraid free DNS</a></strong><br> Its best to use curl. Install curl with opkg update and then opkg install curl or apt or yum, etc.<br> <code>*/10 * * * * /usr/bin/curl -k https://freedns.afraid.org/dynamic/update.php?[random string]</code></p> <p><strong>wget is overly complicated…</strong> but if its all you got, then its great.<br> <code>*/10 * * * * /usr/bin/wget –no-check-certificate -O – https://freedns.afraid.org/dynamic/update.php?[random string] > /dev/null 2>&1</code></p> <p>add to /etc/rc.local so that it updates immediately on bootup. This doesn’t always work if the wan interface isn’t operational at time of execution.<br> <code><br> # Put your custom commands here that should be executed once<br> # the system init finished. By default this file does nothing.<br> /usr/bin/curl -k https://freedns.afraid.org/dynamic/update.php?[random string]<br> exit 0<br> </code></p> <p><strong>
Disable factory reset button on openWRT
Comment out the jffs2reset line in /etc/rc.button/reset
#!/bin/sh

[ "${ACTION}" = "released" ] || exit 0

. /lib/functions.sh

logger "$BUTTON pressed for $SEEN seconds"

if [ "$SEEN" -lt 1 ]
then
        echo "REBOOT" > /dev/console
        sync
        reboot
elif [ "$SEEN" -gt 5 ]
then
        logger "$BUTTON button pressed for $SEEN seconds"
        echo "FACTORY RESET IS DISABLED" > /dev/console
        #jffs2reset -y && reboot &
fi

return 0
mysql> CREATE USER ‘newuser’@’localhost’ IDENTIFIED BY ‘password’; mysql> GRANT ALL PRIVILEGES ON newdb . * TO ‘newuser’@’localhost’;</pre> <p>(GRANT ALL PRIVILEGES ON [database name].[table name] TO ‘[username]’@’localhost’;)</p> <pre>mysql> SET PASSWORD FOR ‘newuser’@’localhost’ = PASSWORD(‘newpassword’);
mysql> DROP USER ‘newuser’@’localhost’;</pre> <p>update table g2_PluginMap and set column g_active to 0 where column g_pluginID is captcha. This disables the captcha plugin in gallery2<br> <code>UPDATE g2_PluginMap SET g_active = ‘0’ WHERE g_pluginId = captcha;</code><br> <code>DELETE FROM g2_FactoryMap WHERE g_implModuleId=’captcha’;</code></p> </div>
(unrelated to mysql, you will need to clear the cache to fully disabled this plugin -> http://your-domain.tld/gallery/lib/support/index.php
[] RSYNC
rsync highlights:
typical use — rsync -av --delete --stats --exclude media/* /home/ /mnt/usb/rsync-home-mirror
copy [a]rchive, [v]verbosely, –delete any files on the destination that don’t exist in source (mirror), show transfer [stat]istics, [exclude] any files inside directory media, copy contents of /home/ into /mnt/rsync-home-mirror
advanced use — useful for copying entire OS rsync -aAHXi --super --numeric-ids /source/ /destination
-a archive, -A copy ACL, -H copy hard links, -X copy extended attributes, -i show changes, –numeric-ids preserves uid and gid numerically instead of by name.
Use -n to do a dry run! Especially valuable when using –delete switch.
You can think of a trailing / on a source as meaning “copy the contents of this directory” as opposed to “copy the directory by name”
[] fstrim
fstrim one-liner for cron. every sunday at 12:30 timestamp the log and include two partitions, / and /home. 30 12 * * 0 /bin/date +\%c > /tmp/fstrim.log && /sbin/fstrim -v / >> /tmp/fstrim.log 2>&1 && /sbin/fstrim -v /home >> /tmp/fstrim.log 2>&1
[] wget
for range in {1..7};do wget http://URL/Episode$range.mp3 ; done for range in {{1..3},{5..7}};do wget http://URL/Episode$range.mp3 ; done
Mirror entire site with wget wget --mirror -p --convert-links http://URL
or wget --recursive --no-clobber --page-requisites --html-extension --convert-links --no-parent --domains website.org http://website.org [] ffmpeg
convert video to webm ffmpeg -i be-hose.mp4 -acodec libvorbis -aq 5 -ac 2 -qmax 25 -threads 2 be-hose.webm
[] booting os manually from grub2
set root=(hd0,gpt2)
linux /boot/vmlinuz-2.6.18-6-686 root=/dev/sda1
initrd /boot/initrd.img-2.6.18-6-686
boot
[] booting into password recovery using grub
new methond: append systemd.debug_shell to linux line of grub. system boots normal and ctrl+alt 9 will have root shell that bypasses password prompt.
old method: append init=/bin/bash to linux line of grub. system boots in read only mode mount -o remount,rw / and run passwd to change password.
[] Text Manipulation, simple and common techniques
file.txt contains:
a b c d e
f g h i j
awk '{print $2 "\t" $5}' file.txt

b	e

g	j
awk '{print $2","$5}' file.txt

b,e

g,j
cut -d " " -f 2 file.txt

b

g
cut -d " " -f 2,4 file.txt

b d

g i
cut -d " " -f 3-5 file.txt

c d e

h i j
MATH with awk!
file.txt contains:
1 2 3 4
5 6 7 8
awk '{print $2 + $4}' file.txt

6

14
awk '{print $2 * $3}' file.txt

6

42
[] EXIM
consult the oracle: zless /usr/share/doc/exim4-base/README.Debian.gz
dpkg-reconfigure exim4-config

update-exim4.conf; service exim4 stop; service exim4 start
Enable tls:
enable the following in /etc/default/exim4 SMTPLISTENEROPTIONS='-oX 25:465:587 -oP /run/exim4/exim.pid'
enable plain_server: PLAIN and LOGIN in /etc/exim4/exim4.conf.template
swaks -a -tls -q HELO -s smtp.schaeferconsulting.com -au test -ap '<>'
for x in $(mailq | grep frozen | sed -e ‘s/^……….//’ -e ‘s/ .*//’); do exim -Mrm $x; done
[] GPG
jason gets the public key for geoff from keyserver gpg --keyserver keys.openpgp.org --recv-keys 6058D99C
or gpg --keyserver keys.openpgp.org --search-keys email@address
signs the key with his B0EE80C1 key gpg --default-key B0EE80C1 --sign-key 6058D99C
export the signed key to send to geoff gpg --output 6058D99C.asc --export --armor 6058D99C
send geoff_6058D99C.asc to geoff
———-
geoff receives key and imports gpg --import geoff_6058D99C.asc
sends the updated key to keyserver gpg --keyserver keys.openpgp.org --send-keys 6058D99C
I wanted a larger wordlist than the default /usr/share/john/password.lst, with only 3115 words. Openwall sells a really great wordlist, but if you don’t need anything that fancy you can follow these instructions. The apt-get bit is debian specific. I will install dictionaries and then concatenate them all into one file, remove duplicates, lower case and configure john to use the new list.
You can concatenate more wordlists into the custom-wordlist file as you find them. Debian has lots more dictionary type packages. For instance, apt-cache search wordlists. Use dpkg -L [installed-package-name] to find where the actual word list file is installed.
Lets count how many lines (words) are in our wordlist so far:
wc -l custom-wordlist
I got 1484152, There must be tons of duplicates. Lets get rid of them. We can also lowercase everything, since john toggles case automatically for us.
Now we can set john up to use our custom wordlist file.
Edit the file /etc/john/john.conf
Wordlist = [path to custom-wordlist_lowercase_nodups]
Now we are ready to crack some passwords! First, combine the passwd and shadow files. This will allow john to use the GECOS information from the passwd file. GECOS is the user information fields such as first, last and phone. These fields will be used by john to make a more educated guess as to what that users password might be.
unshadow passwd shadow > unshadow.txt
run john against the resulting unshadow.txt file
john unshadow.txt
Loaded 15 password hashes with 15 different salts (FreeBSD MD5 [32/64 X2])
The wonderful world of motherboard BIOS updates, is still old fashioned. Updates are often still built for Microsoft Windows environments. Those of us who don’t have MS Windows, DOS, a floppy drive, an install of Windows 98 to create a bootable floppy, or cheesy Pâté for that matter ….. Here is a way one can flash that BIOS of your mobo using, our favorite free software licensed, operating systems and tools.
DISCLAIMER: Don’t attempt this unless you know what you are doing. I have never had problems doing this, BUT many things can go wrong and you CAN easily “brick” your hardware. Proceed at your own risk!!
We will be using FreeDOS, a wonderfully free and royalty exempt Microsoft DOS compatible operating system. Licensed under the General Public License (GPL).
Note: As usual, my posts require some knowledge of the command line.
====================== UPDATE: Because the 1.4mb and 2.8mb FreeDos disk images are not large enough for most modern BIOS flashing utilities and payloads you will need to build a custom disk image of freeDos.
The easiest way to do this is to write freeDos onto a usb flash drive. Here is an example of how to do this.
write the FD12LITE.img to a USB stick. I used gnome-disks (right click and open with “Disk Image Writer” or you can use dd.
mount the usb stick and copy the bios update onto it. If your bios update is too large to fit you will need to resize.
run “sudo gparted” resize the fat16 partition. I chose 100mb. Apply
now copy the bios update and boot from the usb. Don’t run the DOS installer, instead run DOS. Now you can execute the bios update. Done!
Another option would be to install FreeDOS using qemu. This is more complicated but I’ll leave the instructions here for reference.
Download FreeDOS Standard CDROM Installer at http://www.freedos.org/download/
sudo qemu-system-x86_64 -cdrom FD12CD.iso /dev/sdb -boot d
Go through the DOS installer. You can use it to partition the usb stick. I made a 700MB fat 16 partition and marked it “active”. I said no to the fat32 LBA because I had issues, the first time I tried this, reading files that I had put on the fs while booted into DOS. Fat32 should be ok, try it and let me know your experience. After this it will ask to restart the install. Install to hard disk again and now you partition the c: drive. Then install the full version. Done.
If you need more space you can always run cfdisk, gparted or fdisk to add a large fat32 partition on the usb stick. This would show up as d:\ while booted up in FreeDOS. You can copy your BIOS files to the usb DOS partition and boot into FreeDos to run them. Yay! No more floppy space issues!
======================
And feel free to try the old floppy way. I’ll leave it up here for reference.
wget http://www.fdos.org/bootdisks/autogen/FDOEM.144.gz
gunzip FDOEM.144.gz
mkdir floppy
sudo mount -o loop FDOEM.144 floppy/
ls floppy
you should see these files:
AUTOEXEC.BAT COMMAND.COM CONFIG.SYS KERNEL.SYS README sys.com
Download your BIOS update file from the manufacturer or vendor.
Note: Sometimes, the update will be distributed as a .exe (Windows Executable) file. Most likely it will actually be a compressed zip archive. You can use unzip to extract the .exe file.
Download the update using wget, then unzip the resulting image file “FDOEM.144” into the mounted folder: “floppy/”
In this case, the following files are extracted from the BIOS_UPDATE.zip file:
inflating: BIOS.WPH
inflating: OEMPHL.EXE
inflating: OPTIONS.BAT
inflating: PHLASH16.EXE
inflating: releasenotes.txt
inflating: 1.BAT
now, move to the previous directory (cd ..), and un-mount the FDOEM.144 image:
Recently, I was installing debian on a new server and grub2 would not install gave me this error:
“This GPT partition label has no BIOS Boot Partition; embedding won’t be possible! grub-setup: error: Embedding is not possible, but this is required when the root device is on a RAID array or LVM volume.”
Of course, it being grub2, I jumped to the conclusion that grub2 was the problem. I installed legacy grub and got nowhere.
Doing the usual
grub> root (hd0,0)
grub> setup (hd0)
produces this error:
“file /boot/grub/stage1 not read correctly”
No matter what I did, it would not install. So, I went back to the original message and gave grub2 its due process. Turns out this Dell T410 uses GPT (GUID Partition Table) which is an extension of EFI. The “BIOS Boot Partition” is an actual partition on the hard drive. Grub2 embeds the core.img (multiboot boot kernel) into this BIOS boot partition instead of the MBR.
Here are two great resources on this subject: http://www.rodsbooks.com/gdisk/index.html and http://grub.enbug.org/BIOS_Boot_Partition
So, the solution:
I had to re-install Debian with a small partition. Apparently it can be under a few hundred KiB. Space is cheap and I didn’t want to have more problems, so I made mine 5MB and put it at the beginning of the disk. In the Debian partitioner, set the partition under “use as:” to “Reserved BIOS boot area“. Then continue with the rest of your partitions and install. Grub2 installed with no problems this time!
If using an older version of Debian, lenny (v5) or older. The “use as:” does not have an option for Reserved BIOS boot area. So, I booted into expert install mode, when you get to “Load installed components from CD” select parted. This will install parted in the install environment. Before you get to detect disks, do ctrl+alt+f2. On the command line you can manually create a bios boot area.
The following parted commands.
parted -a optimal /dev/sda mkpart 1 1 6
The above command creates the first (1) partition from 1MB of the drive to 6MB. -a optimal sets the block alignment for best performance. If you start the partition at 0 the alignment is wrong and parted will Warn: “The resulting partition is not properly aligned for best performance. Ignore/Cancel?”
parted /dev/sda set 1 bios_grub on
This sets /dev/sda1 as GPT grub bios partition. This partition will be found and used by grub on install.
Now, ctrl+alt+f1, and continue the install. Select manual partitioning and be sure not to delete the primary partition (gpt, grub bios) when creating your new partitions.
Do this to all drives in a raid!
After you boot into the fresh install, you can manually install to the other disks.
grub-install /dev/sdb
Now its installed on sda and sdb. In case sda fails, it should be able to boot from sdb.
look through the list of subkeys (0000, 0001, etc) DriverDesc keyword will tell you which network adapter. For example, “NVIDIA nForce Networking Controller”
when you find it, right click and add -> new -> string value
new keyword:
Value Name: = NetworkAddress
Value Data: = your new MAC, with no space or : For example, 0019DB71C830
then type:
ipconfig /release
ipconfig /renew
ipconfig /all   (to verify the new mac took)
Now your a l33t Winblows H4|<3r! If you want to go back to your hardware MAC, remove the NetworkAddress key and restart the interface.
FYI, in gnu/linux follow these simple steps to change your MAC address
ifconfig eth0 hw ether 00:19:DB:71:C8:30
if you get this error
SIOCSIFHWADDR: Device or resource busy - you may need to down the interface
Here is a list of free wireless spots in Santa Fe. I’m sure I will miss some or make errors, please let me know. I don’t list locations that use a password, as it irritates me when people inconvenience patrons for some ignorant reason.
* Santa Fe Baking Company (one of the first and best wireless spots in town, lots of seating and ample power, food and kitchen smell can be harsh)
* Pyramid Cafe (VERY fast internet, Amazing Mediterranean food)
* Second Street Brewery (very solid reliable connection, inside or out. great beer too!)
* Counter Culture Cafe (the qwest connection goes down a lot, the ap is too far from the seating area, but great place to hang, eat and work)
* Teahouse (The best selection of teas and generally good internet, very relaxing place. great food too)
* Aztec Cafe (small but friendly environment, good coffee and sandwiches)
* Blue Corn (the bar downtown has it, ask the bar tender for password (indiapaleale). The southside is open AP and I think the essid is jaguar)
* Flying Star Cafe (the wireless is always slow, food is overpriced and not very good. They use sputnik as a captive portal, its annoying to ask users to sign up for internet. I login with user: free pass: wireless There is a lot of space and the air is fresh)
* Santa Fe Brewing Company (its awesome they provide internet so far out of town)
* Backroad Pizza (south side location has it, not sure about the 2nd street location)
* Joe’s Good food, friendly staff, good internet
* Body (great healthy food, limited seating in front cafe area, back dining area reserved for no computers and no cell phones :-)
I wanted to share some notes on patching the Linux Libre kernel with realtime capabilities. The Linux-Libre project pulls out all the un-free bits from standard Linux. Contrary to popular belief, Linux has many non-free parts, small binary or obfuscated pieces of code for various hardware. I have a Lenovo T61 laptop. I removed the Intel wireless pci express card and put in a Atheros AR5008 wifi card using ath9k completely free wireless driver. Now my system (as far as I can tell:-) is completely free.
I make music and the realtime patch makes the latency of my system and soundcard very low. This is a unique advantage that the gnu/linux operating system gives its users. I highly recommend a realtime patch for anyone working with audio and video on gnu/linux.
tar xfvj linux-2.6.29.6-libre1.tar.bz2
cd linux-2.6.29.6
bzcat ../patch-2.6.29.6-rt23.bz2 | patch -p1
Now Linux is patched with realtime
now its time for
make menuconfig
from the RT How to:
* enable CONFIG_PREEMPT_RT
* activated the High-Resolution-Timer Option (Attention, the amount of supported platforms by the HR timer is still very limited. Right now the option is only supported on x86 systems, PowerPC and ARM Support are however in queue.)
* disabled all Power Management Options like ACPI or APM (not all ACPI functions are “bad”, but you will have to check very carefully to find out which function will affect your real time system. Thus it’s better to simply disable them all if you don’t need them. APM, however, is a no-go.) NOTE: Since rt patch 2.6.18-rt6 you will probably have to activate ACPI option to activate high resolution timer. Since the TSC timer on PC platforms, as used in the previous versions, are now marked as unsuitable for hrt mode due to many lacks of functionalities and reliabilties, you will need i.E. pm_timer as provided by ACPI to use as clock source. To activate the pm_timer, you can just activate the ACPI_SUPPORT in menuconfig and deactivate all other sub modules like “fan”, “processor” or “button”. If you have an old pc, which lacks ACPI support, you migh have problems using the high resolution timer.
I personally have not removed my power management options, as I use a laptop and want these features. I don’t notice any problems but have not tried it without them to know what I’m missing.