jason schaefer . com

"arguing that you don’t care about the right to privacy because you have nothing to hide is no different than saying you don’t care about free speech because you have nothing to say."

Category: wireless

  • Meshtastic solar repeater and client node setup

    ** this post is under construction **

    == Repeater setup ==

    Requisites:

    – solar charged
    – battery powered
    – low temp Li-ion charge cutoff
    – low power
    – no gps module due to fixed location
    – advantageous location
    – reliable/durable
    – medium gain antenna

    Materials:

    Soldering iron. Whatever you have should work, no fancy soldering required

    Heatshrink tubing https://www.amazon.com/Wirefy-180-Heat-Shrink-Tubing/dp/B084GDLSCK/

    RAKwireless WisBlock Meshtastic Starter Kit US915 https://store.rokland.com/products/rak-wireless-wisblock-meshtastic-starter-kit

    Optional GPS module https://store.rokland.com/products/rak-wireless-rak12500-gnss-gps-location-module-u-blox-zoe-m8q

    Outdoor, 915mhz, dipole antenna https://www.mouser.com/ProductDetail/712-ANT-8-9-IPW1SMA

    18650 Battery holder https://www.amazon.com/dp/B098SS1XYG

    Nitecore low temp battery https://www.18650batterystore.com/products/nitecore-nl1835lthp-18650-3500mah-8a-low-temperature-battery

    JST 2.0 Ph 2-Pin Connector Plug Male with 150mm Cable & Female https://www.amazon.com/dp/B01DUC1O68

    JST ZH1.5mm 2PIN Micro Electrical Male and Female Connector Plug with 150mm Wire Cables **this is only needed if you want to bypass the low temp charge controller and plug in direct to the onboard RAK solar plug** https://www.amazon.com/dp/B0B58M7D49

    5w solar panel https://www.amazon.com/Dzees-USB-C-Solar-Panel-360%C2%B0Adjustable/dp/B0CT355XFY/

    Adafruit solar charger with low temp cutoff https://www.adafruit.com/product/4755

    10k thermistor https://www.adafruit.com/product/372

    Male DC Power adapter – 2.1mm plug to screw terminal block https://www.adafruit.com/product/369

    Insulated enclosure https://www.harborfreight.com/brands/apache/1800-weatherproof-protective-case-small-black-64550.html

    Camo the PV and Enclosure https://www.rustoleum.com/product-catalog/consumer-brands/specialty/camouflage-spray-paint

    The Rak Wisblock is the perfect choice for a repeater. Its low power, modular and extremely reliable. You can purchase the starter kit which comes with the base board (RAK19007) and the Lora + bluetooth chip (RAK4631). It comes with PCB antennas (0.8dBi) that we won’t use for this fixed repeater. Always keep the antennas connected before powering the radio! Lack of antenna load will result in damage to the radio chip.

    Lets start by setting up the Rak wisblock for Meshtastic firmware

    Download the version of Meshtastic that suites you. Go through the change log to help you decide https://github.com/meshtastic/firmware/releases

    Here is the link to the latest stable https://github.com/meshtastic/firmware/releases/latest

    unzip firmware-2.3.10.d19607b.zip

    locate the firmware file for the wisblock 4631. Its called “firmware-rak4631-2.3.10.d19607b.uf2” (replace the 2.3.10…. with whatever fw version your using)

    plug the wisblock into your computer and double tap the button shown below.
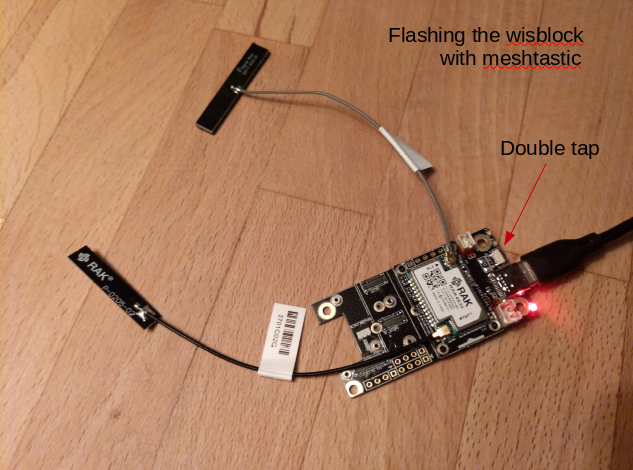
    This will expose a mountable filesystem that you can copy the firmware image into.
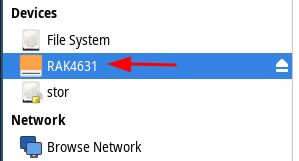
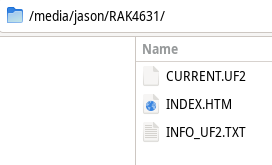
    copy “firmware-rak4631-2.3.10.d19607b.uf2” onto the RAK4631 mount point. It might have current.uf2, index.htm and info_uf2.txt, don’t mess with those. Just copy and paste the “firmware-rak4631-2.3.10.d19607b.uf2” file into the RAK4631 partition. The green light will flash while its transferring and it will reboot when done. The firmware is now loaded and we move onto programming the radio with meshtastic software.
    We will be using the CLI (command line interface) meshtastic python script. https://meshtastic.org/docs/getting-started/initial-config/

    start by creating your python environment for interfacing with the RAK firmware operating system. https://meshtastic.org/docs/getting-started/initial-config/

    We will use pip to install meshtastic and create a python virtual environment to control the version of binaries and all the dependencies needed. These instructions are for Debian, of course ;-)

    sudo apt-get update
    sudo apt-get install python3
    sudo apt-get install python3-pip

    lets create a working directory for meshtastic

    mkdir meshtastic
    
    cd meshtastic

    Now create the virtual environment for python

    mkdir python

    python3 -m venv python/

    Enter the virtual environment and install meshtastic esptool and all its dependencies

    source python/bin/activate

    pip install --upgrade esptool meshtastic

    Anytime in the future when you need to use meshtastic you will enter the python virtual environment with

    source meshtastic/python/bin/activate

    This way you can control the versions of meshtastic and esptool without affecting any other versions of the python scripts, binaries and dependencies on your system.

    Now we can program the RAK radio

    to see whats currently programmed run

    meshtastic --info

    If this radio has been used before or you want to be sure of a blank slate run a factory reset

    meshtastic --factory-reset

    Now the radio can be setup from scratch. “Region US” sets the radio up for use in the USA at 915mhz

    meshtastic --set lora.region US

    set the name of this node

    meshtastic --set-owner [name]

    I like to set a preset bluetooth pin so I can easily access it locally over bluetooth from android phone using the meshtastic app.

    meshtastic --set bluetooth.mode FIXED_PIN

    the pin must be 6 characters long

    meshtastic --set bluetooth.fixed_pin 123456

    designate this as a router. Here is a description of what this means https://meshtastic.org/docs/configuration/radio/device/

    meshtastic --set device.role ROUTER

    Since this wisblock does not have the gps module (since its fixed location and conserves power) you will need to set its location manually. You can add a GPS module with the RAK12500 GNSS GPS Location Module.

    meshtastic --set position.fixed_position true --setlat 38.88987 --setlon -77.00971
    meshtastic --ch-set name family --ch-index 0

    use “psk random” for high encryption aes256

    meshtastic --ch-set psk random --ch-index 0

    Add a admin channel to this repeater so you can remotely administer the hardware. Unfortunately, this admin channel needs to be added to both nodes in order for administration features to work. This means that if someone physically gains access to this device they will have access to your channels encryption key and the admin key. So communications can be decrypted and they can remotely administer other nodes that have this admin channel.

    meshtastic --ch-add admin

    run –info again to confirm changes

    meshtastic --info

    you should see things like

    
    Owner: raktest (49aa)
    ....
      "device": {
        "role": "ROUTER",
    ....
        "position": {
          "latitudeI": 388898700,
          "longitudeI": -770097100,
          "latitude": 38.88987,
          "longitude": -77.00971
    
    ....
      "bluetooth": {
        "enabled": true,
        "mode": "FIXED_PIN",
        "fixedPin": 123456
    ....
    Channels:
      Index 0: PRIMARY psk=secret { "psk": "McyfwZfTvif/Ig6KTf5zWX0JxzFdYLPJeKYi91lhxpA=", "name": "family",
    ....
    Index 1: SECONDARY psk=secret { "psk": "w5idYjeyhw1e5jHL5EjjQuDwEH6iqZckSbzXgZNSfGA=", "name": "admin",

    And finally the channels URL. These URL’s hold the encryption key and name of the channel. Use these to add future devices to the mesh. The last “Complete URL” additionally contains the admin channel so only use that for nodes that you want to use for remote administration and devices that you want to be able to remotely administer. I will go over client configs later in this post using a tbeam.

    Primary channel URL: https://meshtastic.org/e/#Ci4SIDHMn8GX074n_yIOik3-c1l9CccxXWCzyXimIvdZYcaQGgZmYW1pbHk6AgggEgoIAUADSAFQHmgB
    
    Complete URL (includes all channels): https://meshtastic.org/e/#Ci4SIDHMn8GX074n_yIOik3-c1l9CccxXWCzyXimIvdZYcaQGgZmYW1pbHk6AgggCikSIMOYnWI3socNXuYxy-RI40Lg8BB-oqmXJEm814GTUnxgGgVhZG1pbhIKCAFAA0gBUB5oAQ

    copy and paste the channel URL’s into your notes, for later.

    Now we move on to the hardware needed to turn this into a robust, long term outdoor repeater

    The RAK repeater is very tolerant to extreme temperatures but the li-ion battery is not so forgiving. It is sensitive to very hot and cold conditions. The most limiting factor is charging li-ion in freezing conditions. This will quickly destroy a battery. To help minimize temperature swings I opted for a larger container with some insulation to smooth out the hot and cold transitions. This case was cheap, insulated and decent quality. So far its survived a few years in the harshest of conditions. https://www.harborfreight.com/brands/apache/1800-weatherproof-protective-case-small-black-64550.html
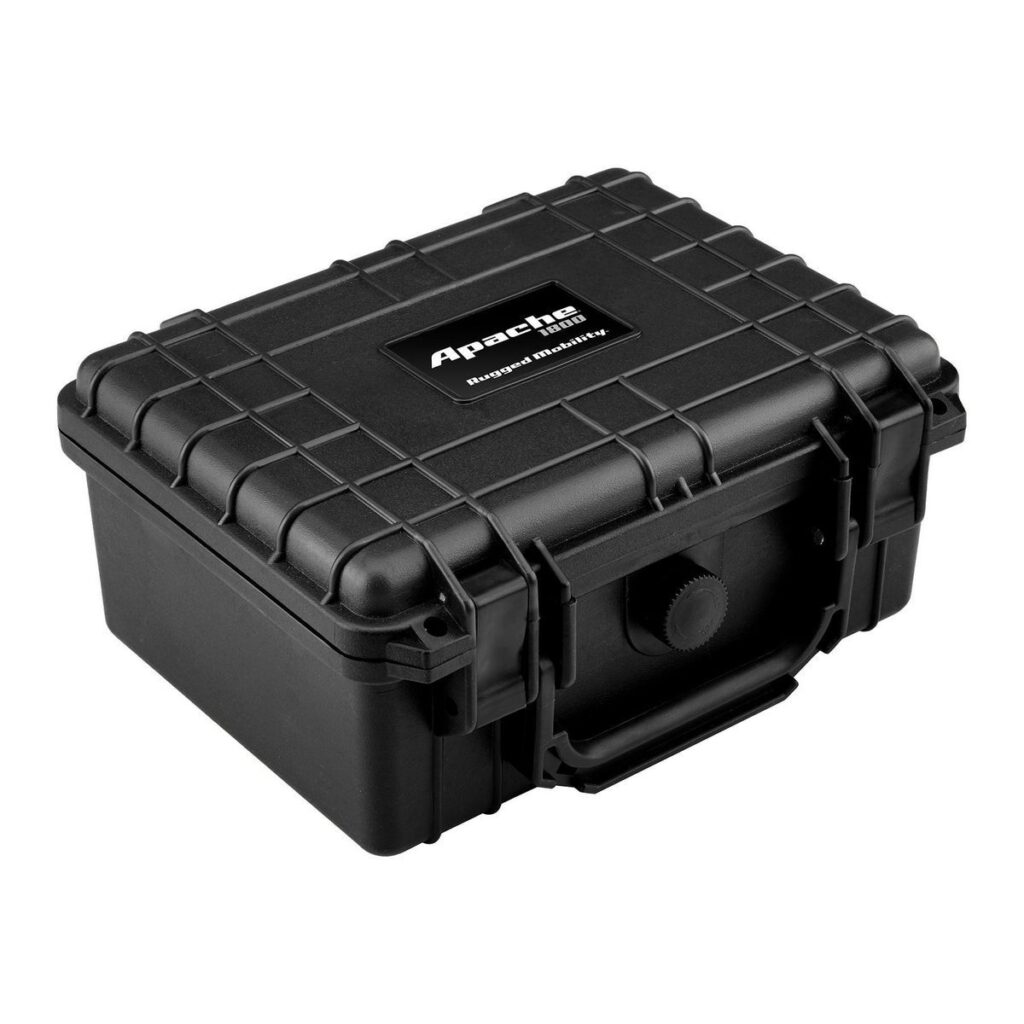
    This case is not enough to keep the battery above freezing. Winter months are long and very cold and my batteries would get trashed within a few months of use in winter conditions. To solve this problem I used a low temp-cutoff charge controller from adafruit. https://www.adafruit.com/product/4755 in conjunction with a 10k thermistor https://www.adafruit.com/product/372

    This charge controller is far superior to the internal charge controller of the RAK and with the added low temp cutoff I haven’t had to replace a battery since.

    == Roaming mobile nodes ==

    Requisites:

    – Small/portable
    – low power
    – battery powered
    – GPS
    – waterproof
    – low gain antenna
    – easily re-charged (usb)

    Materials:

    Lilygo TBeam v1.2 https://store.rokland.com/products/lilygo-ttgo-meshtastic-t-beam-v1-1-esp32-lora-915-mhz-wireless-module-wifi-gps-neo-6m-with-oled-display-soldered-for-arduino-q349

    cable gland pg9 https://www.amazon.com/dp/B07VT317NT

    39/64″ drill bit https://www.amazon.com/Drill-America-High-Speed-Reduced-Shank-64/dp/B01BKTNHPY/

    Pelican 1010 micro enclosure https://www.pelican.com/us/en/product/cases/micro/1010

    TO BE CONTINUED…
  • Flashing om1p with stock openwrt

    I have many open-mesh OM1P units laying around from failed wireless projects. Needless to say I’m not a big fan of open-mesh and have some other projects in mind for this hardware. It was a painful process but well worth it. Now I have nice little OpenWRT units for any hacking pleasure.

    I have made a concise synopsis of the openwrt wiki page for flashing proper firmware on the OM1p/Fon/Fonera/Accton/etc. Please visit http://wiki.openwrt.org/toh/fon/fonera#openwrt for more detail.

    Begin with serial access
    serial-ttl-om1p
    You will need a TTL serial to usb or similar like this https://www.adafruit.com/products/284

    Consult the openwrt wiki for pinout of om1p

    Use minicom or screen to access it.

    We need a tftp server (don’t worry its super easy if your using Debian :-).
    I tried with http (apache) and it doesn’t work.

    apt-get install atftpd

    cd /srv/tftp/
    wget http://downloads.openwrt.org/backfire/10.03.1/atheros/openwrt-atheros-vmlinux.lzma
    wget http://downloads.openwrt.org/backfire/10.03.1/atheros/openwrt-atheros-root.squashfs

    (don’t install anything newer than 10.03.1, this little thing is old)

    stop network manager so we can assign static ip:
    /etc/init.d/network-manager stop
    assign static ip:
    ip address add 192.168.0.2/24 dev eth0

    connect to the usb serial:
    screen /dev/ttyUSB0 9600

    a few seconds into the boot you will see the following:

    Board: ap51 
    RAM: 0x80000000-0x82000000, [0x8003f640-0x80fe1000] available
    FLASH: 0xa8000000 - 0xa87f0000, 128 blocks of 0x00010000 bytes each.
    == Executing boot script in 3.000 seconds - enter ^C to abort

    You have 3 seconds to press ctrl+c to interrupt the boot process and enter into redboot boot loader

    On the om1p, in RedBoot, run the following commands.

    Set the ip of redboot and the tftp server:
    (Don’t forget to connect them with ethernet cable.)

    RedBoot> ip_address -h 192.168.0.2 -l 192.168.0.1/24

    IP: 192.168.0.1/255.255.255.0, Gateway: 0.0.0.0
    Default server: 192.168.0.2

    download linux onto the om1p:
    RedBoot> load -r -b %{FREEMEMLO} openwrt-atheros-vmlinux.lzma

    Using default protocol (TFTP)
    Raw file loaded 0x8003f800-0x8011f7ff, assumed entry at 0x8003f800

    initialize the current flash partition, this will erase openmesh firmware, yay!:
    RedBoot> fis init

    About to initialize [format] FLASH image system - continue (y/n)? y
    *** Initialize FLASH Image System
    ... Erase from 0xa87e0000-0xa87f0000: .
    ... Program from 0x80ff0000-0x81000000 at 0xa87e0000: .

    Now flash the kernel image to memory:
    RedBoot> fis create -e 0x80041000 -r 0x80041000 vmlinux.bin.l7

    ... Erase from 0xa8030000-0xa8110000: ..............
    ... Program from 0x8003f800-0x8011f800 at 0xa8030000: ..............
    ... Erase from 0xa87e0000-0xa87f0000: .
    ... Program from 0x80ff0000-0x81000000 at 0xa87e0000: .

    Now load the rootfs:
    RedBoot> load -r -b %{FREEMEMLO} openwrt-atheros-root.squashfs

    Using default protocol (TFTP)
    Raw file loaded 0x8003f800-0x8021f7ff, assumed entry at 0x8003f800

    And then flash the rootfs:
    RedBoot> fis create rootfs

    ... Erase from 0xa8110000-0xa82f0000: ..............................
    ... Program from 0x8003f800-0x8021f800 at 0xa8110000: ..............................
    ... Erase from 0xa87e0000-0xa87f0000: .
    ... Program from 0x80ff0000-0x81000000 at 0xa87e0000: .

    Reboot the om1p:
    RedBoot> reset

    You will see OpenWRT booting and creating filesystems and such.

    ...
    jffs2_scan_eraseblock(): End of filesystem marker found at 0x0
    jffs2_build_filesystem(): unlocking the mtd device... done.
    jffs2_build_filesystem(): erasing all blocks after the end marker... done.
    mini_fo: using base directory: /
    mini_fo: using storage directory: /overlay
    BusyBox v1.15.3 (2011-11-24 02:38:24 CET) built-in shell (ash)
    Enter 'help' for a list of built-in commands.
      _______                     ________        __
     |       |.-----.-----.-----.|  |  |  |.----.|  |_
     |   -   ||  _  |  -__|     ||  |  |  ||   _||   _|
     |_______||   __|_____|__|__||________||__|  |____|
              |__| W I R E L E S S   F R E E D O M
     Backfire (10.03.1, r29592) ------------------------
      * 1/3 shot Kahlua    In a shot glass, layer Kahlua 
      * 1/3 shot Bailey's  on the bottom, then Bailey's, 
      * 1/3 shot Vodka     then Vodka.
     ---------------------------------------------------
    root@OpenWrt:/#

    Now we need to set a heartbeat for the hardware watchdog otherwise the om1p reboots every 5 minutes.

    vi /etc/config/om1pwatchdog

    #!/bin/sh
    gpioctl dirout 3 ; gpioctl clear 3
    sleep 1
    gpioctl set 3

    Make it executable:
    chmod 755 /etc/config/om1pwatchdog

    Run every 2 minutes:
    crontab -e
    add the following and save
    */2 * * * * /etc/config/om1pwatchdog

    Start NM again, you will now get an ip from the om1p openwrt dhcp server.
    /etc/init.d/network-manager start

    connect with firefox at http://192.168.1.1

    yay, no more crap open-mesh!

  • OpenWRT, Access Point only config. LAN and PUBLIC wireless on an existing subnet

    In this scenario we will be implementing a openWRT as a wireless access point only. One wireless essid will be LAN accessible and the other will be segregated from the LAN but able to access the WAN. The openWRT in this example will not be the gateway to the network. Another device is the gateway and there is an existing dhcp server.

                                PUBLIC wifi
                             172.16.134.0/24
                                      |
                         public gateway and dhcp server
                                172.16.134.1
                                      \
                       Source NAT to 10.101.101.10
                                                  \
    ISP <-Gateway-> LAN wired 10.101.101.0/24 <-openWRT-> 
                                                  /
                               LAN wifi (wpa2+aes)
                               10.101.101.0/24


    1. Add a new wireless access point

    wifinogw.1.add-wireless-essid

    2. Settings for the new wireless access point. Create a new network interface of “public”. Don’t use any encryption, as this is for general public use.

    wifinogw.2.wifi-settings

    3. Edit network interface for the public network

    wifinogw.3.public-interface-edit

    4. Edit PUBLIC interface settings. Set to static address and enable DHCP server for this new network.

    wifinogw.4.pub-int-settings

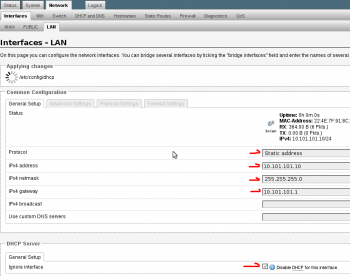
    5. Edit the LAN interface. Set the lan interface to an un-used ip of the existing network. Don’t set to “dhcp client” as you will lose connectivity and need to perform a recovery on your openwrt device. Be sure to disabled the DHCP server as the existing network already has one.

    wifinogw.5.lan-settings

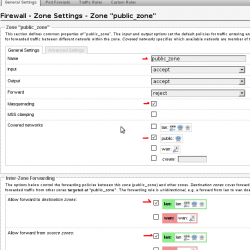
    6. Add a new zone and call it “public_zone”. Masquarade it and put it in the public network. Allow forwarding to and from “lan” zone. We will limit this later with specific firewall rules.

    fw_public_zone

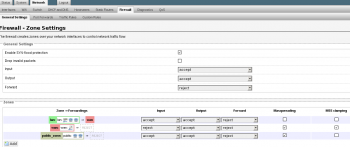
    7. This is what the general firewall zones should look like

    wifinogw.7.fw-general-overview

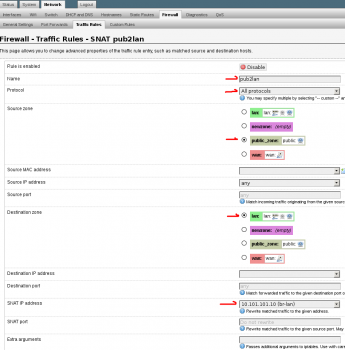
    8. Under the Firewall -> Traffic Rules section add a new Source NAT Rule. Call it “pub2lan“. Set the “Source zone” to “public_zone” and the “Destination zone” to “lan” and set the drop down option “To source IP” to br-lan interface, in this example its 10.101.101.10. Leave “To source port” blank. This SNAT rule will translate all traffic on the public wireless network of 172.16.134.0/24 into the IP of 10.101.101.10. This is the redirect rule from /etc/config/firewall
    wifinogw.8.fw-tr-snat

    config redirect
    option target 'SNAT'
    option src 'public_zone'
    option dest 'lan'
    option proto 'all'
    option name 'pub2lan'
    option src_dip '10.101.101.10'
    option enabled '1'

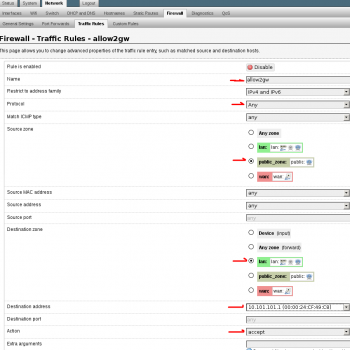
    9. Setup a “New forward rule:” Set name to allow2gw or similar. Source zone to “public_zone” Destination zone to “lan” Click “Add and edit…” Protocols should be “Any”, Destination address is the gateway of the network. In this case 10.101.101.1. The following is the /etc/config/firewall rule for reference. This will allow traffic from the public_zone to reach the gateway of the network.

    wifinogw.9.fw-tr-forward-allow2gw

    config rule
    option target 'ACCEPT'
    option proto 'all'
    option name 'allow2gw'
    option src 'public_zone'
    option dest 'lan'
    option dest_ip '10.101.101.1'

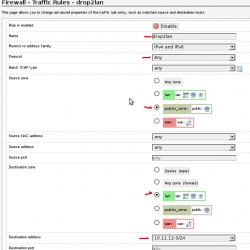
    10. Setup a “New forward rule”. Set the name to drop2lan or similar. Set the Source zone to “public_zone” and Destination zone to “lan”. Click “Add and edit…” Set Protocol to “Any”, Destination address to custom and enter the subnet of the LAN. In this case its 10.101.101.0/24, set “Action” to “drop”. You can add more rules like this one to limit access to other networks or hosts as needed.

    drop2lan

    config rule
    option name 'drop2lan'
    option src 'public_zone'
    option proto 'all'
    option target 'DROP'
    option dest 'lan'
    option dest_ip '10.101.101.0/24'


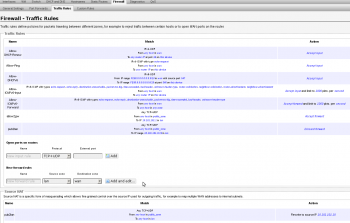
    11. Firewall Traffic Rule overview. There is an error on this view. The following rules have “option proto ‘all’” set and the luci web interface shows “Any TCP+UDP”. This is simply a bug in the luci interface and can be ignored. The order of these rules is very important. In this case you can see we added the “Allow to 10.101.101.1” before the “Drop to 10.101.101.0/24”. If reversed, the lan including the gateway would not be accessible from the public wireless AP. Therefore, you would not be able to reach the Internet.

    wifinogw.11.fw-tr-overview

  • OpenWRT setting up a public wireless access that is firewalled from the LAN

    In this post I will outline how to use zones to create public firewalled networks. A device that can bring up multiple interfaces per radio is very attractive here. One essid for private wireless and another for open public wireless. The Atheros ath9k chipsets are very well supported in this regard because they are free software.
    This post is different than my older post where we have a private LAN behind our WAN interface that we need to protect… In this scenario we have our ISP connected directly to the openWRT WAN port and we need to bring up a public wireless that is segregated from the LAN. Like so:

                                             "public wifi"
                                                     /
    ISP <-openWRT fw-> LAN 192.168.1.0/24 <-public_zone-> PUBLIC 172.16.134.0/24
                            \ 
                     "private LAN wifi"

    Obviously the zone can be utilized however you like. Another common option would be to firewall a open wireless network from the LAN. And forgo the insecure nature of a “secured” wireless altogether. The OpenWRT could be running openvpn, that you connect to over the “insecure” wireless, now thats secure!

    The following steps are done via the web interface (luci).

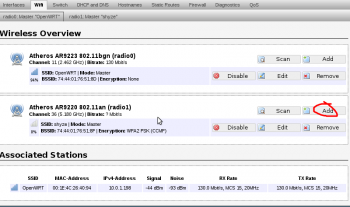
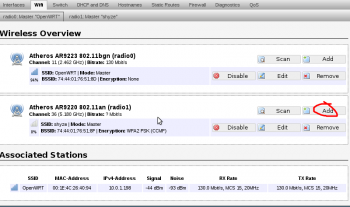
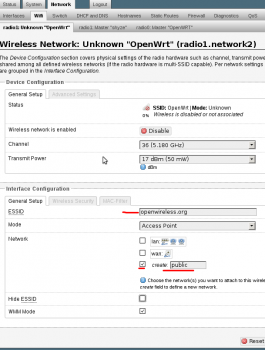
    1. Start by adding a new wireless interface. In this case to the 5ghz radio. You can do this again for the 2.4ghz radio. wireless 1. add

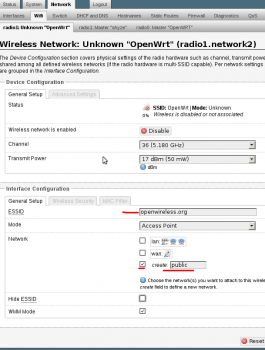
    2. Set the essid and network name “public”. This will allow us to use firewall zones to segregate the networks, rather than excluding individual rfc1918 subnets like in the first example.wireless 2. new wifi settings


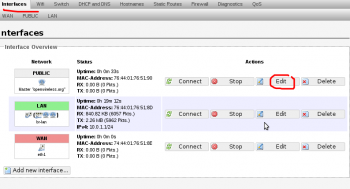
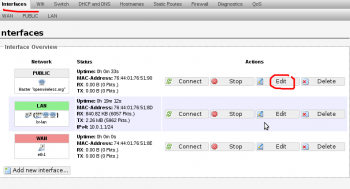
    3. Edit the interface “PUBLIC” so that we can set it as a static ip.wireless 3. edit interface

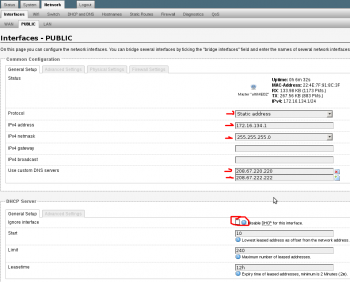
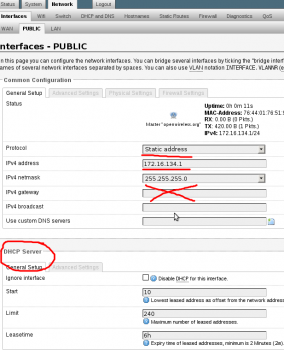
    4. Change the protocol to “static address” set a ip for it and a subnet. DO NOT set a gateway. This will write a new default gateway to the routing table and cause the internet to break occasionally. Setup a dhcp server for this network.wireless 4. public interface

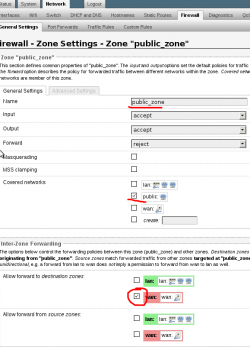
    5. In the firewall section. Setup a zone called something like “public_zone” and assign it to the “public” network. And allow it to forward to “WAN” zone.wireless 5. firewall zone

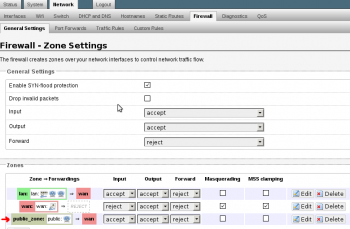
    6. This is what the general firewall zone’s should look like now.wireless 6. general firewall zone

    Be sure to test it. Connect to the public and try and nmap a known host on the private and vice versa. A few times I have needed to reboot the router for everything to start working properly. It could be because I tinkered too much and caused a hickup. Just something to keep in mind..


  • Spoof MAC address in Windows or gnu/linux

    start -> run -> regedit
    make a backup, if you want.
    goto:

    HKEY_LOCAL_MACHINE\SYSTEM\CurrentControlSet\Control\Class\{4D36E972-E325-11CE-BFC1-08002bE10318}
    

    look through the list of subkeys (0000, 0001, etc)
    DriverDesc keyword will tell you which network adapter. For example, “NVIDIA nForce Networking Controller”
    when you find it, right click and add -> new -> string value

    new keyword:

    Value Name: = NetworkAddress
    Value Data: = your new MAC, with no space or : For example, 0019DB71C830
    

    then type:

    ipconfig /release
    ipconfig /renew
    ipconfig /all   (to verify the new mac took)
    

    Now your a l33t Winblows H4|<3r! If you want to go back to your hardware MAC, remove the NetworkAddress key and restart the interface. FYI, in gnu/linux follow these simple steps to change your MAC address

    ifconfig eth0 hw ether 00:19:DB:71:C8:30

    if you get this error

    SIOCSIFHWADDR: Device or resource busy - you may need to down the interface

    do this

    ifconfig eth0 down

    and try to change the MAC again.

  • Free Wireless in Santa Fe, NM

    Here is a list of free wireless spots in Santa Fe. I’m sure I will miss some or make errors, please let me know. I don’t list locations that use a password, as it irritates me when people inconvenience patrons for some ignorant reason.

    * Santa Fe Baking Company (one of the first and best wireless spots in town, lots of seating and ample power, food and kitchen smell can be harsh)
    * Pyramid Cafe (VERY fast internet, Amazing Mediterranean food)
    * Second Street Brewery (very solid reliable connection, inside or out. great beer too!)
    * Counter Culture Cafe (the qwest connection goes down a lot, the ap is too far from the seating area, but great place to hang, eat and work)
    * Teahouse (The best selection of teas and generally good internet, very relaxing place. great food too)
    * Aztec Cafe (small but friendly environment, good coffee and sandwiches)
    * Blue Corn (the bar downtown has it, ask the bar tender for password (indiapaleale). The southside is open AP and I think the essid is jaguar)
    * Flying Star Cafe (the wireless is always slow, food is overpriced and not very good. They use sputnik as a captive portal, its annoying to ask users to sign up for internet. I login with user: free pass: wireless There is a lot of space and the air is fresh)
    * Santa Fe Brewing Company (its awesome they provide internet so far out of town)
    * Backroad Pizza (south side location has it, not sure about the 2nd street location)
    * Joe’s Good food, friendly staff, good internet
    * Body (great healthy food, limited seating in front cafe area, back dining area reserved for no computers and no cell phones :-)

  • OpenWRT, firewall to block public wireless users from private lan behind wan

    The updated and more flexible way to do this is outlined here. It also requires updated hardware. The wrt54gl only supports openwrt v10 (backfire). I would like to add that despite the wrt54gl literally being ancient, its still a rock solid device today. Of course, only if openwrt is installed!

    A while ago Second Street Brewery asked for a good stable public wireless internet connection. Of course, the solution was obvious, openwrt! In this case a linksys wrt54gl. The office, point of sale and public networks all share the same gateway. The problem was segregating the public wireless network from the private office lan. Sam (http://thepromisedlan.org) and I set out to setup a firewall to protect them. This is what we came up with:

             "secured office wifi"
                    /
    ISP <-fw-> office LAN 10.1.10.0/24 <-fw-> (linksys) "open public wifi" 
    (clients on public wifi cannot reach 10.1.10.0/24 or any other private subnet)

    check if the following is in /etc/config/firewall otherwise, add it

    config include
    option path /etc/firewall.user

    and in /etc/firewall.user we put:

    #Insert this into the chain, so 10.1.10.0/24 (office) can connect to public 192.168.10.0/24.
    #This rule gets repeated by the setup script /etc/init.d/firewall.
    iptables -I FORWARD 1 -m state --state RELATED,ESTABLISHED -j ACCEPT
    
    #block all traffic to any possible private network address (10.*.*.*, 172.16-32.*.*, 192.168.*.*)
    iptables -I FORWARD 2 -d 192.168.0.0/16 -j DROP
    iptables -I FORWARD 2 -d 172.16.0.0/12 -j DROP
    iptables -I FORWARD 2 -d 10.0.0.0/8 -j DROP

    If you would like to have remote administration on the openwrt so you can access the luci web interface and ssh from the wan side of the router, you can change /etc/config/firewall wan zone to allow it. !!WARNING!! If you are directly connected to the internet, this will expose your open ports to the world. You should take precautions to secure them before changing this firewall rule.

    config 'zone'
      option 'name' 'wan'
      option 'input' 'REJECT' #

    or if you just want to allow remote ssh access

    config rule
      option target 'ACCEPT'
      option src 'wan'
      option proto 'tcp'
      option dest_port '22'
      option name 'ssh'